All courses
Agentic AI
Agentic AI

IIIT Bangalore
Executive Programme in Generative AI for LeadersArtificial Intelligence
Degree / Exec. PG

IIIT Bangalore
Executive Diploma in Machine Learning and AI
OPJ Global University
Master’s Degree in Artificial Intelligence and Data Science
Liverpool John Moores University
Master of Science in Machine Learning & AI
Golden Gate University
DBA in Emerging Technologies with Concentration in Generative AIExecutive Certificate

IIITB & IIM, Udaipur
Chief Technology Officer & AI Leadership ProgrammeIIIT Bangalore
Executive Programme in Generative AI for Leaders
upGrad | Microsoft
Gen AI Foundations Certificate Program from MicrosoftupGrad | Microsoft
Gen AI Mastery Certificate for Data AnalysisupGrad | Microsoft
Gen AI Mastery Certificate for Software DevelopmentupGrad | Microsoft
Gen AI Mastery Certificate for Managerial ExcellenceOffline Bootcamps

upGrad
Data Science and AI-MLDoctorate
For All Domains
IIITB & IIM, Udaipur
Chief Technology Officer & AI Leadership Programme
Swiss School of Business and Management
Global Doctor of Business Administration from SSBM
Edgewood University
Doctorate in Business Administration by Edgewood UniversityGolden Gate University
Doctor of Business Administration From Golden Gate University
Rushford Business School
Doctor of Business Administration from Rushford Business School, SwitzerlandGolden Gate University
Master + Doctor of Business Administration (MBA+DBA)-d9bdeff6165f4eb1ba2adcebde78e961.svg)
University of Waterloo
Chief Technology and AI Officer ProgramLeadership / AI
Golden Gate University
DBA in Emerging Technologies with Concentration in Generative AIMachine Learning
Machine Learning
Data Science
Degree / Exec. PG
O.P Jindal Global University
Master’s Degree in Artificial Intelligence and Data ScienceIIIT Bangalore
Executive Diploma in Data Science & AILiverpool John Moores University
Master of Science in Data ScienceExecutive Certificate
upGrad | Microsoft
Gen AI Foundations Certificate Program from MicrosoftupGrad | Microsoft
Gen AI Mastery Certificate for Data AnalysisupGrad | Microsoft
Gen AI Mastery Certificate for Software DevelopmentupGrad | Microsoft
Gen AI Mastery Certificate for Managerial ExcellenceupGrad | Microsoft
Gen AI Mastery Certificate for Content CreationOffline Bootcamps
upGrad
Data Science and AI-MLupGrad
Data AnalyticsMBA
Masters

Paris School of Business
Master of Science in Business Management and TechnologyO.P.Jindal Global University
MBA (with Career Acceleration Program by upGrad)Edgewood University
MBA from Edgewood UniversityO.P.Jindal Global University
MBA from O.P.Jindal Global UniversityGolden Gate University
Master + Doctor of Business Administration (MBA+DBA)Executive Certificate

IMT, Ghaziabad
Advanced General Management ProgramMarketing
Executive Certificate
Offline Bootcamps
upGrad
Digital MarketingManagement
Degree
O.P Jindal Global University
MSc in International Accounting & Finance (ACCA integrated)Paris School of Business
Master of Science in Business Management and Technology
Golden Gate University
Master of Arts in Industrial-Organizational PsychologyExecutive Certificate

IIIT-B & IIM, Udaipur
Chief Technology Officer & AI Leadership Programme
IIM Kozhikode
Human Resource Analytics Course from IIM-KupGrad | Microsoft
Gen AI Foundations Certificate Program from MicrosoftEducation
Education

Northeastern University
Master of Education (M.Ed.) from Northeastern UniversityEdgewood University
Doctor of Education (Ed.D.)Edgewood University
Master of Education (M.Ed.) from Edgewood UniversityCertifications
Project Management
Certification

Knowledgehut
Leadership And Communications In ProjectsKnowledgehut
Microsoft Project 2007/2010-ae8d039bbd2a41318308f8d26b52ac8f.svg)
Knowledgehut
Financial Management For Project ManagersKnowledgehut
Fundamentals of Earned Value Management (EVM)Knowledgehut
Fundamentals of Portfolio ManagementKnowledgehut
Fundamentals of Program Management-35c169da468a4cc481c6a8505a74826d.webp&w=128&q=75)
Knowledgehut
CAPM® CertificationsKnowledgehut
Microsoft® Project 2016Certifications & Trainings
-7f4b4f34e09d42bfa73b58f4a230cffa.webp&w=128&q=75)
Knowledgehut
PMP® CertificationKnowledgehut
PMI-RMP® CertificationKnowledgehut
PMP Renewal Learning PathKnowledgehut
Oracle Primavera P6 V18.8Knowledgehut
Microsoft® Project 2013Knowledgehut
PfMP® Certification CourseKnowledgehut
Project Planning and MonitoringPrince2 Certifications

Knowledgehut
PRINCE2® FoundationKnowledgehut
PRINCE2® PractitionerKnowledgehut
PRINCE2 Agile Foundation and PractitionerKnowledgehut
PRINCE2 Agile® Foundation CertificationKnowledgehut
PRINCE2 Agile® Practitioner CertificationManagement Certifications
Knowledgehut
Project Management Masters Certification ProgramKnowledgehut
Change ManagementKnowledgehut
Project Management TechniquesKnowledgehut
Product Management Certification ProgramKnowledgehut
Project Risk Management- Study abroad
- Offline centres
- uGSOT - B.Tech
More


27. Columns in Excel
33. Count In Excel
49. Slicers in Excel
54. Solver in Excel
56. Macros In Excel
Data Validation in Excel
Data validation in Excel is a readily available method that helps ensure data integrity when creating a financial model. The uses of data validation in Excel help secure your model’s inputs and outputs.
In this tutorial, I’ll take you through the definition of data validation in Excel, its uses, how to apply it, and the various challenges of using data validation in Excel.
When To Use Data Validation
As a small business owner, data validation in Excel is an amazing feature that has helped me maintain data quality as it checks for complete, consistent data in my business.
Let us take a better look at when you can use data validation in Excel to your advantage as a beginner.
1. Restricting data entry on specific cells:
If you’re a small business owner like me, you’re very likely to use data validation in Excel, and it is important to remember that even the smallest of errors in data can lead to the biggest of issues.
For example, assume you're working with a team, and a team member enters wrong information on an important spreadsheet, and it ends up ruining your data collection. This is where restricting data entry on specific cells comes in handy!
You can control access to the spreadsheet, only allowing qualified individuals to input data. This helps in reducing the possibility of confused team members inputting irrelevant information.
2. Warning users of out-of-range data:
You can use data validation in Excel to produce a warning that appears if a team member enters data that is outside of the allowed range. This warning tells the team member that their input does not comply with your set requirements, but it does not prevent them from inputting incorrect information.
This feature allows you to enter various data in cells if necessary, but it also alerts users to the fact that certain information belongs to particular cells.
If you want to be more efficient, you should learn more about Excel to improve your skills.
3. Guiding users toward consistent data formatting:
You can use data validation in Excel to ensure you and your team members can only enter data under your intended format. Uniform formatting polishes your spreadsheet and makes the data easier to read.
Suppose you have an Excel sheet that needs to be filled up by your staff with the birthdays of your team members. You can add data validation in Excel presets as you see fit, for example, you can set the format as month, day, and year (01/16/2024) or day, month, and year (16/01/2024), whichever you prefer.
4. Restricting entries to a drop-down selection:
You can prevent your team members’ errors by using the data validation in Excel drop down list to set a drop-down list of suitable inputs for the spreadsheet. This way, you can set specific rules when you’re collecting data and want to set the inputs to a few choices.
How To Apply Data Validation in Excel
Now that you have a grasp on when to use data validation in Excel, you should know that data validation in Excel will help you if you’re particularly interested in Data Analysis. With that said, let’s see how you can apply it.
1. Choose the cell or cells for which you want to create a rule
To start, choose the cells where you want to apply the rule by clicking within a cell, selecting a row or column by clicking the numbers or letters on the side or top of the worksheet, or select all cells using the Select All button in the upper-left corner of your Excel sheet.
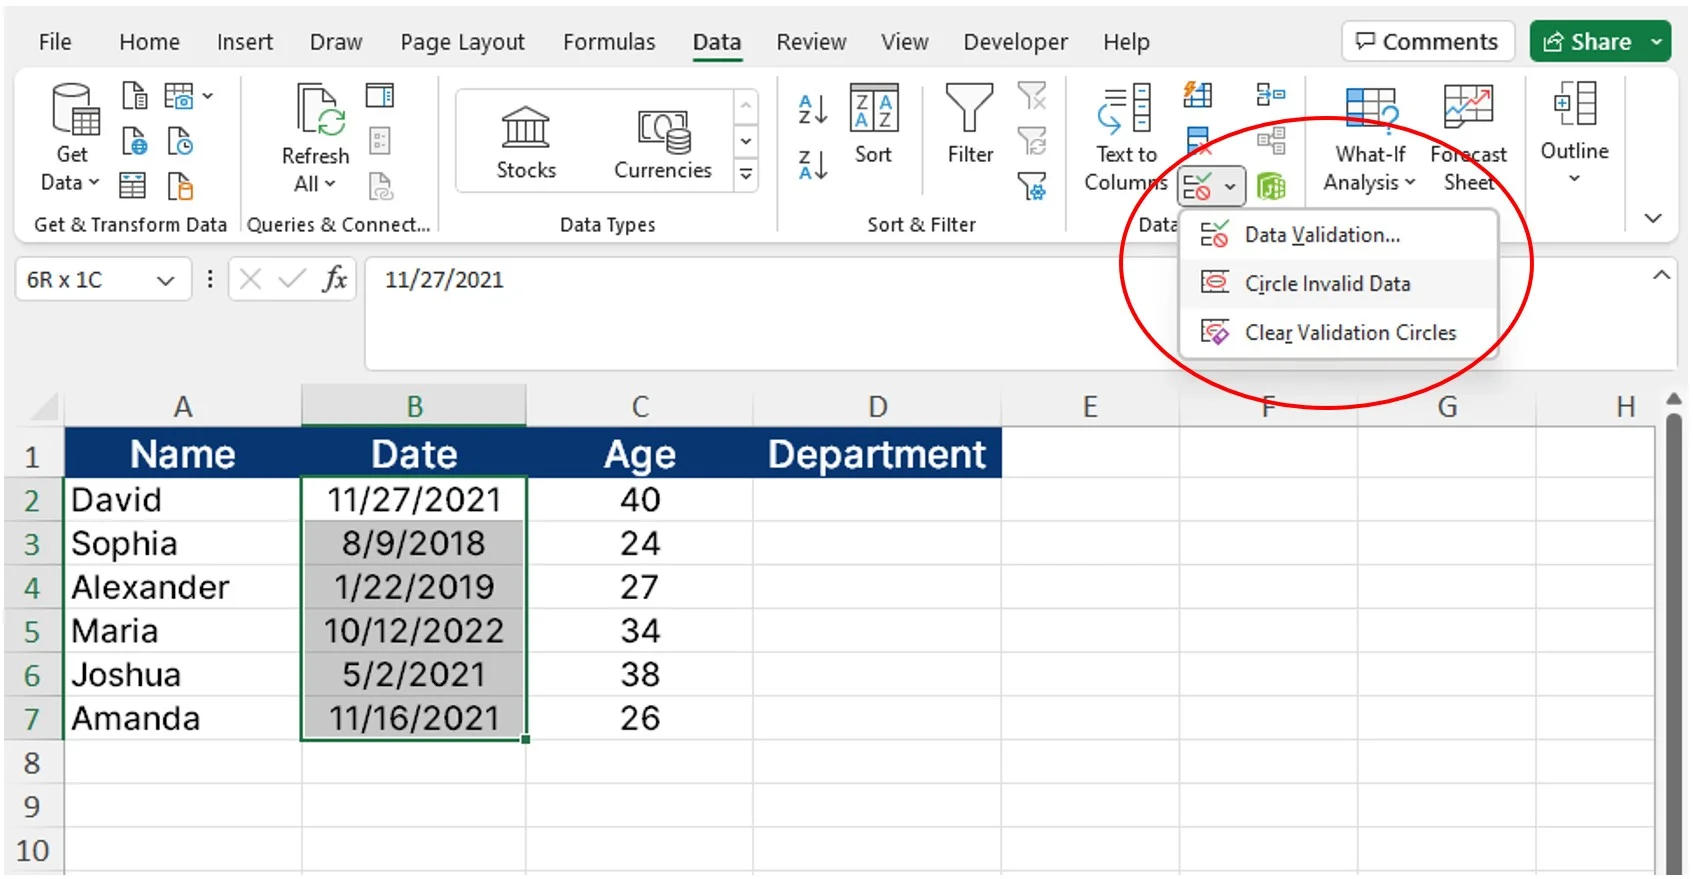
2. Click "data validation" after selecting the data tab.
Select the Data tab first, then click the Data Validation button. The Data Validation dialog box will open when you choose Data Validation from the drop-down menu.
3. Choose an option under allow on the settings tab.
Select the tab for Settings. Click the data validation drop-down list in the text field under Validation Criteria. You will be presented with a selection of validation choices. Select the most effective option for your spreadsheet.
Here’s a list of the options and what they mean:
- Any value: You can enter any text into a cell if the option "any value" is chosen. In technical terms, any value indicates the absence of data validation.
- Whole number: In certain cells, you can only input entire numbers. There can be no decimals. You can further limit other user input after choosing the "whole number” option. For example, you might want other users to choose a whole number greater than 18.
- Decimal: You can enter decimals and whole numbers into a cell by selecting "Decimal." "Decimals" gives you the same range of allowable numbers as whole numbers.
- List: The list function helps you create a preset data validation in Excel where you can set specific acceptable responses for other users to choose from. You can also use the setting tabs or manually save your list to work with your spreadsheet.
For example, say I had to hire some new staff, I chose options like “How did you come across us?” on my spreadsheet and set the responses to a few social media or job sites for candidates to select from.
- Date: When you choose the date function, you limit other users to choose from a specific range into a cell. For example, since I was managing a project schedule and needed team members to submit project milestones within a certain date, I set an option with an acceptable range of January 1, 2024, to March 31, 2024.
- Time: You can only enter time into a time cell. For example, I wanted to conduct a survey to determine the optimal work hours for my team, so I set up a data validation in Excel drop down list and set the time slot between 9 AM and 5 PM and let my team members choose according to their preferences.
- Text length: You can use the text data validation in Excel to limit the number of characters or digits an input can have. This is especially helpful when you need users to enter codes containing a certain amount of numbers or characters. For example, I have an Indian clientele, so I limit the PIN code option to six numbers.
- Custom: The custom function allows you to create your algorithm for data validation. The custom formula for data validation in Excel helps you to create a wide variety of rules. For example, you can create a formula that only accepts email addresses entered in lowercase letters.
4. Select a condition under the data tab
Once you've decided how to sort your data, you'll need to specify the criteria for your input. This sets what range of inputs you will accept. Click the drop-down menu under Data to get a list of parameters and select the best option.
For example, the "Lists" criteria don't involve specifying a range of values because users choose from predefined responses.
5. Using the allow and data values that you selected, set the other necessary conditions.
Next, you can enter any further data that Excel requires to finish your rule. Depending on your criteria, the kind of data you enter may vary. if you pick "Text length" as your criteria and "Equal to" as your condition, you'll need to provide the exact length that the text should be for it to be considered valid
6. Use the input message tab and set a customized message users will see when entering data.
When a user clicks on a cell with a data validation rule, an input message appears to help them enter an appropriate value. You can go to the Input Message tab in the dialog box to add a custom input message. Enter the desired input message and a title for it.
7. Choose “Show input message when cell is selected”
You have to tick the box next to "Show input message when cell selected" for your message to appear. This option is pre-chosen in some cases.
8. Choose a Style and personalize the error message by selecting the Error Alert tab.
If a user enters data into your spreadsheet that isn't acceptable, an error message will appear. Enter your custom alert by clicking the Error Alert tab. Error alerts are also optional, much like input messages.
9. Click “OK”
When you’re done setting the presets and error message, click OK to activate it.
Challenges and Solutions to Using Data Validation in Excel
As great as data validation is, it comes with specific challenges that might prevent some users from implementing it. Let’s take a look at these challenges and how you can deal with them:
Let us take a look at the pros and cons of using data validation in Excel:
Challenges | Solutions |
|---|---|
It can take a while to manually validate data format, particularly for large datasets. The time required may be decreased by sampling the data. | You can apply data sampling strategies. to accelerate validation procedures, |
Data dispersed over several databases within the project could make data validation difficult. | You can centralize your data sources for simpler validation by implementing comprehensive data integration alternatives. |
Validating datasets with few columns could seem easy at first, but as the number of columns rises, the work becomes more difficult. | You can use scripts or automation tools to make validation work easier for datasets with lots of columns. |
Wrapping Up
Now that you know what data validation in Excel is, you agree with me when I say data validation is an important feature for ensuring data integrity and accuracy in financial models and business operations. Without data validation, there would be tons of inaccurate data in your business model.
Want to learn more about data validation in Excel or Excel just in general? Why not visit upGrad? Come check us out and learn more about Excel through our online courses and blogs.
Frequently Asked Questions
1. What are the steps of Data Validation?
The three key steps to data validation in Excel include determining your data through a data sample, validating your database, and validating your data format. How to do a drop down in Excel?
2. How to do a drop down in Excel?
To create a drop-down menu in Excel, start by selecting the cells where you want the drop-down to appear. Then, navigate to the "Data" tab on the Ribbon and click on "Data Validation." In the dialog box that appears, choose "List" from the "Allow" dropdown menu. Next, in the "Source" field, enter the options you want to appear in the drop-down list, separated by commas. Finally, click "OK" to apply the drop-down menu to the selected cells. What is the validation rule in MS Excel?
3. What is the validation rule in MS Excel?
Data validation in Excel is a feature used to restrict input on a worksheet. You can check out the various online tutorials to learn more about Excel and data validation. Data validation in Excel is a feature used to restrict input on a worksheet. You can check out the various online tutorials to learn more about Excel and data validation. How do I add to a Data Validation list?
4. How do I add to a Data Validation list?
To add items to a Data Validation list in Excel, select the desired cell or range, go to the "Data" tab, click "Data Validation" in the "Data Tools" group, choose "List" from the "Allow" drop-down menu in the Data Validation dialog box, enter the list of items in the "Source" field, and click "OK". How do I add Data Validation to Excel?
5. How do I add Data Validation to Excel?
I have added a detailed step-by-step process to do so in this tutorial. How do I show a Data Validation list in Excel?
6. How do I show a Data Validation list in Excel?
Navigate to the Ribbon's Data tab and choose Data Validation. Choose “List” from the Allow box on the Settings tab. If it's acceptable for users to leave the cell unchecked, use the Ignore blank option. Verify the In-cell drop-down menu.

Author|15 articles published


upGrad Learner Support
Talk to our experts. We are available 7 days a week, 10 AM to 7 PM
Indian Nationals
Foreign Nationals
Disclaimer
The above statistics depend on various factors and individual results may vary. Past performance is no guarantee of future results.
The student assumes full responsibility for all expenses associated with visas, travel, & related costs. upGrad does not .