All courses
Agentic AI
Agentic AI

IIIT Bangalore
Executive Programme in Generative AI for LeadersArtificial Intelligence
Degree / Exec. PG

IIIT Bangalore
Executive Diploma in Machine Learning and AI
OPJ Global University
Master’s Degree in Artificial Intelligence and Data Science
Liverpool John Moores University
Master of Science in Machine Learning & AI
Golden Gate University
DBA in Emerging Technologies with Concentration in Generative AIExecutive Certificate

IIITB & IIM, Udaipur
Chief Technology Officer & AI Leadership ProgrammeIIIT Bangalore
Executive Programme in Generative AI for Leaders
upGrad | Microsoft
Gen AI Foundations Certificate Program from MicrosoftupGrad | Microsoft
Gen AI Mastery Certificate for Data AnalysisupGrad | Microsoft
Gen AI Mastery Certificate for Software DevelopmentupGrad | Microsoft
Gen AI Mastery Certificate for Managerial ExcellenceOffline Bootcamps

upGrad
Data Science and AI-MLDoctorate
For All Domains
IIITB & IIM, Udaipur
Chief Technology Officer & AI Leadership Programme
Swiss School of Business and Management
Global Doctor of Business Administration from SSBM
Edgewood University
Doctorate in Business Administration by Edgewood UniversityGolden Gate University
Doctor of Business Administration From Golden Gate University
Rushford Business School
Doctor of Business Administration from Rushford Business School, SwitzerlandGolden Gate University
Master + Doctor of Business Administration (MBA+DBA)-d9bdeff6165f4eb1ba2adcebde78e961.svg)
University of Waterloo
Chief Technology and AI Officer ProgramLeadership / AI
Golden Gate University
DBA in Emerging Technologies with Concentration in Generative AIMachine Learning
Machine Learning
Data Science
Degree / Exec. PG
O.P Jindal Global University
Master’s Degree in Artificial Intelligence and Data ScienceIIIT Bangalore
Executive Diploma in Data Science & AILiverpool John Moores University
Master of Science in Data ScienceExecutive Certificate
upGrad | Microsoft
Gen AI Foundations Certificate Program from MicrosoftupGrad | Microsoft
Gen AI Mastery Certificate for Data AnalysisupGrad | Microsoft
Gen AI Mastery Certificate for Software DevelopmentupGrad | Microsoft
Gen AI Mastery Certificate for Managerial ExcellenceupGrad | Microsoft
Gen AI Mastery Certificate for Content CreationOffline Bootcamps
upGrad
Data Science and AI-MLupGrad
Data AnalyticsMBA
Masters

Paris School of Business
Master of Science in Business Management and TechnologyO.P.Jindal Global University
MBA (with Career Acceleration Program by upGrad)Edgewood University
MBA from Edgewood UniversityO.P.Jindal Global University
MBA from O.P.Jindal Global UniversityGolden Gate University
Master + Doctor of Business Administration (MBA+DBA)Executive Certificate

IMT, Ghaziabad
Advanced General Management ProgramMarketing
Executive Certificate
Offline Bootcamps
upGrad
Digital MarketingManagement
Degree
O.P Jindal Global University
MSc in International Accounting & Finance (ACCA integrated)Paris School of Business
Master of Science in Business Management and Technology
Golden Gate University
Master of Arts in Industrial-Organizational PsychologyExecutive Certificate

IIM Kozhikode
Human Resource Analytics Course from IIM-KupGrad | Microsoft
Gen AI Foundations Certificate Program from MicrosoftEducation
Education

Northeastern University
Master of Education (M.Ed.) from Northeastern UniversityEdgewood University
Doctor of Education (Ed.D.)Edgewood University
Master of Education (M.Ed.) from Edgewood UniversityCertifications
Project Management
Certification

Knowledgehut
Leadership And Communications In ProjectsKnowledgehut
Microsoft Project 2007/2010-ae8d039bbd2a41318308f8d26b52ac8f.svg)
Knowledgehut
Financial Management For Project ManagersKnowledgehut
Fundamentals of Earned Value Management (EVM)Knowledgehut
Fundamentals of Portfolio ManagementKnowledgehut
Fundamentals of Program Management-35c169da468a4cc481c6a8505a74826d.webp&w=128&q=75)
Knowledgehut
CAPM® CertificationsKnowledgehut
Microsoft® Project 2016Certifications & Trainings
-7f4b4f34e09d42bfa73b58f4a230cffa.webp&w=128&q=75)
Knowledgehut
PMP® CertificationKnowledgehut
PMI-RMP® CertificationKnowledgehut
PMP Renewal Learning PathKnowledgehut
Oracle Primavera P6 V18.8Knowledgehut
Microsoft® Project 2013Knowledgehut
PfMP® Certification CourseKnowledgehut
Project Planning and MonitoringPrince2 Certifications

Knowledgehut
PRINCE2® FoundationKnowledgehut
PRINCE2® PractitionerKnowledgehut
PRINCE2 Agile Foundation and PractitionerKnowledgehut
PRINCE2 Agile® Foundation CertificationKnowledgehut
PRINCE2 Agile® Practitioner CertificationManagement Certifications
Knowledgehut
Project Management Masters Certification ProgramKnowledgehut
Change ManagementKnowledgehut
Project Management TechniquesKnowledgehut
Product Management Certification ProgramKnowledgehut
Project Risk Management- Study abroad
- Offline centres
- uGSOT - B.Tech
More
%20(1)-d5498f0f972b4c99be680c2ee3b792d7.svg)


27. Columns in Excel
33. Count In Excel
49. Slicers in Excel
54. Solver in Excel
56. Macros In Excel
How To Lock Cells in Excel
MS Excel has dominated the software market ever since it was introduced to the masses. However, even if you have used MS Excel extensively, do you know how to lock cells in Excel?
Let me share a story before diving headfirst into the tutorial.
A few years ago, while collaborating on a crucial project in Excel, I encountered unexpected changes to vital data when sharing the worksheet with my team. It had put the entire project at risk and nearly cost my job. The only thing I could think of was, “How do I lock cells in Excel?” Upon mastering this function, I realized its importance in keeping data safe.
For starters, locking cells lets you view and use the worksheet but stops anyone from accidentally changing important information. If you have searched for “how do you lock a cell in Excel” online, this easy tutorial is your go-to guide. Happy reading!
How to Lock Cells in Excel
When you share your Excel spreadsheet with others, certain cells might contain valuable data or have special formatting and formulas critical to the calculations. To prevent unintended changes that could affect the integrity of your sheet, you'll want to protect these specific cells.
The only way to protect the vital components in the spreadsheet is by locking the cells in the sheet. You can not only lock particular cells, but rows and columns as required and safeguard them from unintentional changes and edits. The question that arises is “how to lock cells in Excel”.
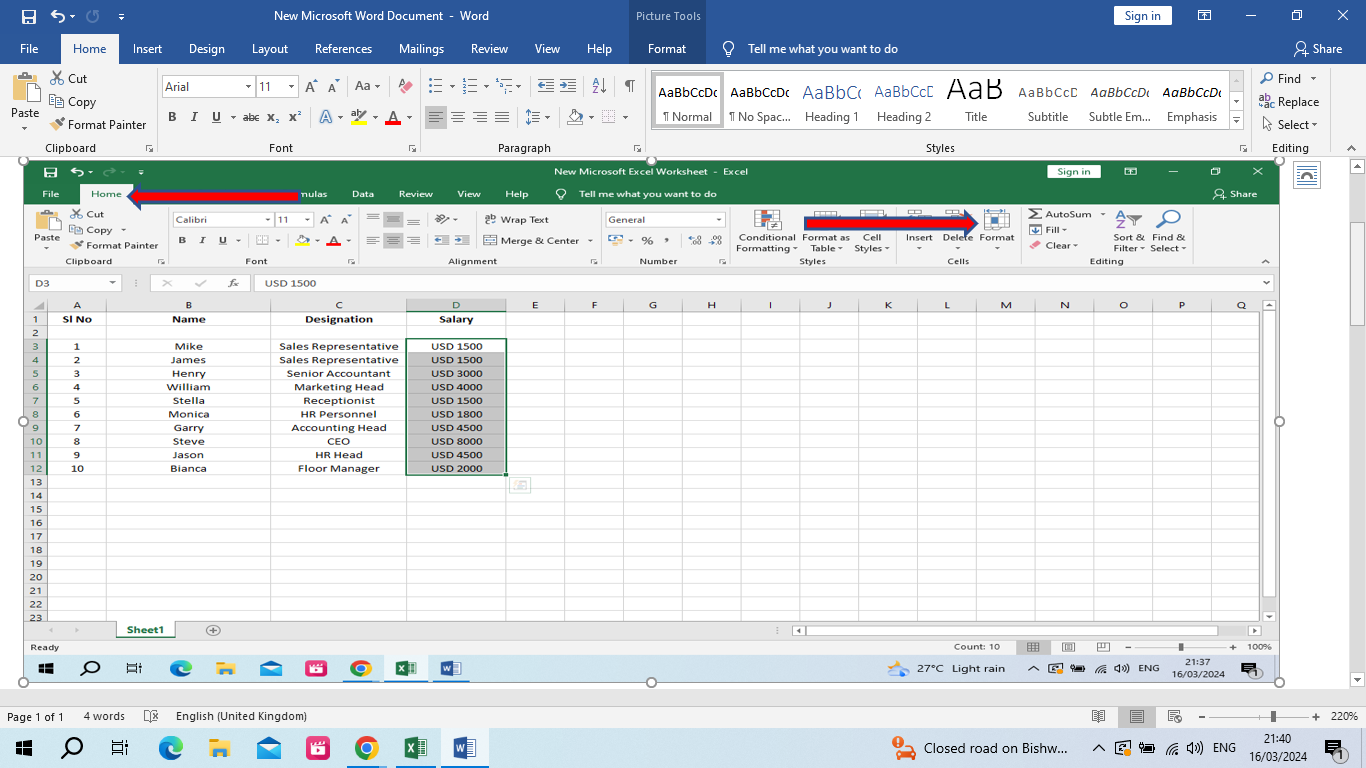
How to Lock All Cells in An Excel Sheet?
If you’re pondering over the same question, “How can I lock cells in Excel,” the first thing you need to know about an Excel worksheet is that all cells are locked by default. But this lock facility becomes effective only after you protect the whole worksheet.
Let’s take a look at these simple steps to learn how to lock cells in Excel.
Step 1: Press Ctrl-A to select all the cells in the worksheet
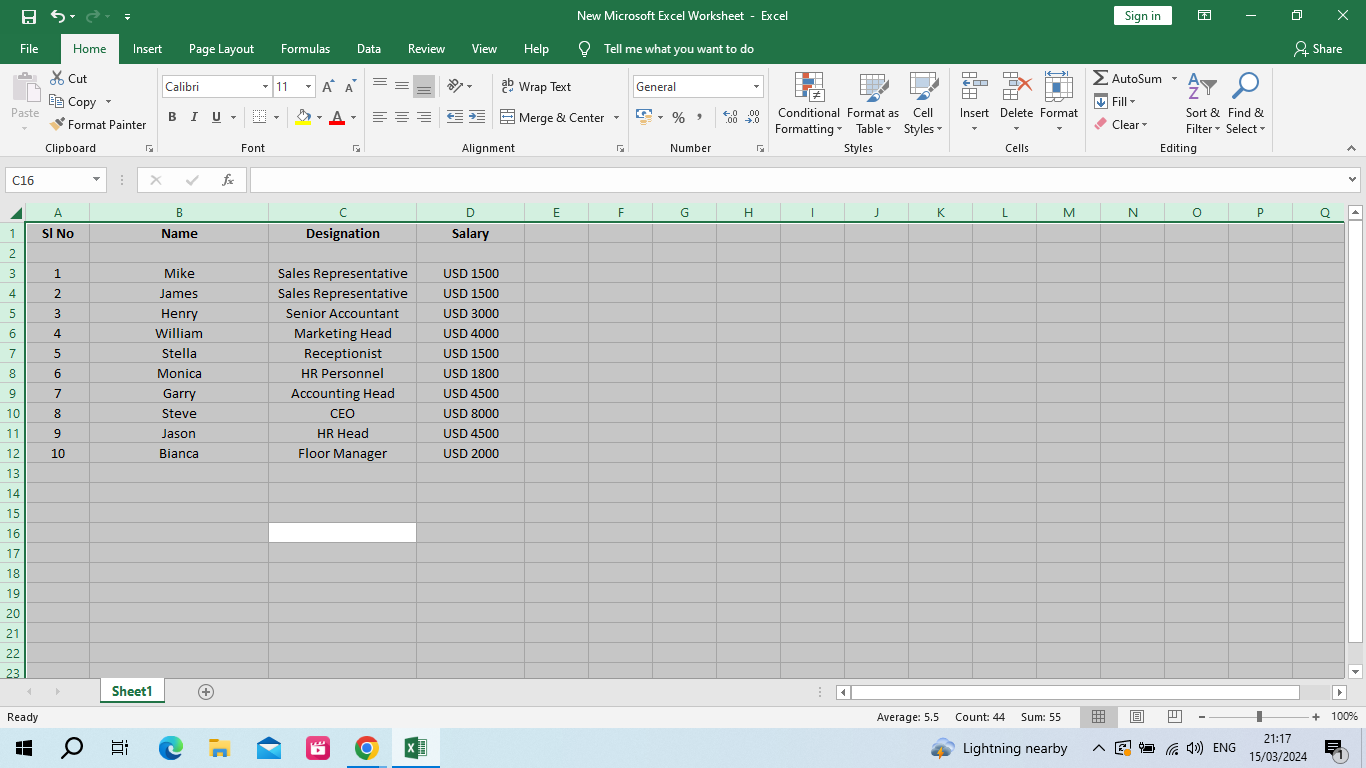
- Step 2: Right-click on the worksheet and select ‘Format Cells’.
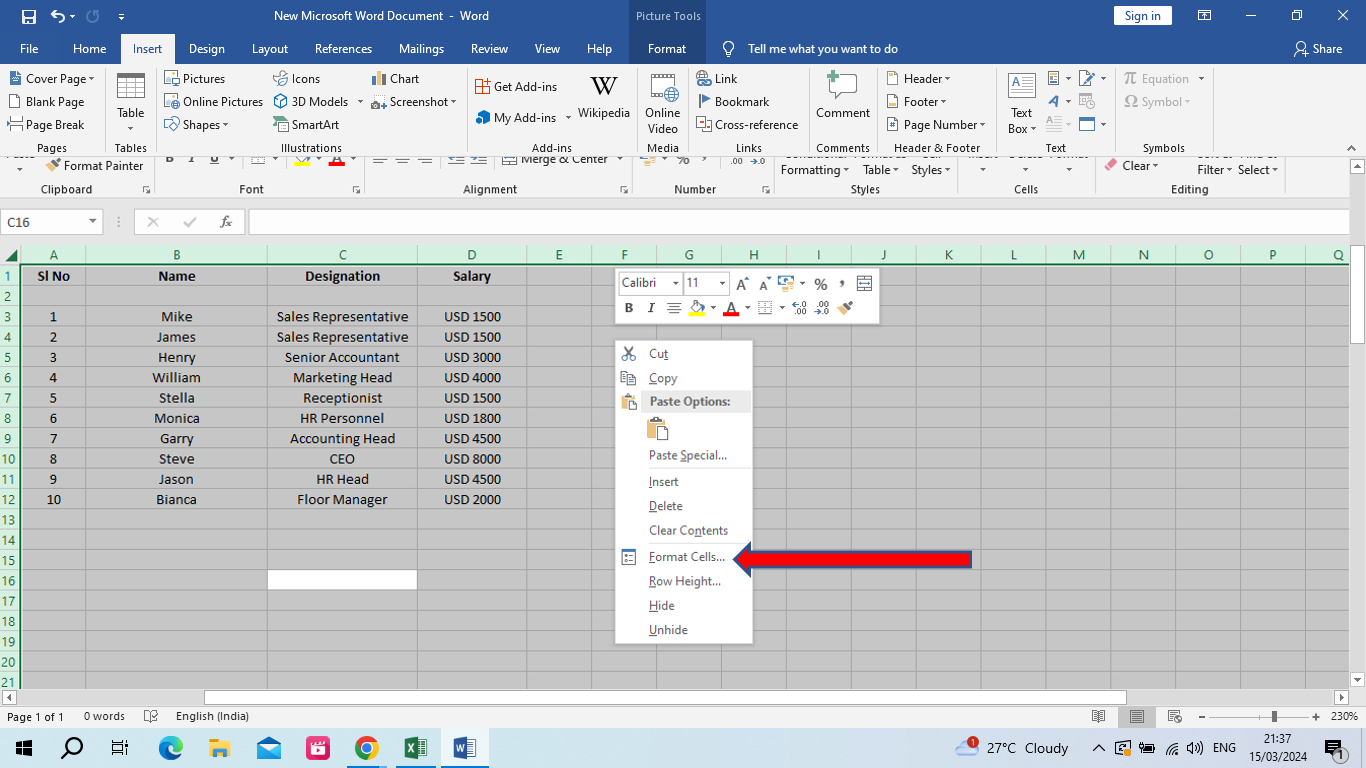
- Step 3: A new window opens up. Click on the ‘Protection’ tab at the extreme right.
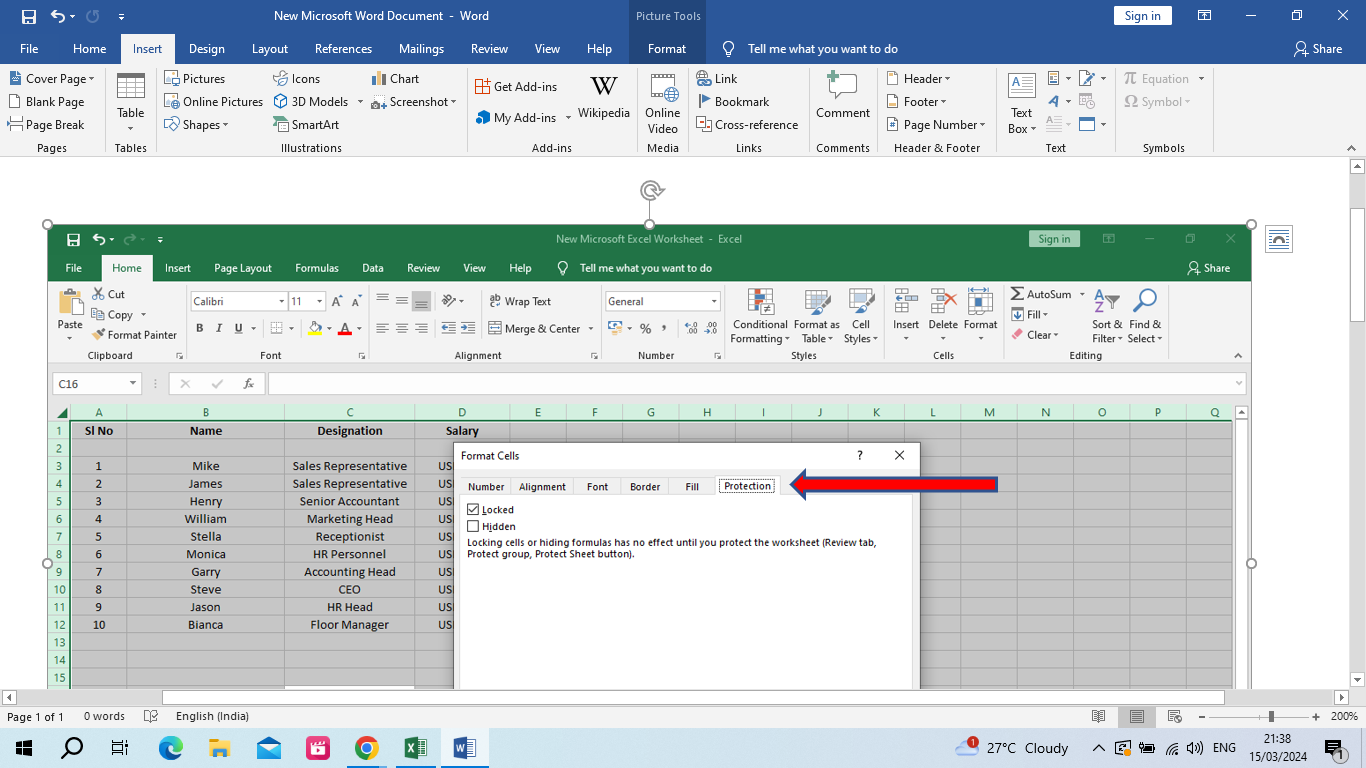
- Step 4: The ‘Locked’ option is checked by default. Click ‘OK’.

How to Lock a Worksheet in Excel
As mentioned previously, locking the cells in an Excel sheet becomes effective only when the whole worksheet is locked. Here is a step-by-step guide as to how to lock a sheet in Excel.
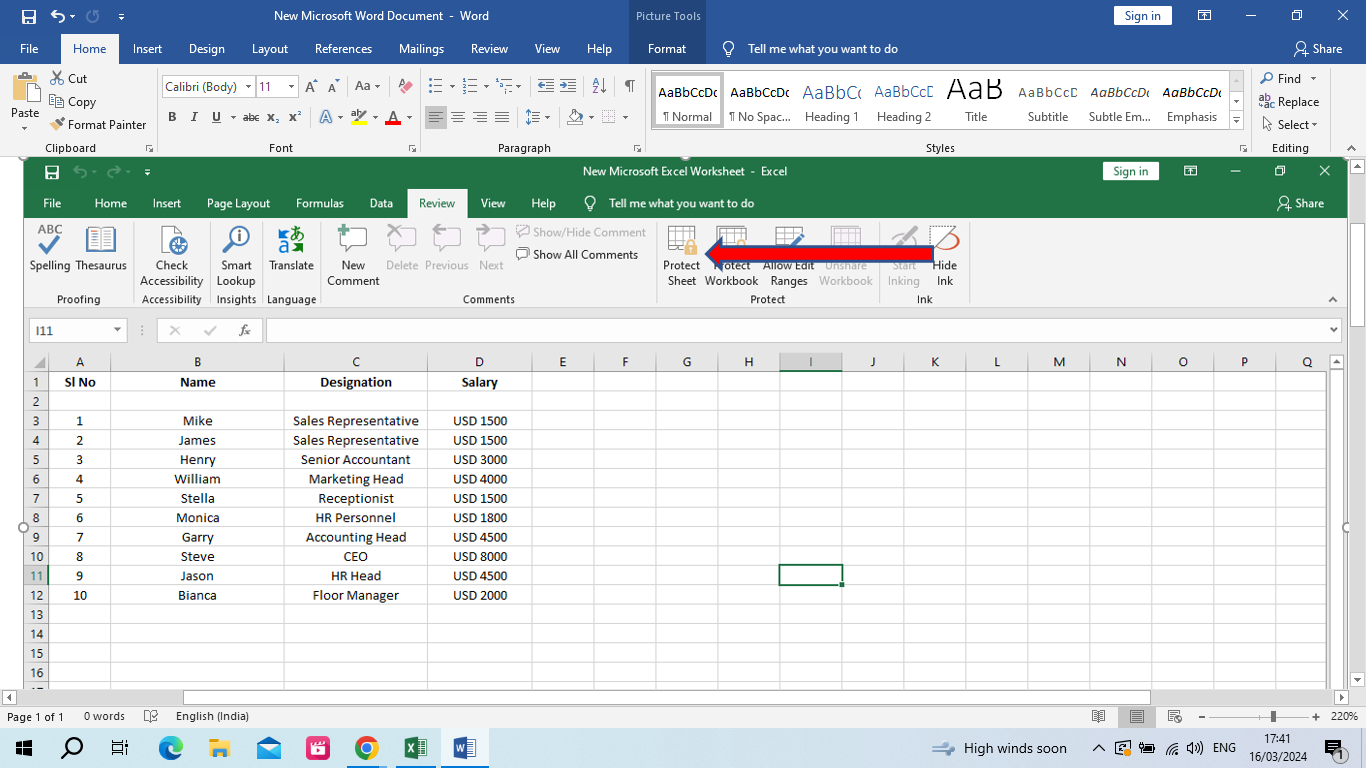
Step 1: In the Excel sheet, click on the ‘Review’ tab.
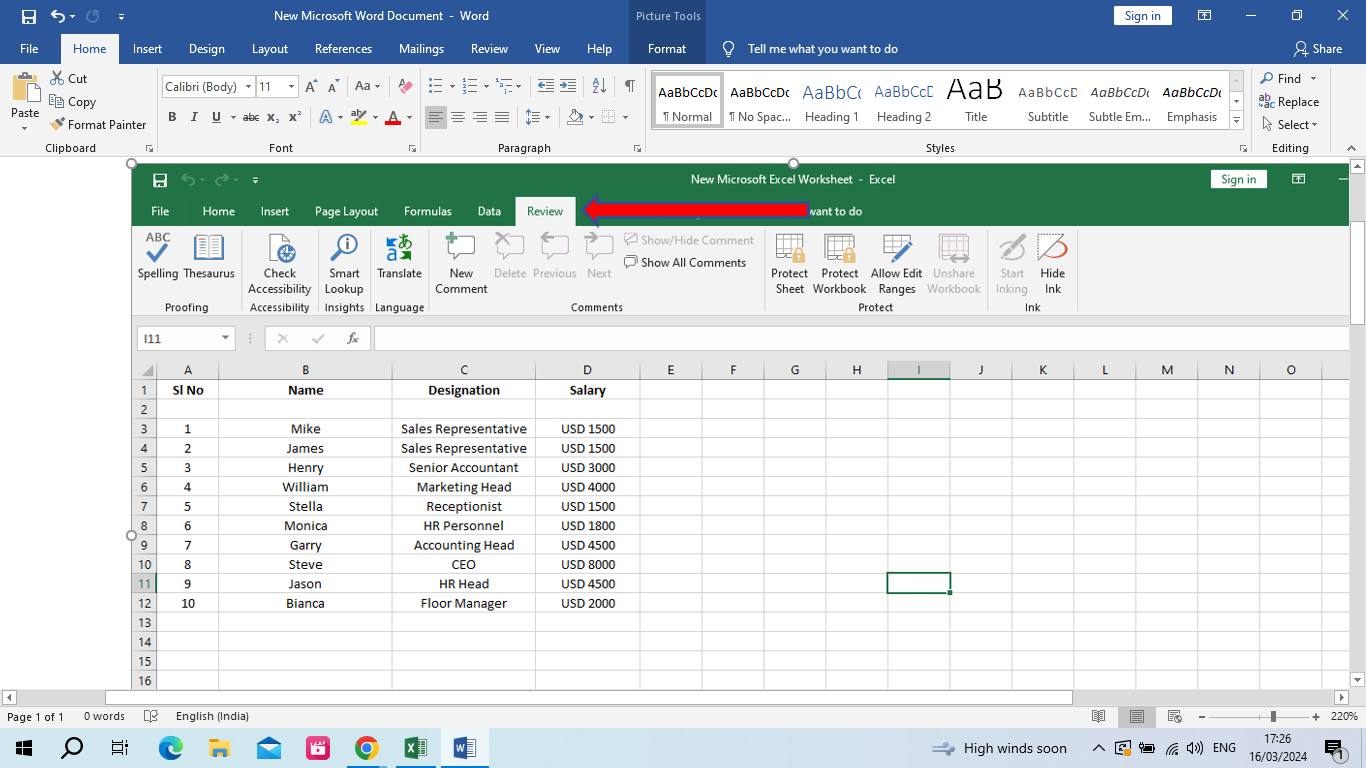
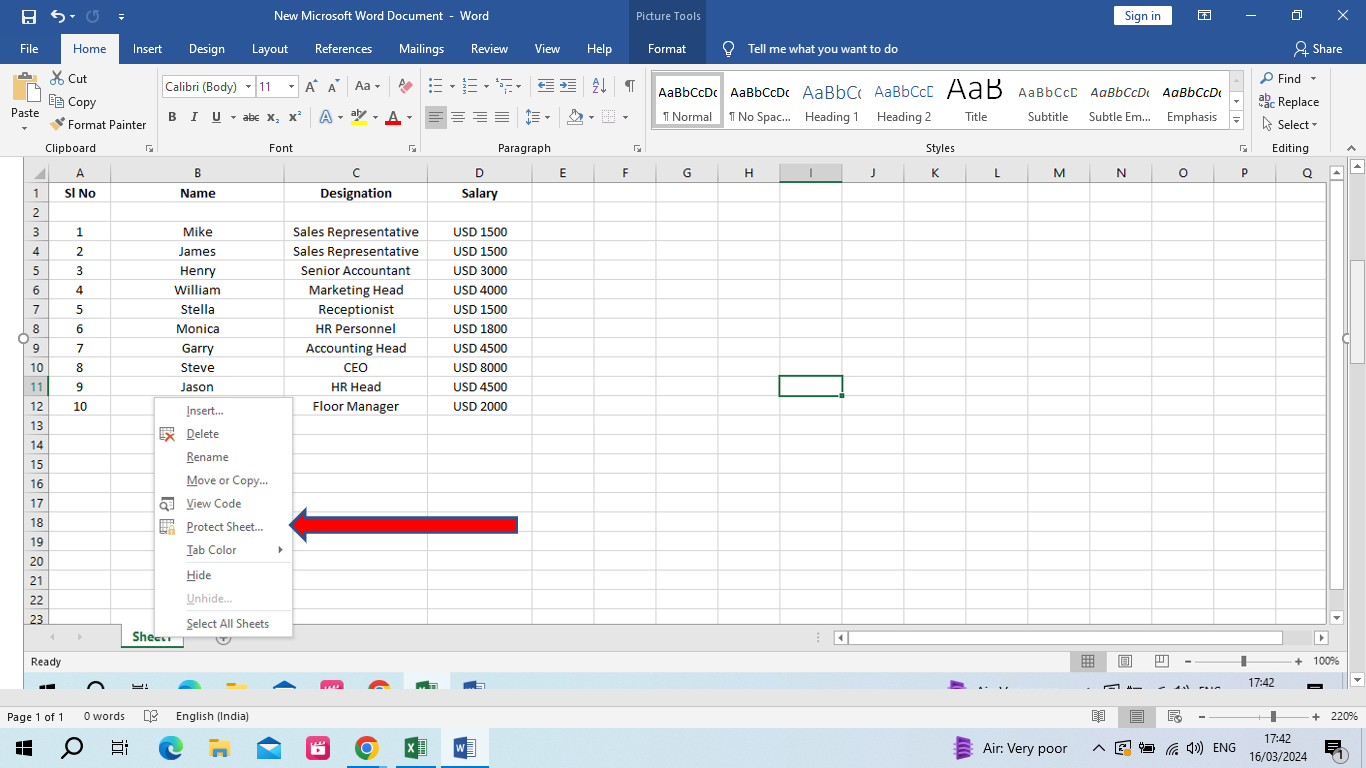
Step 2: Click on the ‘Protect Sheet’ option. You can also right-click on the sheet tab at the bottom and select the ‘Protect Sheet’ option from there.
or
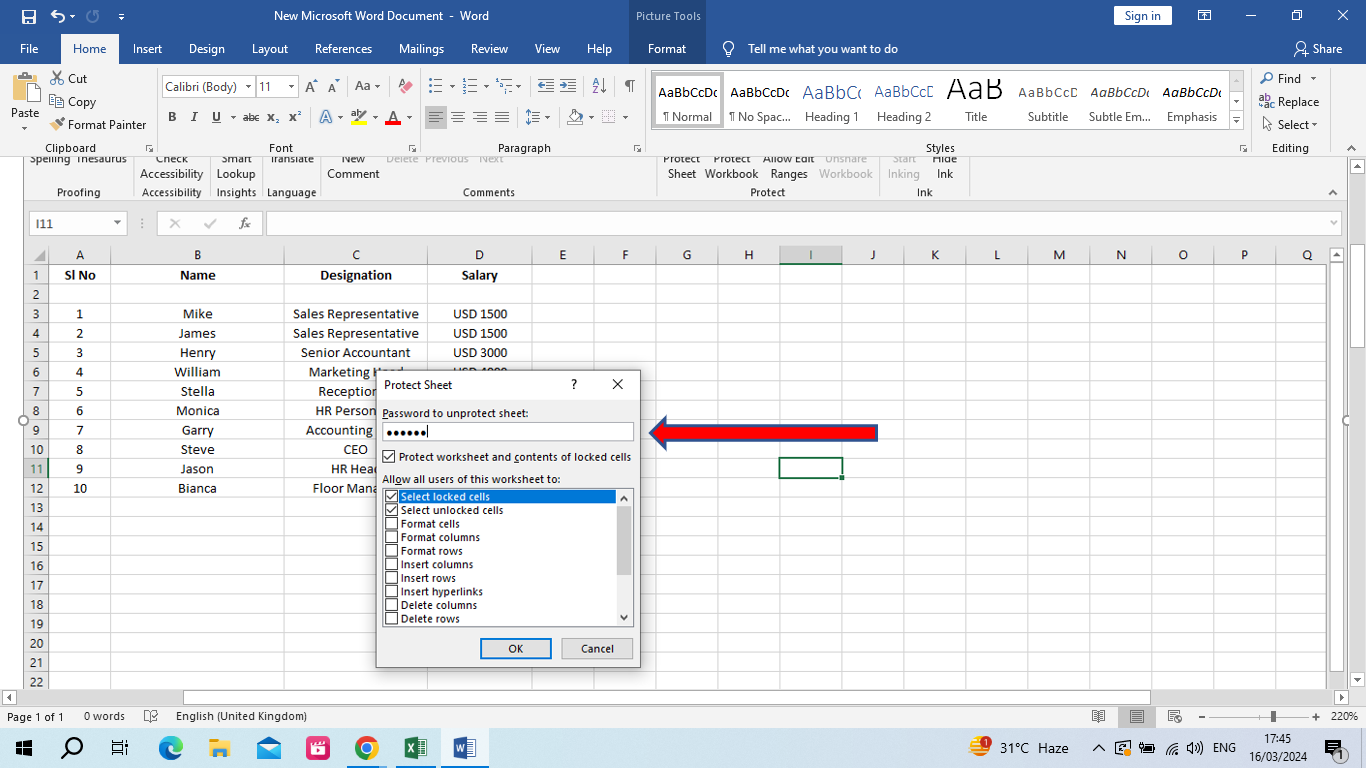
Step 3: A new window opens up. You will have to enter a password. You can check and uncheck the boxes to allow users to make certain changes in the worksheet. Once done, click ‘OK’.
If you or any other collaborator tries to edit any of the cells in this worksheet, an error message will pop up like this:

To make changes to the cells in the sheet, you have to unlock the worksheet. Let’s discuss how to unlock Excel protected sheet next.
How to Unlock a Protected Sheet in MS Excel
Before delving into the step-by-step process, here’s a pro tip. You have already come halfway into this guide, so, why not take a step further? You can learn many more advanced Excel functions like how to lock cells in Excel via professional online courses.
Back to the guide!
Now that you have the question “How do I lock Excel spreadsheet” answered, you must also know the way to unlock such a sheet. If you want to edit certain cells in your MS Excel-protected spreadsheet, you have to unlock the sheet to make the necessary changes.
Here is how you can unlock the Excel protected sheet:
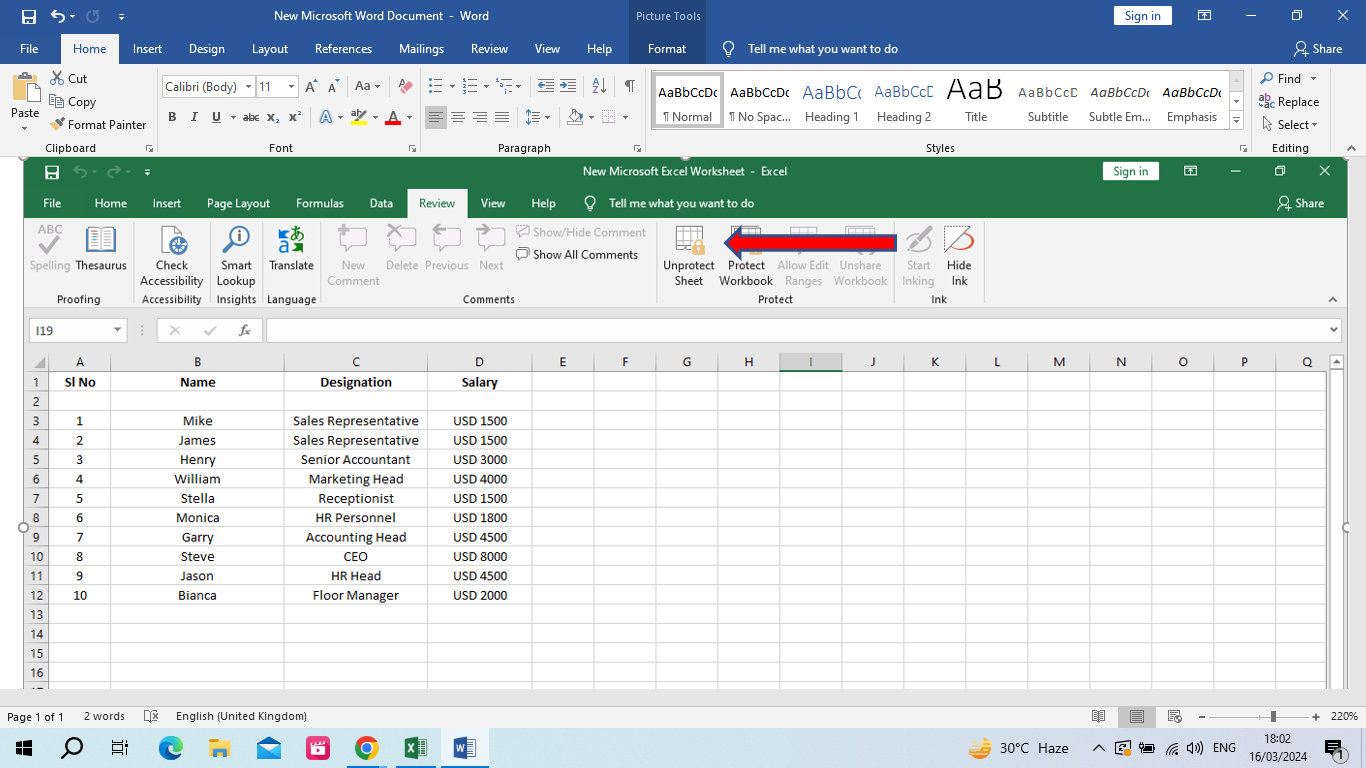
Step 1: On the Excel sheet, go to the ‘Review’ tab.

Step 2: Click on ‘Unprotect Sheet’.
Step 3: A window appears where you have to insert the password and then click ‘OK’.
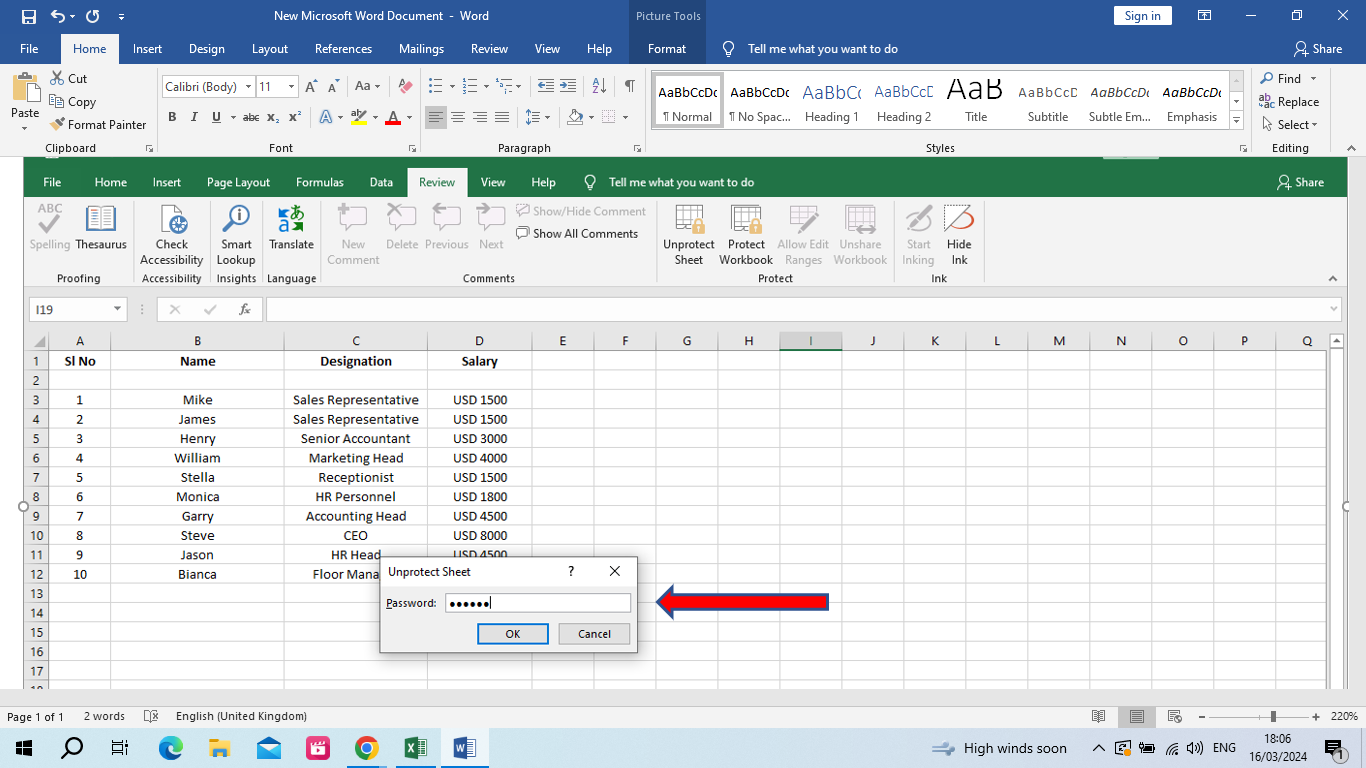
Your Excel worksheet is now unprotected. You or anyone else with whom you share the sheet can make all necessary changes in the cells of the sheet.
Locking Specific Cells in MS Excel
Initially, in this tutorial you learned how to lock cells in Excel - this implied locking all the cells in the spreadsheet. But can you lock specific cells in MS Excel? Of course, you can. This segment guides you as to how you can lock particular cells in Excel. Let us look at the steps you need to follow.
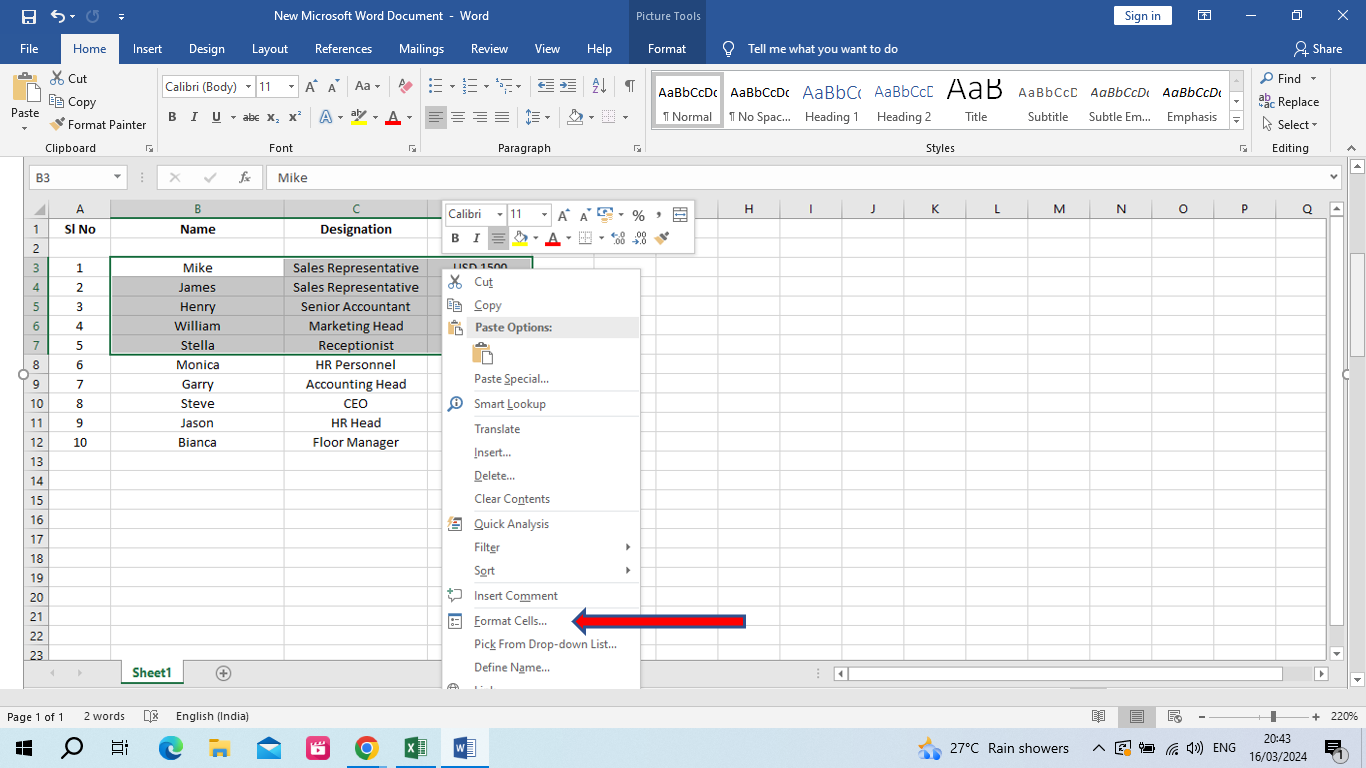
Step 1: Select all the cells in the worksheet with ‘Ctrl-A’

Step 2: Right-click on the Excel sheet and select ‘Format Cells’.

Step 3: A new window opens up. Click on the ‘Protection’ tab.

Step 4: Uncheck the ‘Locked’ option and click ‘OK’.

Step 5: Now select the cells, rows, or columns that you want to lock or protect.

Step 6: Right-click on the selected cells. Click on the ‘Format Cells’ option.
Step 7: Click on the ‘Protection’ tab. Check the ‘Locked’ option. Click ‘OK’.
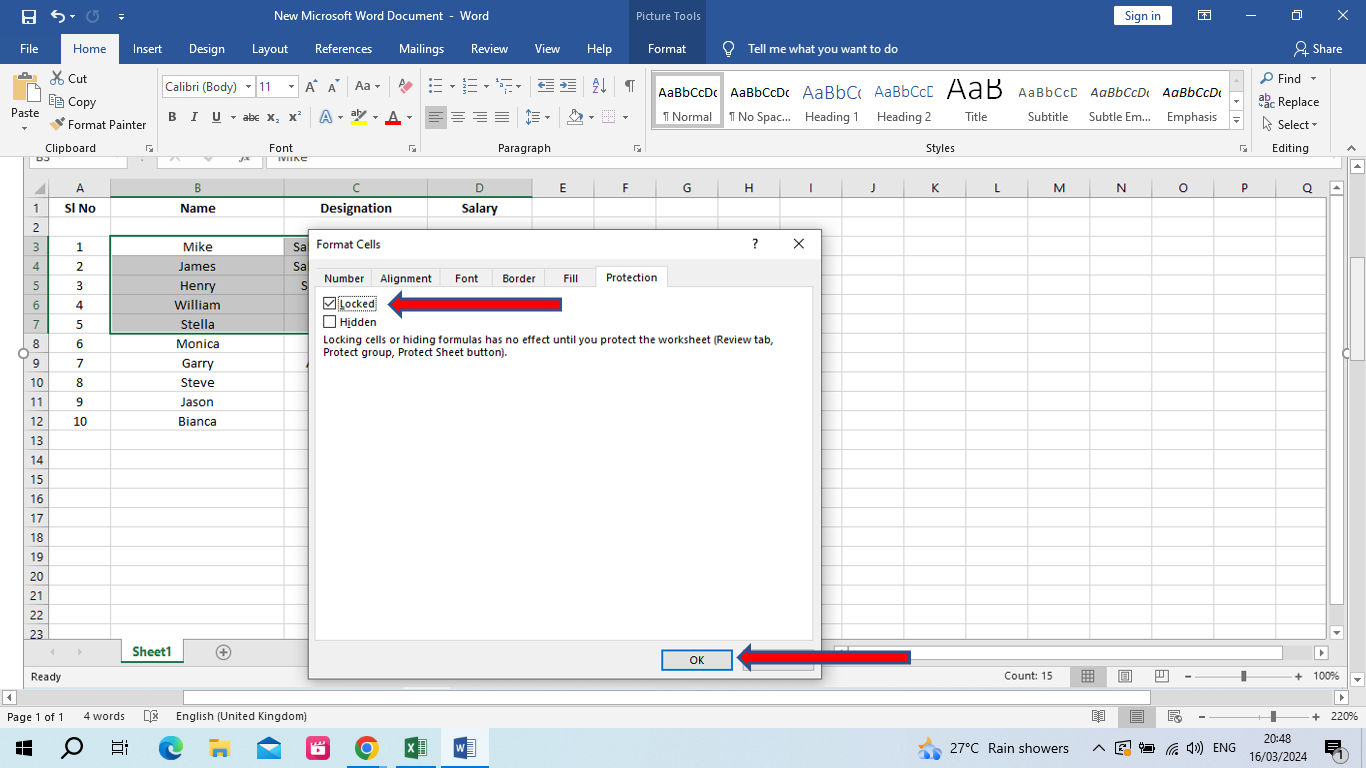
You are done. The particular cells that you selected in the Excel sheet are now locked and protected.
How to Lock Formula Cells in Excel
Learning how to cell lock in Excel is pretty simple. However, if you want to lock formula cells in Excel, this step-by-step guide will be of help.
To lock formula cells in Excel, repeat the first 4 steps of the previous segment ‘How to Lock Specific Cells in MS Excel’ and then follow the below-mentioned steps.
Step 1: Go to the ‘Home’ tab.
Step 2: Click on the ‘Find & Select’ option and a dropdown appears. Click on the ‘Go to Special’ option.
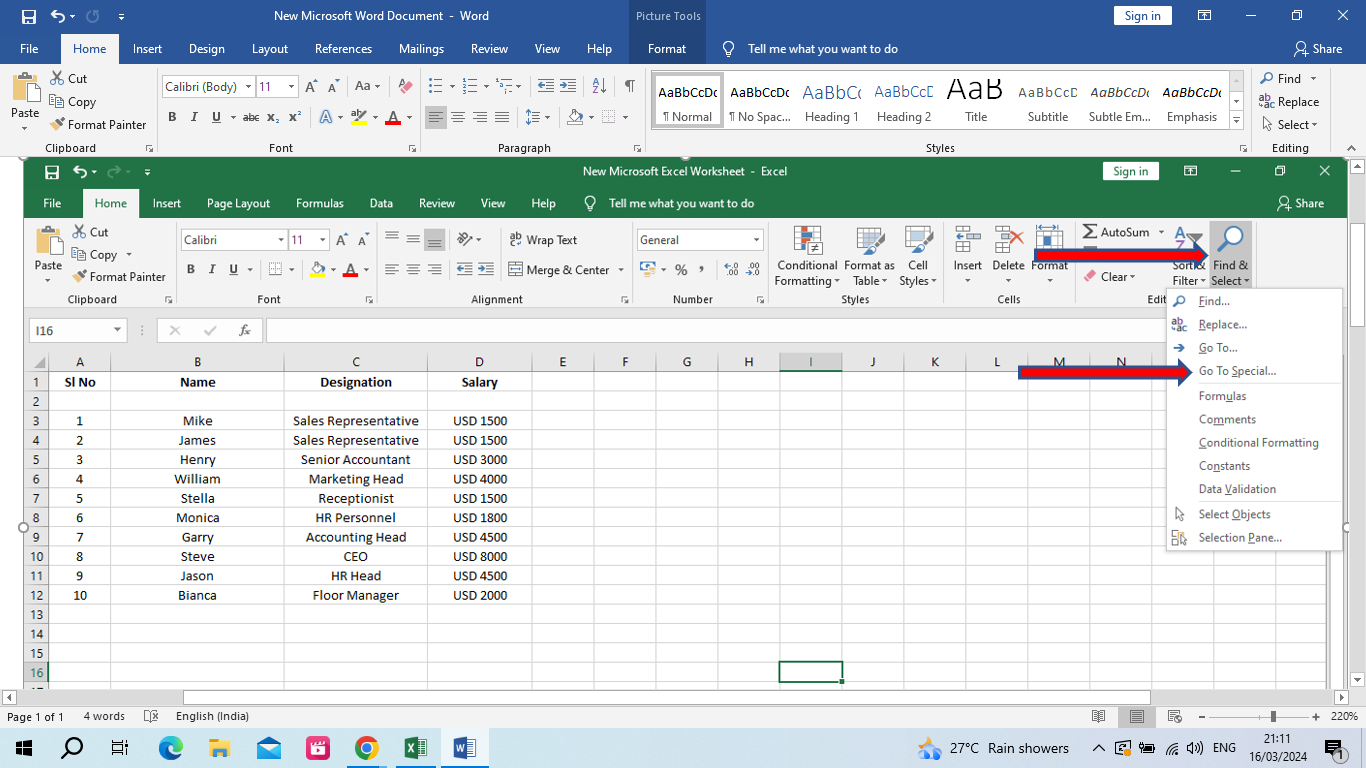
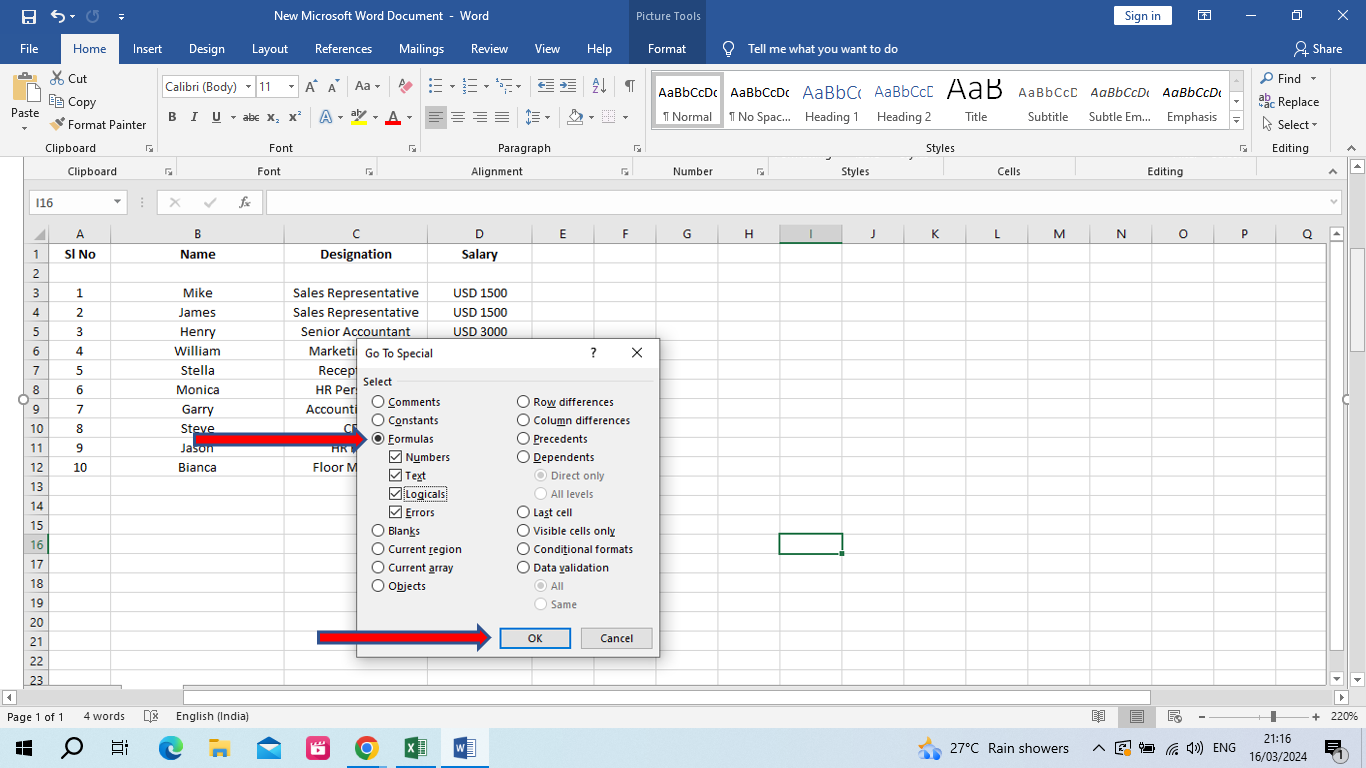
Step 3: A new window opens up. Select the ‘Formulas’ option. All the variables under the ‘Formulas’ option namely ‘Numbers’, ‘Text’, ‘Logicals,’ and ‘Errors’ should be checked. Click on ‘OK’.
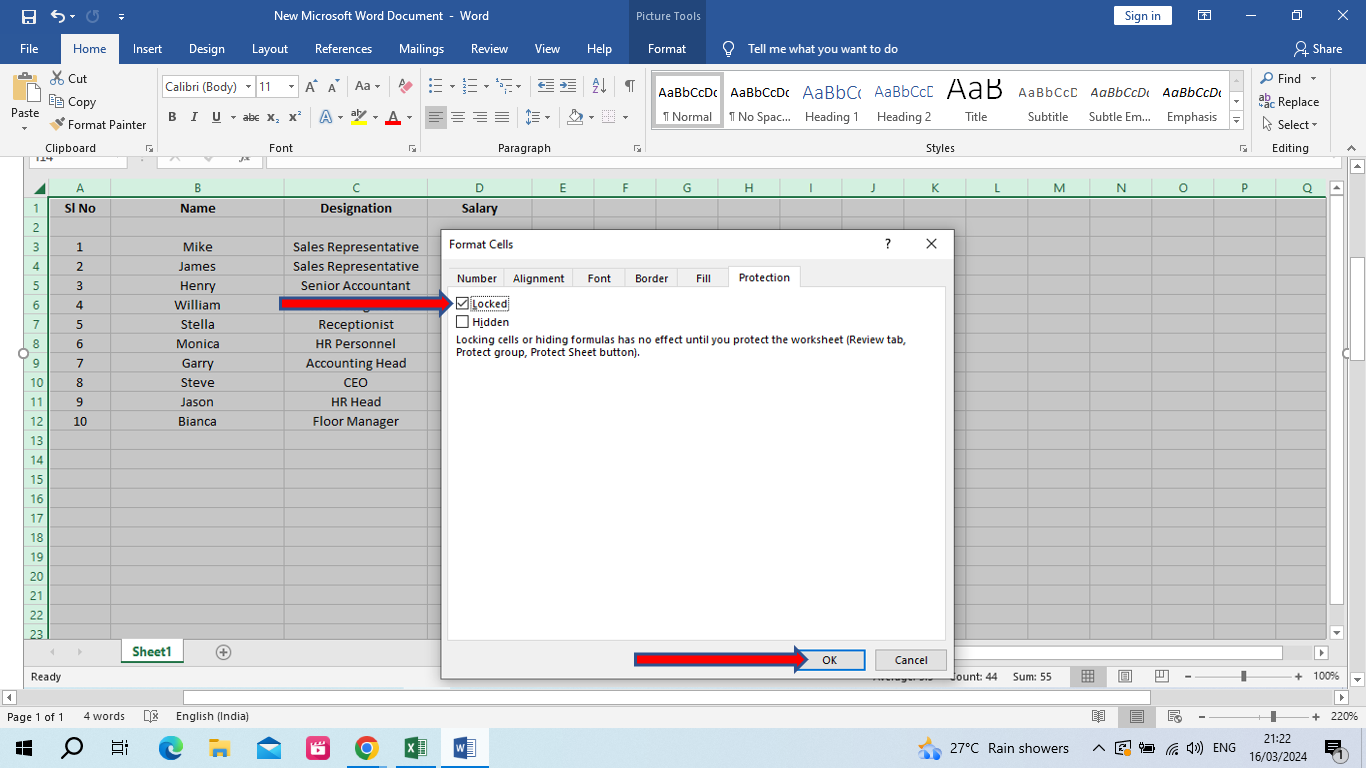
Step 4: Go back to the tab named ‘Protection’. Check the ‘Locked’ option and click ‘OK’.
How to Hide Formulas in an Excel Sheet
Once you have locked your worksheet, you can hide certain formulas you have used from being displayed. Follow this step-by-step guide.
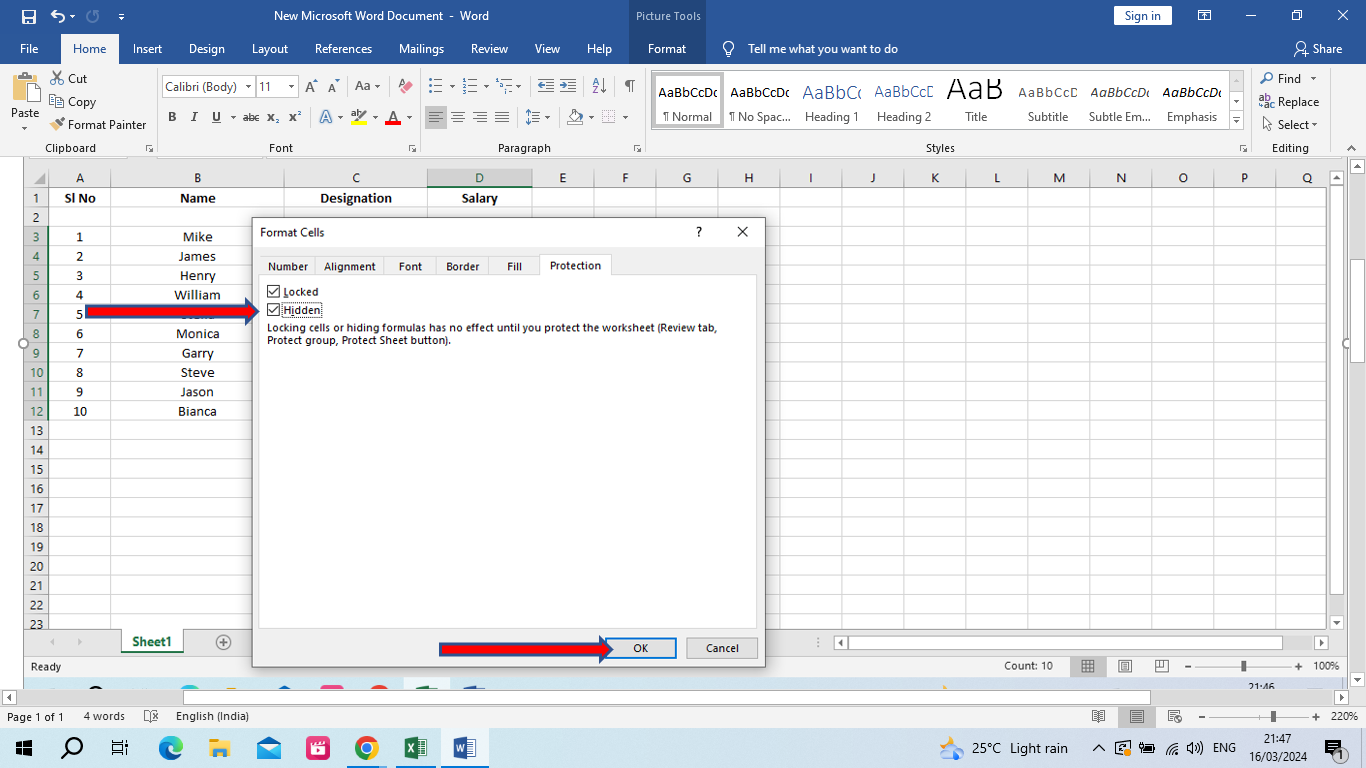
Step 1: Select the cells which have the formula that you want to hide from being displayed.
Step 2: Go to the ‘Home’ tab and click on the ‘Format’ button.
Step 3: Click on the ‘Format Cells’ option.
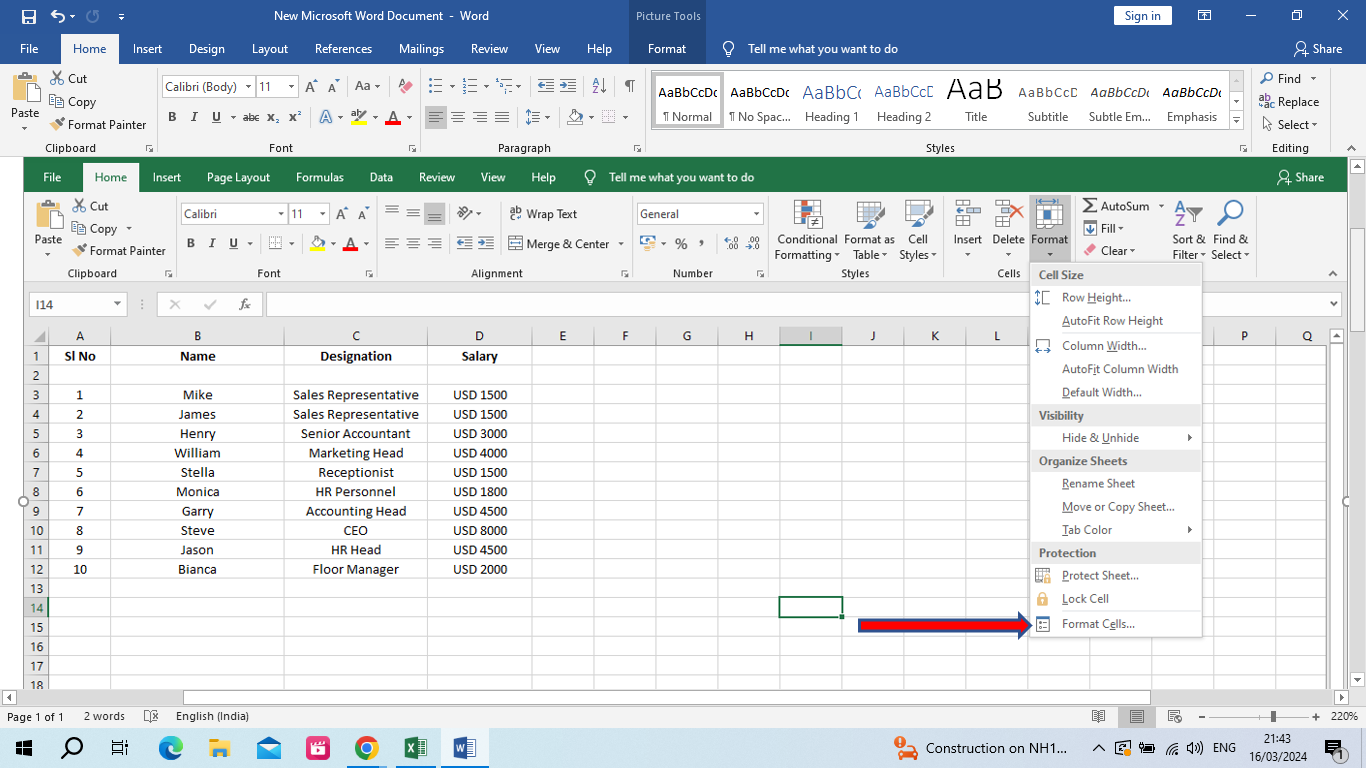
Step 4: Click on the ‘Protection’ tab and check the ‘Hidden’ option along with the ‘Locked’ option. Then click on ‘OK’.
Even with the cells being locked and hidden, nothing will be effective till the worksheet is locked. You can learn more advanced Excel functions aside from how to lock cells in Excel to upskill yourself especially if you are considering data analytics as a career option.
Wrapping up
This guide on how to lock cells in Excel will help you protect your valuable data, statistics, and other components in MS Excel even when you share it with your colleagues or office employees. Now that you have enough knowledge about how to lock a worksheet in Excel, advanced protection for your data is bound to be a cakewalk for you.
Learning the various facets and features of MS Excel makes working easier and error-free. upGrad offers a host of certification courses not only in MS Excel but also, in other professional streams like Data Analytics and the like. Right from the updated curriculum to guidance from industry veterans and experts, upskill yourself for enhanced expertise and better job opportunities and placements.
Frequently Asked Questions
1. How do I lock specific cells in Excel?
To lock specific cells in Excel, you have to first uncheck the ‘Locked’ option in the ‘Protection’ tab (Format-Format Cells-Protection tab). Next, select the cells in the sheet you want to lock. Right-click on the cells and click on ‘Format Cells’. In the window that opens up, go to the tab entitled ‘Protection’ and check the ‘Locked’ option. The specific cells will be locked. How do I lock cells in Excel F4?
2. How do I lock cells in Excel F4?
The F4 key in Excel is used to handle cell references. The F4 key helps in cycling through relative, absolute, and mixed reference types. In relative reference, press F4 to change cell reference to the mixed option locking either the row or the column. How do I lock unused cells in Excel?
3. How do I lock unused cells in Excel?
The process of unlocking unused cells in Excel will be the same as locking specific cells in MS Excel. In this case, the specific cells will be the unused ones. How do I lock rows in Excel?
4. How do I lock rows in Excel?
If you know how to lock cells in Excel, you can lock rows in Excel similarly. First, head over to the ‘Protection’ tab from the ‘Format Cells’ option and uncheck the ‘Locked’ option. Click ‘OK’. Return to the original Excel worksheet and select the row you want to lock. Right-click on the row and click on the ‘Format Cells’ option. Now check the ‘Locked’ option in the ‘Protection’ tab followed by ‘OK’. How do I lock multiple rows in Excel?
5. How do I lock multiple rows in Excel?
To lock multiple rows in Excel, select the rows you want to lock, right-click on the selection, choose "Format Cells," go to the "Protection" tab, and check the "Locked" option. Then protect the sheet via Review > Protect Sheet, ensuring to input a password if necessary. This will lock the specified rows from editing. How do I lock rows in sheets?
6. How do I lock rows in sheets?
To lock rows in sheets, you have to first uncheck the ‘Locked’ option in the ‘Protection’ tab (obtained after clicking the ‘Format Cells’ option) and click ‘OK’. now select the row that you want to lock. With a right-click you will get the ‘Format Cells’ option. In the ‘Protection’ tab, check the ‘Locked’ option and click ‘OK’.

Author|15 articles published


upGrad Learner Support
Talk to our experts. We are available 7 days a week, 10 AM to 7 PM
Indian Nationals
Foreign Nationals
Disclaimer
The above statistics depend on various factors and individual results may vary. Past performance is no guarantee of future results.
The student assumes full responsibility for all expenses associated with visas, travel, & related costs. upGrad does not .