For working professionals
For fresh graduates
- Study abroad
More
- Executive Doctor of Business Administration from SSBM
- Doctorate in Business Administration by Edgewood University
- Doctorate of Business Administration (DBA) from ESGCI, Paris
- Doctor of Business Administration From Golden Gate University
- Doctor of Business Administration from Rushford Business School, Switzerland
- Post Graduate Certificate in Data Science & AI (Executive)
- Gen AI Foundations Certificate Program from Microsoft
- Gen AI Mastery Certificate for Data Analysis
- Gen AI Mastery Certificate for Software Development
- Gen AI Mastery Certificate for Managerial Excellence
- Gen AI Mastery Certificate for Content Creation
- Post Graduate Certificate in Product Management from Duke CE
- Human Resource Analytics Course from IIM-K
- Directorship & Board Advisory Certification
- Gen AI Foundations Certificate Program from Microsoft
- CSM® Certification Training
- CSPO® Certification Training
- PMP® Certification Training
- SAFe® 6.0 Product Owner Product Manager (POPM) Certification
- Post Graduate Certificate in Product Management from Duke CE
- Professional Certificate Program in Cloud Computing and DevOps
- Python Programming Course
- Executive Post Graduate Programme in Software Dev. - Full Stack
- AWS Solutions Architect Training
- AWS Cloud Practitioner Essentials
- AWS Technical Essentials
- The U & AI GenAI Certificate Program from Microsoft
27. Columns in Excel
33. Count In Excel
49. Slicers in Excel
54. Solver in Excel
56. Macros In Excel
Page Setup in Excel: How to Format Sheets for Printing
My primary years as a financial modeler were spent mastering the intricacies of spreadsheet management. This helped me streamline my approach to both process management and financial modeling. During this process, I learned how important it is to input data correctly and present it in a clear, professional format. Page Setup in Excel allows you to do exactly that by controlling how your spreadsheet appears when printed, ensuring that your data is both accessible and aesthetically pleasing.
The header and footer in Excel are part of Page Setup. They are used for information hierarchy and user navigation. In this detailed tutorial, I will explain these tools and how they can enhance the overall appeal of your data.
Headers and footers explained
Source- WallStreetMojo
Headers
Headers are positioned at the top margin of each printed page and act as metadata containers. These usually are static text strings like document titles, creation dates, or file paths. This internal information system of documents makes it easier to recognize and understand them, especially in long or multi-worksheet spreadsheets.
Footers
Footers are located at the bottom margin and generally contain page numbering for documents that have more than one page. This feature of a text program allows you to easily find your place in the document, thereby improving the user experience.
Footers can also go beyond mere page numbering. They can be programmed to include system dates, user names, or even personal logos, the dynamic elements of a system. This flexibility allows you to design footers according to your specific needs. Thus, you can create a professional and distinctive footer that represents your brand within your spreadsheets.
Hence, header and footer in Excel are typically used to display information that should be repeated on every page, such as:
- Report titles: Verify that your report's purpose is apparent on each page.
- File paths: Develop context for the data by stating the source file location.
- Page numbers: Assist in easy navigation within multi-page reports using the techniques.
- Dates: Remember the date of the data generation.
The power of Page Layout view
Source- MS Excel
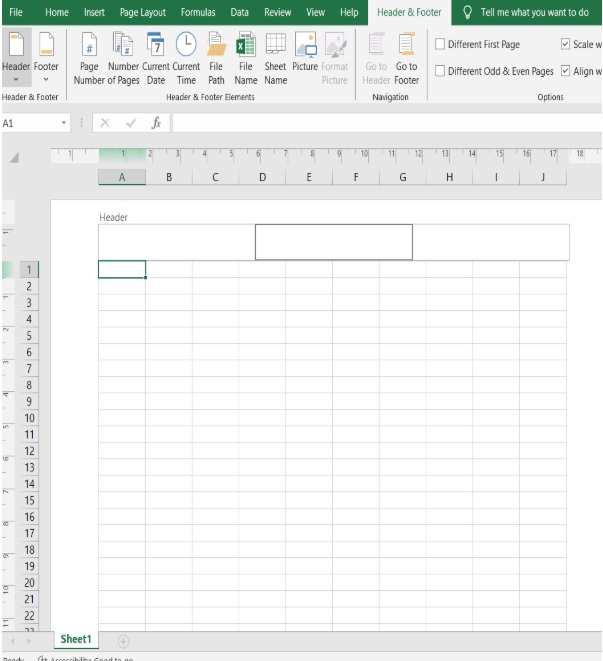
The Page Layout view is a useful tool for creating web pages that consider all the elements within the browser window.
Although header and footer in Excel are not visible in the usual worksheet mode, the Page Layout view can be used to edit and preview them. To get to the Page Layout view, go to the View tab and then select Page Layout. This will completely change your worksheet by adding margins, headers, and footers, thus showing you the Excel Print Preview.
How to add header to every page in Excel
To add a header to every page in Excel, follow these steps:
Step 1: Open the worksheet
Open the Excel worksheet where you want to add the header.
Step 2: Go to the Page Layout tab
Click on the "Page Layout" tab at the top of the Excel window.
Step 3: Open Page Setup dialog box
In the "Page Setup" group, click on the small arrow icon in the bottom-right corner to open the Page Setup dialog box.
Step 4: Select the Header/Footer tab
In the Page Setup dialog box, go to the "Header/Footer" tab.
Step 5: Add Header
- Click on the "Custom Header" button.
- In the Header dialog box, you can enter your header text in the left, center, or right sections as desired. You can also insert elements like page numbers, dates, or images by clicking the appropriate buttons.
Step 6: Apply and close
- Once you have entered your header text, click "OK" to close the Header dialog box.
- Click "OK" again to close the Page Setup dialog box.
The header will now appear on every printed page of your Excel worksheet.
How to add footer to every page in Excel
To add a footer to every page in Excel, follow these steps:
Step 1: Open the worksheet:
Open the Excel worksheet where you want to add the footer.
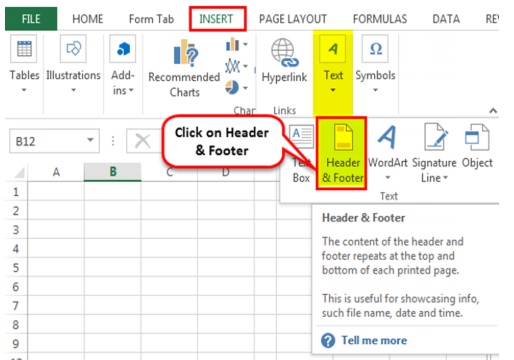
Step 2: Select the Insert tab
Click on the "Insert" tab at the top of the Excel window.
Step 3: Choose Header & Footer
In the "Text" group, click on "Header & Footer". This will switch your worksheet to Page Layout view and open the Header & Footer Tools.
Step 4: Add Footer
- Scroll down to the bottom of the page to find the footer section. Click on the footer area where you want to add text (left, center, or right section).
- Enter the desired footer text or use the "Header & Footer Tools" Design tab to add elements like page numbers, dates, or file paths.
Step 5: Apply and save
- Once you have added the footer, click anywhere outside the footer area to apply it.
- Save your workbook.
The footer will now appear on every printed page of your Excel worksheet.
Customizing your header and footer in Excel
Source- MS Excel
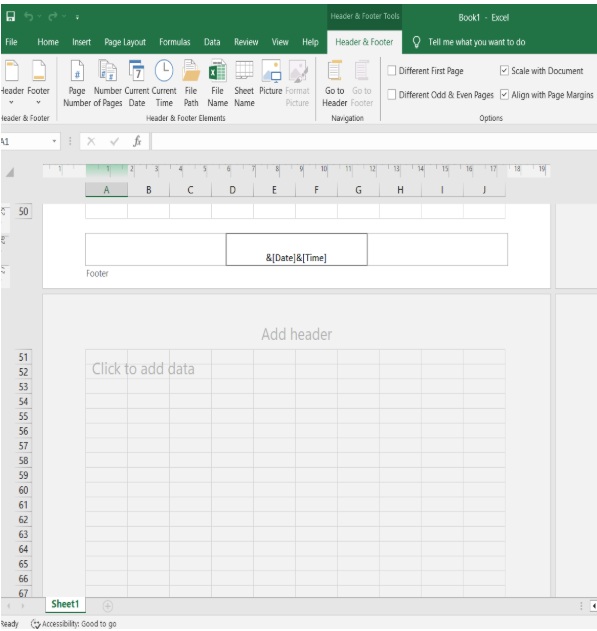
There are several Excel Print options available for modifying your headers and footers. You can:
1. Type custom text
Provide any data you want to be shown in the header or footer area.
2. Insert page numbers
Just click the Insert Page Number button, and it will automatically add page numbers to the footer.
3. Add the date and time
The Insert Date or Insert Time button is the key to add the current date or time in your header or footer.
4. Insert pictures
Click on the Insert Picture button to insert the company logo or any other image.
5. Format the text
The header and footer text can be formatted according to the preferred font, size, color, and alignment using the formatting options.
Mastering headers and footers in your documents
In this section, I’ll illustrate how you can take advantage of these amazing tools to achieve organization, clarity, and professionalism in your work.
1. Three-sectioned canvas
Use the header and footer in Excel as a divided canvas with 3 areas, each one on the left, center, and right side. There is no limit to your design imagination as this feature opens the doors for strategic placement of items like the company logo (left header), report title (center header), and page numbers (right footer), which in turn provide your audience with an engaging and informative presentation.
2. Beyond pagination
The header and footer in Excel can do much more than just exhibit the page numbers. They unlock a world of possibilities. For long documents, stick chapter titles in the header for easy access to the main content.
Here are some other uses of the two:
- Consistent branding
Include your company logo in the header portion to create a pattern that subconsciously makes your users aware of your brand.
- Informative footers
Declare the necessary information, such as contact details, website links, or copyright notices, in the footer and ensure that it’s visible on every page, giving this information a priority.
3. Tailoring the first page
The first page is the first to capture the reader's focus and should define the overall idea. At the top, have a one-line summary report that delivers the facts to give readers a glimpse of the problem before they turn to the details.
4. Excel Print Preview
Master the placement template and ensure the details of the headers and footers are all correct. This last part of the process helps prevent annoying issues and brings the details into greater focus. Additionally, in Excel, you can optimize your document for printing by selecting the Fit to One Page Excel option, ensuring that your content fits neatly onto a single printed page.
Wrapping up
The ability to use header and footer in Excel allows you to make impeccable and informative end-of-paper reports and deliver your data in the best style. By including these elements, you can ensure that the crucial information is on every page, which, in turn, will make the whole thing easier to understand and professional.
Want to take your Excel expertise to a whole new level? I recommend joining upGrad. It delivers Excel courses of different types that are aimed at improving your professional skills. The detailed programs, created by industry experts, provide you with the latest tools and techniques for using spreadsheets to help you become a spreadsheet power user.
Whatever your aim, be it becoming a data analyst or making a professional jump, upGrad has a program to suit your needs. Explore its online courses or tutorials designed to transform your documents from functional to truly impressive, leaving a lasting impact.
Frequently Asked Questions
- Where are headers and footers visible in Excel?
Headers and footers are only visible on the printed version of your Excel workbook or when you are in Page Layout in Excel.
- How do I increase the header and footer in Excel?
You can not directly change the header and footer in Excel areas. The worksheet has a fixed Excel paper size. However, you can change the margins to give extra space for your headers and footers.
- What are the header and footer margins in Excel?
In Excel, the header and footer margins refer to the space between the header or footer content and the edges of the page. These margins ensure that the text or images in the header and footer do not overlap with the main content of the worksheet or run off the page when printed.
- How do I add a header to every page in Excel?
I have covered this in the tutorial. Read it to learn the steps.
- What is a header footer?
A header footer is the title section of a document, usually visible at the top and bottom of each page.
- How do I show headers and footers?
The header and footer in Excel are not present in the normal worksheet view. To be able to see and edit them, you first need to switch to Page Layout view by clicking on the View tab and the Page Layout option.
- In which tab is the header and footer available?
Although headers and footers are mainly edited in the Page Layout view, you can also use the Header & Footer button in the Text group in the Insert tab.
- What is the shortcut key for the header and footer?
There is no one-liner shortcut for the headers and footers. Nevertheless, you can quickly access the Page Layout view in Excel (which is used for editing headers and footers) by pressing Alt + P and F.
- How do I show headers and footers only on the first page?
In the Page Layout view, double-click on the header or footer section and tick the box called Different First Page. Then, you can go to the main page and enter the text you want to be displayed only on the first page.

Author|14 articles published


upGrad Learner Support
Talk to our experts. We are available 7 days a week, 9 AM to 12 AM (midnight)
Indian Nationals
Foreign Nationals
Disclaimer
1.The above statistics depend on various factors and individual results may vary. Past performance is no guarantee of future results.
2.The student assumes full responsibility for all expenses associated with visas, travel, & related costs. upGrad does not provide any a.


