All courses
Agentic AI
Agentic AI

IIIT Bangalore
Executive Programme in Generative AI for LeadersArtificial Intelligence
Degree / Exec. PG

IIIT Bangalore
Executive Diploma in Machine Learning and AI
OPJ Global University
Master’s Degree in Artificial Intelligence and Data Science
Liverpool John Moores University
Master of Science in Machine Learning & AI
Golden Gate University
DBA in Emerging Technologies with Concentration in Generative AIExecutive Certificate

IIITB & IIM, Udaipur
Chief Technology Officer & AI Leadership ProgrammeIIIT Bangalore
Executive Programme in Generative AI for Leaders
upGrad | Microsoft
Gen AI Foundations Certificate Program from MicrosoftupGrad | Microsoft
Gen AI Mastery Certificate for Data AnalysisupGrad | Microsoft
Gen AI Mastery Certificate for Software DevelopmentupGrad | Microsoft
Gen AI Mastery Certificate for Managerial ExcellenceOffline Bootcamps

upGrad
Data Science and AI-MLDoctorate
For All Domains
IIITB & IIM, Udaipur
Chief Technology Officer & AI Leadership Programme
Swiss School of Business and Management
Global Doctor of Business Administration from SSBM
Edgewood University
Doctorate in Business Administration by Edgewood UniversityGolden Gate University
Doctor of Business Administration From Golden Gate University
Rushford Business School
Doctor of Business Administration from Rushford Business School, SwitzerlandGolden Gate University
Master + Doctor of Business Administration (MBA+DBA)-d9bdeff6165f4eb1ba2adcebde78e961.svg)
University of Waterloo
Chief Technology and AI Officer ProgramLeadership / AI
Golden Gate University
DBA in Emerging Technologies with Concentration in Generative AIMachine Learning
Machine Learning
Data Science
Degree / Exec. PG
O.P Jindal Global University
Master’s Degree in Artificial Intelligence and Data ScienceIIIT Bangalore
Executive Diploma in Data Science & AILiverpool John Moores University
Master of Science in Data ScienceExecutive Certificate
upGrad | Microsoft
Gen AI Foundations Certificate Program from MicrosoftupGrad | Microsoft
Gen AI Mastery Certificate for Data AnalysisupGrad | Microsoft
Gen AI Mastery Certificate for Software DevelopmentupGrad | Microsoft
Gen AI Mastery Certificate for Managerial ExcellenceupGrad | Microsoft
Gen AI Mastery Certificate for Content CreationOffline Bootcamps
upGrad
Data Science and AI-MLupGrad
Data AnalyticsMBA
Masters

Paris School of Business
Master of Science in Business Management and TechnologyO.P.Jindal Global University
MBA (with Career Acceleration Program by upGrad)Edgewood University
MBA from Edgewood UniversityO.P.Jindal Global University
MBA from O.P.Jindal Global UniversityGolden Gate University
Master + Doctor of Business Administration (MBA+DBA)Executive Certificate

IMT, Ghaziabad
Advanced General Management ProgramMarketing
Executive Certificate
Offline Bootcamps
upGrad
Digital MarketingManagement
Degree
O.P Jindal Global University
MSc in International Accounting & Finance (ACCA integrated)Paris School of Business
Master of Science in Business Management and Technology
Golden Gate University
Master of Arts in Industrial-Organizational PsychologyExecutive Certificate

IIM Kozhikode
Human Resource Analytics Course from IIM-KupGrad | Microsoft
Gen AI Foundations Certificate Program from MicrosoftEducation
Education

Northeastern University
Master of Education (M.Ed.) from Northeastern UniversityEdgewood University
Doctor of Education (Ed.D.)Edgewood University
Master of Education (M.Ed.) from Edgewood UniversityCertifications
Project Management
Certification

Knowledgehut
Leadership And Communications In ProjectsKnowledgehut
Microsoft Project 2007/2010-ae8d039bbd2a41318308f8d26b52ac8f.svg)
Knowledgehut
Financial Management For Project ManagersKnowledgehut
Fundamentals of Earned Value Management (EVM)Knowledgehut
Fundamentals of Portfolio ManagementKnowledgehut
Fundamentals of Program Management-35c169da468a4cc481c6a8505a74826d.webp&w=128&q=75)
Knowledgehut
CAPM® CertificationsKnowledgehut
Microsoft® Project 2016Certifications & Trainings
-7f4b4f34e09d42bfa73b58f4a230cffa.webp&w=128&q=75)
Knowledgehut
PMP® CertificationKnowledgehut
PMI-RMP® CertificationKnowledgehut
PMP Renewal Learning PathKnowledgehut
Oracle Primavera P6 V18.8Knowledgehut
Microsoft® Project 2013Knowledgehut
PfMP® Certification CourseKnowledgehut
Project Planning and MonitoringPrince2 Certifications

Knowledgehut
PRINCE2® FoundationKnowledgehut
PRINCE2® PractitionerKnowledgehut
PRINCE2 Agile Foundation and PractitionerKnowledgehut
PRINCE2 Agile® Foundation CertificationKnowledgehut
PRINCE2 Agile® Practitioner CertificationManagement Certifications
Knowledgehut
Project Management Masters Certification ProgramKnowledgehut
Change ManagementKnowledgehut
Project Management TechniquesKnowledgehut
Product Management Certification ProgramKnowledgehut
Project Risk Management- Study abroad
- Offline centres
- uGSOT - B.Tech
More
%20(1)-d5498f0f972b4c99be680c2ee3b792d7.svg)


4. C++ Variable
10. C++ for Loop
12. C++ Lambda
13. Loop in C++
15. Array in C++
16. Strings in C++
17. Substring in C++
29. Vector in C++
30. Map in C++
31. Pair in C++
33. Iterators in C++
34. Queue in C++
36. Stack in C++
37. ifstream in C++
40. Templates in C++
43. Namespace in C++
46. Recursion in C++
48. C++ Shell
49. Setw in C++
51. Atoi in C++
54. C# vs C++
55. C++ GUI
56. C++ Game Code
57. Class in C++
58. C++ Header Files
63. Cin in C++
64. Printf in C++
65. Struct in C++
66. C++ List
68. C++ Comments
72. Sorting in C++
Switch Case in C++: Syntax, Usage, and Best Practices
In programming, we make decisions that determine our code's path. The switch-case statement in C++ serves as a powerful compass, guiding our programs toward the correct course of action based on specific conditions.
At its core, the switch-case statement is a control flow structure that allows us to select a single block of code to execute from a set of multiple possibilities. The decision-making process revolves around the value of a particular expression, known as the controlling expression or switch expression.
Let us learn all about switch case C++ and how we can effectively use it when programming.
Why Switch Case C++?
The beauty of the switch-case statement lies in its simplicity and clarity when dealing with multiple discrete values. Unlike a series of nested if-else statements, which can quickly become convoluted and difficult to manage, the switch-case structure presents a clean and organized way to handle multiple scenarios. It acts as a central control point, directing the flow of execution based on the value of the switch expression, making your code easier to read, understand, and maintain.
So how does switch case C++ work? The switch-case expression is evaluated, and its value is compared against a series of predefined constant values, called case labels. When a match is found between the expression and a case label, the corresponding code block associated with that label is executed. The process continues until a break statement is encountered, or the end of the switch-case block is reached.
Syntax and Basic Usage of Switch Case C++
To effectively use the switch-case statement in C++, it is essential for us to understand the C++ switch case syntax and the roles played by its various components. Let us break down the structure of this decision-making construct:
The switch Expression
The heart of the switch-case statement is the expression enclosed within the parentheses following the switch keyword. This C++ switch syntax is an expression that serves as the guiding force, determining which path your code will take. In C++, this expression must be evaluated to an integral or enumeration type, meaning it can be an integer, a character, or a value from an enumeration.
The value of the switch expression is compared to the values specified in the case labels to find a match. Once a matching case is found, execution jumps to the code block associated with that case.
The case Labels
Each case label represents a potential value that the switch expression might have. We can think of them as signposts, each pointing to a specific section of code. The syntax for a case label is:
case constant_value:
// Code to execute if the switch expression matches constant_value
It is important for us to remember that the values in case labels must be unique and constant expressions. This means we cannot use variables or expressions that might change during runtime within a case label.
The break Statement
The break statement acts as an exit ramp for each case block. When the code within a case block reaches a break statement, execution jumps to the end of the entire switch-case statement, bypassing any subsequent cases. If we omit the break statement, execution will "fall through" to the next case, potentially leading to unintended consequences.
The default Label
The default label is optional, but it is a good practice to include it in most switch-case statements. It serves as a catch-all for cases that have not been explicitly defined. If the value of the switch expression doesn't match any of the case labels, the code within the default block (if present) will be executed.
Switch Case C++ Example
Let's illustrate the basic usage of switch-case with a simple example:
int dayOfWeek = 3; // 1 = Monday, 2 = Tuesday, etc.
switch (dayOfWeek) {
case 1:
std::cout << "It's Monday!" << std::endl;
break;
case 2:
std::cout << "It's Tuesday!" << std::endl;
break;
// ... other cases for Wednesday to Sunday
default:
std::cout << "Invalid day of the week." << std::endl;
}
In this example, the switch expression is dayOfWeek. The code checks for each day of the week, and if the value of dayOfWeek matches a case, the corresponding message is printed. The default case handles any invalid input.
Fallthrough Behavior in Switch Case C++
One of the most distinctive features of the switch-case statement is its fallthrough behavior. While it can be a powerful tool when used intentionally, it can also lead to subtle errors if not handled carefully.
What is Fallthrough in Switch Case C++?
In a switch-case statement, if a matching case label is found and the corresponding code block doesn't contain a break statement, execution will continue to the next case block, regardless of whether the value of the switch expression matches that case. This cascading execution is known as fallthrough.
Intentional Fallthrough in Switch Case C++
In certain scenarios, fallthrough can be a deliberate and useful feature. For example, consider a scenario where we want the same action to be performed for multiple values of the switch expression:
int grade = 85;
switch (grade / 10) {
case 9: // Fallthrough
case 8:
std::cout << "You got an A or B!" << std::endl;
break;
case 7:
std::cout << "You got a C." << std::endl;
break;
// ... other cases
}
Here, if the grade is either 85 or 95, the same message will be printed due to the intentional fallthrough.
Unintentional Fallthrough in Switch Case C++
While intentional fallthrough can be beneficial, unintentional fallthrough is a frequent source of errors. Omitting a break statement can lead to the unintended execution of subsequent case blocks, producing incorrect results.
int userInput = 2;
switch (userInput) {
case 1:
std::cout << "Option 1 selected" << std::endl;
// Missing break statement!
case 2:
std::cout << "Option 2 selected" << std::endl; // This will also execute
break;
// ... other cases
}
In this switch case C++ example, even though the userInput is 2, both "Option 1 selected" and "Option 2 selected" will be printed due to the missing break statement.
Here are some tips to avoid unintentional fallthrough in switch case C++:
- Always include a break statement at the end of each case block unless you have a specific reason for fallthrough.
- Double-check your code to ensure that all intended break statements are present.
- Use compiler warnings as most modern compilers can warn us about potential fallthrough scenarios.
- Consider using the [[fallthrough]] attribute (C++17 and later) to explicitly mark intentional fallthrough and suppress compiler warnings.
Advanced Switch Case C++ Techniques
While the basic switch-case structure is powerful on its own, C++ offers several advanced techniques that can further enhance its flexibility, readability, and efficiency.
Nested Switch-Case Statements
In certain scenarios, we might encounter situations where a decision needs to be made based on multiple criteria. Nested switch-case statements allow us to handle such hierarchical decision-making. We can embed one switch-case statement within the code block of another, creating a multi-level decision tree.
Let us consider a game where a character's action depends on both their current state and the input received. We could use a nested switch-case to handle this:
switch (characterState) {
case IDLE:
switch (input) {
case MOVE_LEFT:
// ... handle moving left
break;
case MOVE_RIGHT:
// ... handle moving right
break;
// ... other input cases
}
break;
case ATTACKING:
// ... handle attacking behavior
break;
// ... other character states
}
However, excessive nesting can quickly make our code harder to read and maintain. We should use nested switch-case statements judiciously and only when the logic naturally calls for it.
Range-Based Cases (C++17)
C++17 introduced range-based case labels, allowing us to specify a range of values for a single case. This can significantly simplify our code when dealing with consecutive cases that require the same action:
int score = 88;
switch (score / 10) {
case 9: // Fallthrough
case 8:
std::cout << "Excellent!" << std::endl;
break;
case 7:
std::cout << "Good." << std::endl;
break;
case 6:
std::cout << "Satisfactory." << std::endl;
break;
default:
std::cout << "Needs improvement." << std::endl;
}
In this CPP switch case example, the range-based case case 9: case 8: covers scores from 80 to 99.
Initializers in C++ case Statement (C++17)
C++17 also brought the ability to declare and initialize variables within case blocks using the init statement. This can improve code locality and make our intentions clearer when using CPP switch case:
switch (event) {
case START:
init startTime = getCurrentTime();
// ... use startTime for logging or calculations
break;
case END:
// ... other code
}
Alternative Implementations
While we usually will not need to worry about the implementation details, it is interesting to note that compilers can optimize switch-case statements in different ways:
- Jump tables: For dense sets of cases, a jump table (an array of addresses) can be used to directly jump to the correct code block.
- Binary search trees: For sparse sets of cases, a binary search tree can be used to efficiently locate the matching case.
switch Statement in C++ Example Program
Here is an example of C++ switch statement that you can try out yourself:
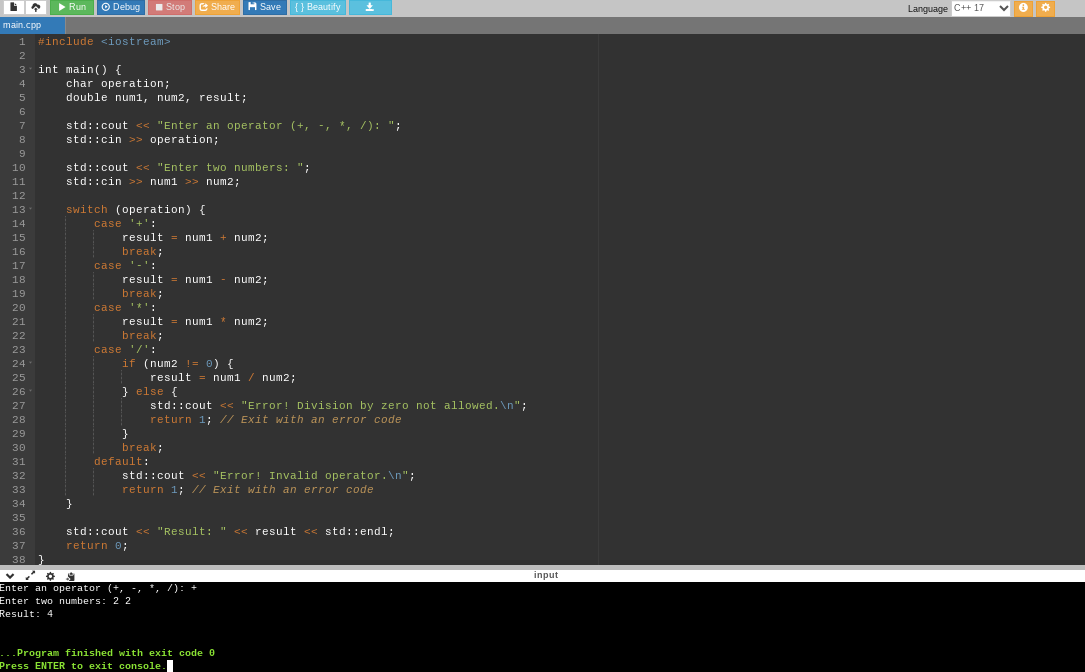
Code:
#include <iostream>
int main() {
char operation;
double num1, num2, result;
std::cout << "Enter an operator (+, -, *, /): ";
std::cin >> operation;
std::cout << "Enter two numbers: ";
std::cin >> num1 >> num2;
switch (operation) {
case '+':
result = num1 + num2;
break;
case '-':
result = num1 - num2;
break;
case '*':
result = num1 * num2;
break;
case '/':
if (num2 != 0) {
result = num1 / num2;
} else {
std::cout << "Error! Division by zero not allowed.\n";
return 1; // Exit with an error code
}
break;
default:
std::cout << "Error! Invalid operator.\n";
return 1; // Exit with an error code
}
std::cout << "Result: " << result << std::endl;
return 0;
}
The above example is a calculator program that prompts the user to enter an operator (+, -, *, or /). Once the user provides this input, the CPP switch case program then asks for two numbers. The switch statement uses the operation variable as its controlling expression and each case label corresponds to one of the valid operators.
If you wish to learn how to code in C++, you can check out upGrad’s software engineering courses.
Best Practices and Recommendations
To harness the full potential of the switch-case statement and avoid common pitfalls, it's essential to adopt best practices that prioritize clarity, correctness, and maintainability.
When to Use switch-case
While versatile, the switch-case statement is not always the optimal choice. Consider using it when:
- Multiple discrete values: If you have a finite set of distinct values to test against, switch-case provides a clear and concise structure compared to a chain of if-else statements.
- Equality comparisons: switch-case excels at comparing the switch expression against constant values for equality. If your decision logic involves complex conditions or ranges, if-else might be more appropriate.
Clarity and Readability
Clean, well-structured code is a joy to read and maintain. Here is how to make our switch-case statements shine:
- Indentation: Use consistent indentation to visually group cases and their corresponding code blocks.
- Comments: Explain the purpose of each case and any non-obvious logic.
- Meaningful names: Choose descriptive names for your switch expression variable and case labels.
- Avoid deep nesting: If your nested switch-case statements become too complex, consider refactoring them into functions or alternative control flow structures.
Testing and Error Handling
Thorough testing is crucial to catch unexpected fallthrough errors and ensure our code behaves as expected in all scenarios.
- Test every case: Write test cases that exercise each case label, including the default case (if present).
- Verify fallthrough: If you intentionally use fallthrough, add comments to make your intent clear and test those cases thoroughly.
- Validate input: Before entering the switch statement, validate the input to ensure it's within the expected range or set of values.
- Provide meaningful error messages: If an invalid value is encountered, provide a clear error message to aid debugging and user experience.
Final Tips
The switch-case statement is a versatile decision-making tool in C++, offering a structured and readable way to handle multiple possible code paths based on the value of an expression. By following the best practices and tips we discussed in this tutorial, you'll transform the switch-case statement from a mere control flow tool into an elegant and reliable mechanism for making decisions in your C++ programs.
If you wish to learn programming languages such as C++, you can check out upGrad’s computer science programs such as the Master’s in Computer Science Program.
Frequently Asked Questions
1. What is a switch-case statement in C++?
A switch-case statement is a control flow mechanism that allows you to select one block of code to execute from multiple options based on the value of an expression. How does a switch-case statement work?
2. How does a switch-case statement work?
It evaluates an expression and compares its value against a series of case labels. If a match is found, the code associated with that case is executed. It evaluates an expression and compares its value against a series of case labels. If a match is found, the code associated with that case is executed. What is the syntax of a switch-case statement?
3. What is the syntax of a switch-case statement?
The syntax is: switch (expression) {case constant1:// code to execute if expression == constant1break;case constant2:// code to execute if expression == constant2break;// ... other casesdefault: // optional// code to execute if no other case matches} switch ( expression ) { case constant1 : // code to execute if expression == constant1 break ; case constant2 : // code to execute if expression == constant2 break ; // ... other cases default : // optional // code to execute if no other case matches } Can I use variables in switch-case statements?
4. Can I use variables in switch-case statements?
No, you can only use constant integral or enumeration expressions in case labels. No, you can only use constant integral or enumeration expressions in case labels. Are switch-case statements limited to integral types?
5. Are switch-case statements limited to integral types?
Yes, the switch expression must be evaluated to an integral or enumeration type. Yes, the switch expression must be evaluated to an integral or enumeration type. Can I use strings in switch-case statements?
6. Can I use strings in switch-case statements?
No, directly. But you can use hash functions or lookup tables to indirectly map strings to integral values for use in switch-case. No, directly. But you can use hash functions or lookup tables to indirectly map strings to integral values for use in switch-case . What is the purpose of the default case?
7. What is the purpose of the default case?
The default case is optional and executes if none of the case labels match the expression value. Can I nest switch-case statements?
8. Can I nest switch-case statements?
Yes, you can have nested switch-case statements, where one switch statement is placed within the code block of another.

Author|416 articles published


upGrad Learner Support
Talk to our experts. We are available 7 days a week, 10 AM to 7 PM
Indian Nationals
Foreign Nationals
Disclaimer
The above statistics depend on various factors and individual results may vary. Past performance is no guarantee of future results.
The student assumes full responsibility for all expenses associated with visas, travel, & related costs. upGrad does not .