Working professionals
Doctorate
For All Domains

IIITB & IIM, Udaipur
Chief Technology Officer & AI Leadership Programme
Swiss School of Business and Management
Global Doctor of Business Administration from SSBM
Edgewood University
Doctorate in Business Administration by Edgewood University
Golden Gate University
Doctor of Business Administration From Golden Gate University
Rushford Business School
Doctor of Business Administration from Rushford Business School, SwitzerlandGolden Gate University
MBA to DBA PathwayLeadership / AI
Golden Gate University
DBA in Emerging Technologies with Concentration in Generative AIGolden Gate University
DBA in Digital Leadership from Golden Gate University, San FranciscoArtificial Intelligence
Degree / Exec. PG

IIIT Bangalore
Executive Diploma in Machine Learning and AI
OPJ Global University
Master’s Degree in Artificial Intelligence and Data Science
Liverpool John Moores University
Master of Science in Machine Learning & AIGolden Gate University
DBA in Emerging Technologies with Concentration in Generative AIExecutive Certificate
IIITB & IIM, Udaipur
Chief Technology Officer & AI Leadership Programme
IIIT Bangalore
Executive Programme in Generative AI for Leaders
upGrad | Microsoft
Gen AI Foundations Certificate Program from MicrosoftupGrad | Microsoft
Gen AI Mastery Certificate for Data AnalysisupGrad | Microsoft
Gen AI Mastery Certificate for Software DevelopmentupGrad | Microsoft
Gen AI Mastery Certificate for Managerial ExcellenceOffline Bootcamps

upGrad
Data Science and AI-MLData Science
Degree / Exec. PG
O.P Jindal Global University
Master’s Degree in Artificial Intelligence and Data ScienceIIIT Bangalore
Executive Diploma in Data Science & AILiverpool John Moores University
Master of Science in Data ScienceExecutive Certificate
upGrad | Microsoft
Gen AI Foundations Certificate Program from MicrosoftupGrad | Microsoft
Gen AI Mastery Certificate for Data AnalysisupGrad | Microsoft
Gen AI Mastery Certificate for Software DevelopmentupGrad | Microsoft
Gen AI Mastery Certificate for Managerial ExcellenceupGrad | Microsoft
Gen AI Mastery Certificate for Content CreationOffline Bootcamps
upGrad
Data Science and AI-MLupGrad
Data AnalyticsGen AI & Agentic AI
Gen AI & Agentic AI
Masters

Paris School of Business
Master of Science in Business Management and TechnologyO.P.Jindal Global University
MBA (with Career Acceleration Program by upGrad)Edgewood University
MBA from Edgewood UniversityO.P.Jindal Global University
MBA from O.P.Jindal Global UniversityGolden Gate University
MBA to DBA PathwayExecutive Certificate

IMT, Ghaziabad
Advanced General Management ProgramMarketing
Executive Certificate
upGrad | Microsoft
Gen AI Foundations Certificate Program from MicrosoftupGrad | Microsoft
Gen AI Mastery Certificate for Content CreationOffline Bootcamps
upGrad
Digital MarketingManagement
Degree
O.P Jindal Global University
MSc in International Accounting & Finance (ACCA integrated)Paris School of Business
Master of Science in Business Management and Technology
Golden Gate University
Master of Arts in Industrial-Organizational PsychologyExecutive Certificate
Education
Education

Northeastern University
Master of Education (M.Ed.) from Northeastern UniversityEdgewood University
Doctor of Education (Ed.D.)Edgewood University
Master of Education (M.Ed.) from Edgewood UniversityProject Management
Accreditation Certifications
-7f4b4f34e09d42bfa73b58f4a230cffa.webp&w=128&q=75)
Knowledgehut
Project Management Masters Certification Program-ae8d039bbd2a41318308f8d26b52ac8f.svg)
Knowledgehut
Change ManagementKnowledgehut
Project Management TechniquesKnowledgehut
Oracle Primavera P6 V18.8Knowledgehut
PMP® Certification
Knowledgehut
PRINCE2® FoundationKnowledgehut
PRINCE2® PractitionerFresh graduates
Data Science
Bootcamp
Offline Bootcamps
upGrad
Data Science and AI-MLupGrad
Data AnalyticsManagement
Marketing
Bootcamp
upGrad Campus
Advanced Certificate in Performance MarketingOffline Bootcamps
upGrad
Digital Marketing- Study abroad
- Offline centres
More


2. HTML Basics
3. HTML Syntax
9. HTML Head
10. HTML Title
11. HTML Styles
12. HTML Paragraphs
13. HTML Symbols
14. HTML Emojis
15. HTML Formatting
16. HTML Entities
17. HTML Audio
18. HTML Images
19. HTML Lists
20. HTML Links
21. SVG in HTML
22. HTML Forms
23. HTML Video
24. HTML Canvas
25. Adjacency Lists
26. HTML Input Types
27. HTML Tables
31. HTML Layout
33. HTML Div
37. HTML Iframes
40. HTML Code
41. HTML Colors
42. HTML CSS
43. HTML Editors
44. HTML Examples
45. Class in HTML
46. HTML Exercises
47. HTML ID
49. HTML Table Style
50. HTML Script
Mastering HTML Elements: A Comprehensive Guide
One of the most fundamental concepts I have learned in my journey as a web developer is HTML elements. HTML elements are used to create the structure of the website, and each serves a different purpose.
With this tutorial I’d attempt to give you a basic idea about HTML elements and attributes.
What Exactly are HTML Elements
One of the first things you will realize when learning HTML programming is that the web page you develop in HTML is not one body but many small portions. Let me explain with an example.
Take the example of a car. A car is not just one entity but a culmination of many small parts. For example, a car consists of an engine, doors, wheels, windows, mirrors, seats, and so on and so forth. Similarly, web pages are made of a lot of tiny components called HTML elements.
Now, all HTML elements follow certain rules. Let me show you what is the syntax of these elements.
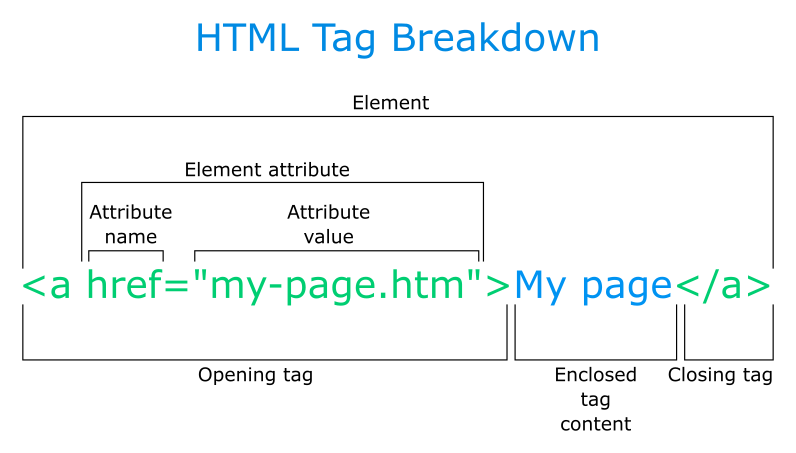
Let me dissect the above example.
- Opening tag: The element begins with an opening tag encased in angle brackets (< and >). It comprises the element name (e.g., <div>, <p>, <a>) and optional attributes. In this case, it is <a href=”my-page.htm”>.
- Attribute: They give additional information about the element and are defined within the opening tag. They are written as name-value pairs separated by an equal sign (=) and surrounded by double quotations (""). In this case, it is href=”my-page.htm”.
- Content: An element's content is the information or markup that is nested between the opening and closing tags. Some elements are self-closing (void), with no content between tags.
- Closing tag: Most elements have a closing tag that indicates the conclusion of the element's content. Closing tags begin with </, followed by the element name, and ending with >. In this case, it is </a>.
Here is a commonly used HTML elements list to get you started.
- <script> contains embedded JavaScript code or links to external JavaScript files.
- <style> defines CSS styles directly in the HTML document so that external CSS is not needed.
- The <body> section contains the webpage's visible content, such as text, graphics, links, etc.
- <h1> to <h6> are headings of different sizes, with <h1> being the largest and <h6> being the smallest.
- <p> denotes a paragraph of text.
- <a> generates links to other web pages or resources.
- <img> adds images to the webpage.
- The <ul> tag defines an unordered list.
- The <ol> tag defines an ordered list.
- <li> identifies list elements within <ul> or <ol> lists.
- <div> is a generic container for grouping and decorating content.
- <span> is a generic inline container for decorating text or tiny sections of material.
- <table> is used to define a table.
- <tr> tag represents a table row within a <table> element.
- <th> tag is used to define a table header cell within a <tr> element.
- <td> tag is used to define a table data cell within a <tr> element.
HTML Elements vs Tags
Elements and tags in HTML are often used interchangeably, which can be very confusing. In this section of the tutorial, I will explain how elements are different from tags.
Point of difference | HTML elements | HTML tags |
Definition | An HTML element is the primary building block for a web page. | An HTML tag is a specific syntax for defining an HTML element. |
Composition | It typically includes an opening tag, content, and a closing tag. | It typically consists of the tag name enclosed in a pair of angle brackets. |
Examples | Include paragraphs (<p>), links (<a>), images (<img>), and divisions (<div>). | Include <p> to open paragraphs, </p> to close paragraphs, and <a> to open links, among others. |
Syntax | Self-closing (void) elements, like <br> for line breaks or <img> for images, do not require a closing tag. | Tags can be opened (<tagname>) to start an element or closed (</tagname>) to end it. |
Examples of HTML Elements
There are a lot of HTML elements and tags in HTML coding. In this section of the tutorial, let me discuss some common HTML elements with examples.
Paragraphs and Headings
Paragraphs and headings are basic HTML elements of text. We use <h1> to <h6> tags for headings, where <h1> is the largest font size and <h6> is the smallest. For paragraphs, we use the <p> tag. Let me show you an example program to explain the syntax.
Code:
<!DOCTYPE html>
<html lang="en">
<head>
<meta charset="UTF-8">
<meta name="viewport" content="width=device-width, initial-scale=1.0">
<title>Paragraphs and Headings Example</title>
</head>
<body>
<h1> Heading in h1 </h1>

<h2> Heading in h2 </h2>
<p>This is the content of the first paragraph.</p>

<h3> Heading in h3 </h3>
<p>This is the content of the second paragraph.</p>

<h4> Heading in h4 </h4>
<p>This is the content of the third paragraph.</p>

<h5> Heading in h5 </h5>
<p>This is the content of the fourth paragraph.</p>

<h6> Heading in h6 </h6>
<p>This is the content of the fourth paragraph.</p>
</body>
</html>
In the above example, we have used all the heading sizes from <h1> to <h6>. Under each heading, we have incorporated a paragraph.
List
We can also incorporate lists into HTML. There are two types of lists in HTML: ordered and unordered lists. Let me show you an example program to explain the concept better.
Code:
<!DOCTYPE html>
<html lang="en">
<head>
<meta charset="UTF-8">
<meta name="viewport" content="width=device-width, initial-scale=1.0">
<title>List Example</title>
</head>
<body>
<h2>Unordered List Example</h2>
<ul>
<li> unordered list item 1</li>
<li>unordered list item 2</li>
<li>unordered list item 3</li>
</ul>
<h2> Ordered List Example </h2>
<ol>
<li> ordered list item 1 </li>
<li> ordered list item 2 </li>
<li> ordered list item 3 </li>
</ol>
</body>
</html>
In the above example, the <ul> tag creates an unordered list containing bullet points.
The <ol> creates an ordered list with sequentially numbered items. Each list item in <ul> or <ol> has its own individual <li> tag for each item.
Tables
We can also add tables to our website using HTML. Let me show you how with an example.
Code:
<!DOCTYPE html>
<html lang="en">
<head>
<meta charset="UTF-8">
<meta name="viewport" content="width=device-width, initial-scale=1.0">
<title>HTML Table Example</title>
<style>
table {
width: 100%;
border-collapse: collapse;
}
th, td {
border: 2px solid #ddd;
padding: 8px;
text-align: left;
}
th {
background-color: #f2f2f2;
font-weight: bold;
}
</style>
</head>
<body>
<h2> Table example in HTML </h2>
<table>
<tr>
<th>Name</th>
<th>Age</th>
<th>Score</th>
</tr>
<tr>
<td>John Johnson </td>
<td> 20 </td>
<td> 68 </td>
</tr>
<tr>
<td> Jane Garfield </td>
<td> 21 </td>
<td> 89 </td>
</tr>
<tr>
<td> Mike Stark </td>
<td>22</td>
<td> 98 </td>
</tr>
</table>
</body>
</html>
In the above example,
- <table> specifies the table structure.
- <tr> indicates a table row.
- <th> specifies table header cells (top row).
- The <td> tag specifies normal table cells (data cells).
I have styled the table using inline CSS, which I have included in the <head> section. CSS styles are used to control the appearance of the table, headers, and cells (such as width, borders, padding, alignment, and background color).
Style
The <style> section includes CSS rules for styling different elements in the document. Let me share an example.
Code:
<!DOCTYPE html>
<html lang="en">
<head>
<meta charset="UTF-8">
<meta name="viewport" content="width=device-width, initial-scale=1.0">
<title>Internal Style Example</title>
<style>
body {
font-family: Arial, sans-serif;
background-color: #a0f0f0;
}
h1 {
color: #ac3333;
text-align: center;
}
p {
color: #ac6666;
font-size: 16px;
line-height: 1.5;
}
.container {
max-width: 800px;
margin: 0 auto;
padding: 20px;
background-color: #bfdfff;
box-shadow: 0 2px 4px rgba(0, 0, 0, 0.1);
}
</style>
</head>
<body>
<div class="container">
<h1> Style Element Example</h1>
<p>This is an example of the style element in HTML.</p>
</div>
</body>
</html>
In the above example, we have the style element in the head of the program to include all the CSS attributes.
Nested element
A nested HTML element is when one element is inserted within another, resulting in a hierarchical structure in the HTML document. This allows you to code efficiently and helps with organizing content.
Let me share a small example to explain.
<div>
<p> This is a nested element </p>
</div>
In the above example, the paragraph is a nested element because it exists inside the <div> element, which can be called the parent element.
Summing Up
HTML elements serve as the foundation for web pages, allowing developers to structure and convey material properly. They are the building blocks of every website, no matter how complex. This tutorial has hopefully taught you the basics of elements in HTML, although there is always something new to learn as technology progresses, just like HTML5 introduced new HTML elements.
If you want to learn more complex concepts of HTML, you should definitely check out upGrad. Their courses are in collaboration with some of the best universities around the world. The courses are curated by some of the best professors in this field. Doing these certified courses is sure to add value to your skills.
Frequently Asked Questions
1. What is the main element in HTML?
The element in HTML represents a webpage's main or root element. It includes all other HTML components, such as the and . The element defines a webpage's structure and content and is the starting point for building HTML documents. The element in HTML represents a webpage's main or root element. It includes all other HTML components, such as the and . The element defines a webpage's structure and content and is the starting point for building HTML documents. How are HTML elements structured?
2. How are HTML elements structured?
Elements in HTML are composed of opening and closing tags, with material inserted between them. Opening tags begin with < and end with >, whereas closing tags begin with . There are, however, self-closing tags like , which do not need a closing tag. Elements in HTML are composed of opening and closing tags, with material inserted between them. Opening tags begin with < and end with >, whereas closing tags begin with . There are, however, self-closing tags like
, which do not need a closing tag. What are some common HTML elements?
3. What are some common HTML elements?
Some common HTML elements are
denotes a paragraph of text. generates hyperlinks. contains images.
4. Can HTML elements have attributes?
Elements may include attributes. Attributes include additional information about an element and can be used to change its behavior, appearance, or usefulness. Are HTML elements case-sensitive?
5. Are HTML elements case-sensitive?
HTML element names are not case-sensitive. This means that HTML element names can be written in capitals, lowercase, or a combination of the two, and web browsers will identify and interpret them correctly. Can HTML elements be nested?
6. Can HTML elements be nested?
HTML elements can be nested inside one another. Nesting is the process of inserting one HTML element inside another. How many elements are there in HTML?
7. How many elements are there in HTML?
The newest HTML5 specification includes 115 standard elements in HTML. These elements provide various functionalities, including text formatting, multimedia embedding, form controls, semantic organization, and more. Are there empty HTML elements?
8. Are there empty HTML elements?
Empty elements do exist in HTML. They are those with no content or text between the opening and closing tags. These tags are self-closing and take the form

Author|310 articles published


upGrad Learner Support
Talk to our experts. We are available 7 days a week, 10 AM to 7 PM
Indian Nationals
Foreign Nationals
Disclaimer
The above statistics depend on various factors and individual results may vary. Past performance is no guarantee of future results.
The student assumes full responsibility for all expenses associated with visas, travel, & related costs. upGrad does not .