All courses
Agentic AI
Agentic AI
Artificial Intelligence
Degree / Exec. PG

IIIT Bangalore
Executive Diploma in Machine Learning and AI
OPJ Global University
Master’s Degree in Artificial Intelligence and Data Science
Liverpool John Moores University
Master of Science in Machine Learning & AI
Golden Gate University
DBA in Emerging Technologies with Concentration in Generative AIExecutive Certificate

IIITB & IIM, Udaipur
Chief Technology Officer & AI Leadership Programme
IIIT-B & IIM, Udaipur
Chief Data and AI Officer Programme
IIIT Bangalore
Executive Programme in Generative AI for Leaders
upGrad | Microsoft
Gen AI Mastery Certificate for Software DevelopmentOffline Bootcamps

upGrad
Data Science and AI-MLDoctorate
For All Domains
IIITB & IIM, Udaipur
Chief Technology Officer & AI Leadership Programme
Swiss School of Business and Management
Global Doctor of Business Administration from SSBM
Edgewood University
Doctorate in Business Administration by Edgewood UniversityGolden Gate University
Doctor of Business Administration From Golden Gate University
Rushford Business School
Doctor of Business Administration from Rushford Business School, Switzerland-d9bdeff6165f4eb1ba2adcebde78e961.svg)
University of Waterloo
Chief Technology and AI Officer ProgramLeadership / AI
Golden Gate University
DBA in Emerging Technologies with a concentration in Generative and Agentic AIMachine Learning
Machine Learning
Data Science
Degree / Exec. PG
O.P Jindal Global University
Master’s Degree in Artificial Intelligence and Data ScienceIIIT Bangalore
Executive Diploma in Data Science & AILiverpool John Moores University
Master of Science in Data ScienceExecutive Certificate
upGrad | Microsoft
Gen AI Foundations Certificate Program from MicrosoftIIIT-B & IIM, Udaipur
Chief Data and AI Officer ProgrammeupGrad | Microsoft
Gen AI Mastery Certificate for Data AnalysisupGrad | Microsoft
Gen AI Mastery Certificate for Software DevelopmentupGrad | Microsoft
Gen AI Mastery Certificate for Managerial ExcellenceupGrad | Microsoft
Gen AI Mastery Certificate for Content CreationOffline Bootcamps
upGrad
Data Science and AI-MLMBA
Masters

Liverpool School of Business
Master of Business Administration from Liverpool Business School with IIM Udaipur CertificationO.P.Jindal Global University
MBA (with Career Acceleration Program by upGrad)Edgewood University
MBA from Edgewood UniversityO.P.Jindal Global University
MBA from O.P.Jindal Global UniversityExecutive Certificate

IMT, Ghaziabad
Advanced General Management ProgramMarketing
Executive Certificate
upGrad | Microsoft
Gen AI Foundations Certificate Program from MicrosoftupGrad | Microsoft
Gen AI Mastery Certificate for Content CreationOffline Bootcamps
upGrad
Digital MarketingManagement
Degree
O.P Jindal Global University
MSc in International Accounting & Finance (ACCA integrated)
Golden Gate University
Master of Arts in Industrial-Organizational PsychologyExecutive Certificate
IIIT-B & IIM, Udaipur
Chief Technology Officer & AI Leadership ProgrammeIIIT-B & IIM, Udaipur
Chief Data and AI Officer Programme
IIM Kozhikode
Human Resource Analytics Course from IIM-KupGrad | Microsoft
Gen AI Foundations Certificate Program from MicrosoftEducation
Education

Northeastern University
Master of Education (M.Ed.) from Northeastern UniversityEdgewood University
Doctor of Education (Ed.D.)Edgewood University
Master of Education (M.Ed.) from Edgewood UniversityCertifications
Project Management
Certification

Knowledgehut
Leadership And Communications In ProjectsKnowledgehut
Microsoft Project 2007/2010-ae8d039bbd2a41318308f8d26b52ac8f.svg)
Knowledgehut
Financial Management For Project ManagersKnowledgehut
Fundamentals of Earned Value Management (EVM)Knowledgehut
Fundamentals of Portfolio ManagementKnowledgehut
Fundamentals of Program Management-35c169da468a4cc481c6a8505a74826d.webp&w=128&q=75)
Knowledgehut
CAPM® CertificationsKnowledgehut
Microsoft® Project 2016Certifications & Trainings
-7f4b4f34e09d42bfa73b58f4a230cffa.webp&w=128&q=75)
Knowledgehut
PMP® CertificationKnowledgehut
PMI-RMP® CertificationKnowledgehut
PMP Renewal Learning PathKnowledgehut
Oracle Primavera P6 V18.8Knowledgehut
Microsoft® Project 2013Knowledgehut
PfMP® Certification CourseKnowledgehut
Project Planning and MonitoringPrince2 Certifications

Knowledgehut
PRINCE2® FoundationKnowledgehut
PRINCE2® PractitionerKnowledgehut
PRINCE2 Agile Foundation and PractitionerKnowledgehut
PRINCE2 Agile® Foundation CertificationKnowledgehut
PRINCE2 Agile® Practitioner CertificationManagement Certifications
Knowledgehut
Project Management Masters Certification ProgramKnowledgehut
Change ManagementKnowledgehut
Project Management TechniquesKnowledgehut
Product Management Certification ProgramKnowledgehut
Project Risk Management- Study abroad
- Offline centres
- uGSOT - B.Tech
More
%20(2)-db0b6f38da9c485faf76e366793c9b9e.webp&w=128&q=75)


2. HTML Basics
3. HTML Syntax
9. HTML Head
10. HTML Title
11. HTML Styles
12. HTML Paragraphs
13. HTML Symbols
14. HTML Emojis
15. HTML Formatting
16. HTML Entities
17. HTML Audio
18. HTML Images
19. HTML Lists
20. HTML Links
21. SVG in HTML
22. HTML Forms
23. HTML Video
24. HTML Canvas
25. Adjacency Lists
26. HTML Input Types
27. HTML Tables
31. HTML Layout
33. HTML Div
37. HTML Iframes
40. HTML Code
41. HTML Colors
42. HTML CSS
43. HTML Editors
44. HTML Examples
45. Class in HTML
46. HTML Exercises
47. HTML ID
49. HTML Table Style
50. HTML Script
HTML Form Elements
I am sure you have filled out an online form recently. Be it for an advertisement before a YouTube video or helping your friends do their project survey. Forms have become an integral part of our online experience nowadays. If you want to create your own forms using HTML, HTML form elements come in very handy.
Being a software developer myself, I use HTML form elements to create different HTML form styles very often to make dynamic and interactive forms.
What are HTML Form Elements?
HTML form elements are components that help to create interactive forms on web pages. These elements enable users to enter data, make selections, and send information to a server for processing. Common HTML form elements include.
- <input>
- <textarea>
- <button>
- <label>
We can also use form attributes in HTML like HTML form background color to further customize our forms. HTML form CSS style can also be used to make our forms look more attractive.
Different types of HTML Form Elements
There are many HTML form elements that we can use to customize our HTML forms just the way we like them. Different HTML form elements range from buttons, texts, etc.
Here, I have discussed the different HTML form elements with form tag in HTML with example.
<input> element
The input elements are used to provide the different types of fields into which the user can put the desired information into the form. There are many types of HTML form input type. They vary from the likes of text, email, numbers, etc.
Now that you have a basic idea of how the input element works in HTML forms let me give you an example to explain how to use it in your project.
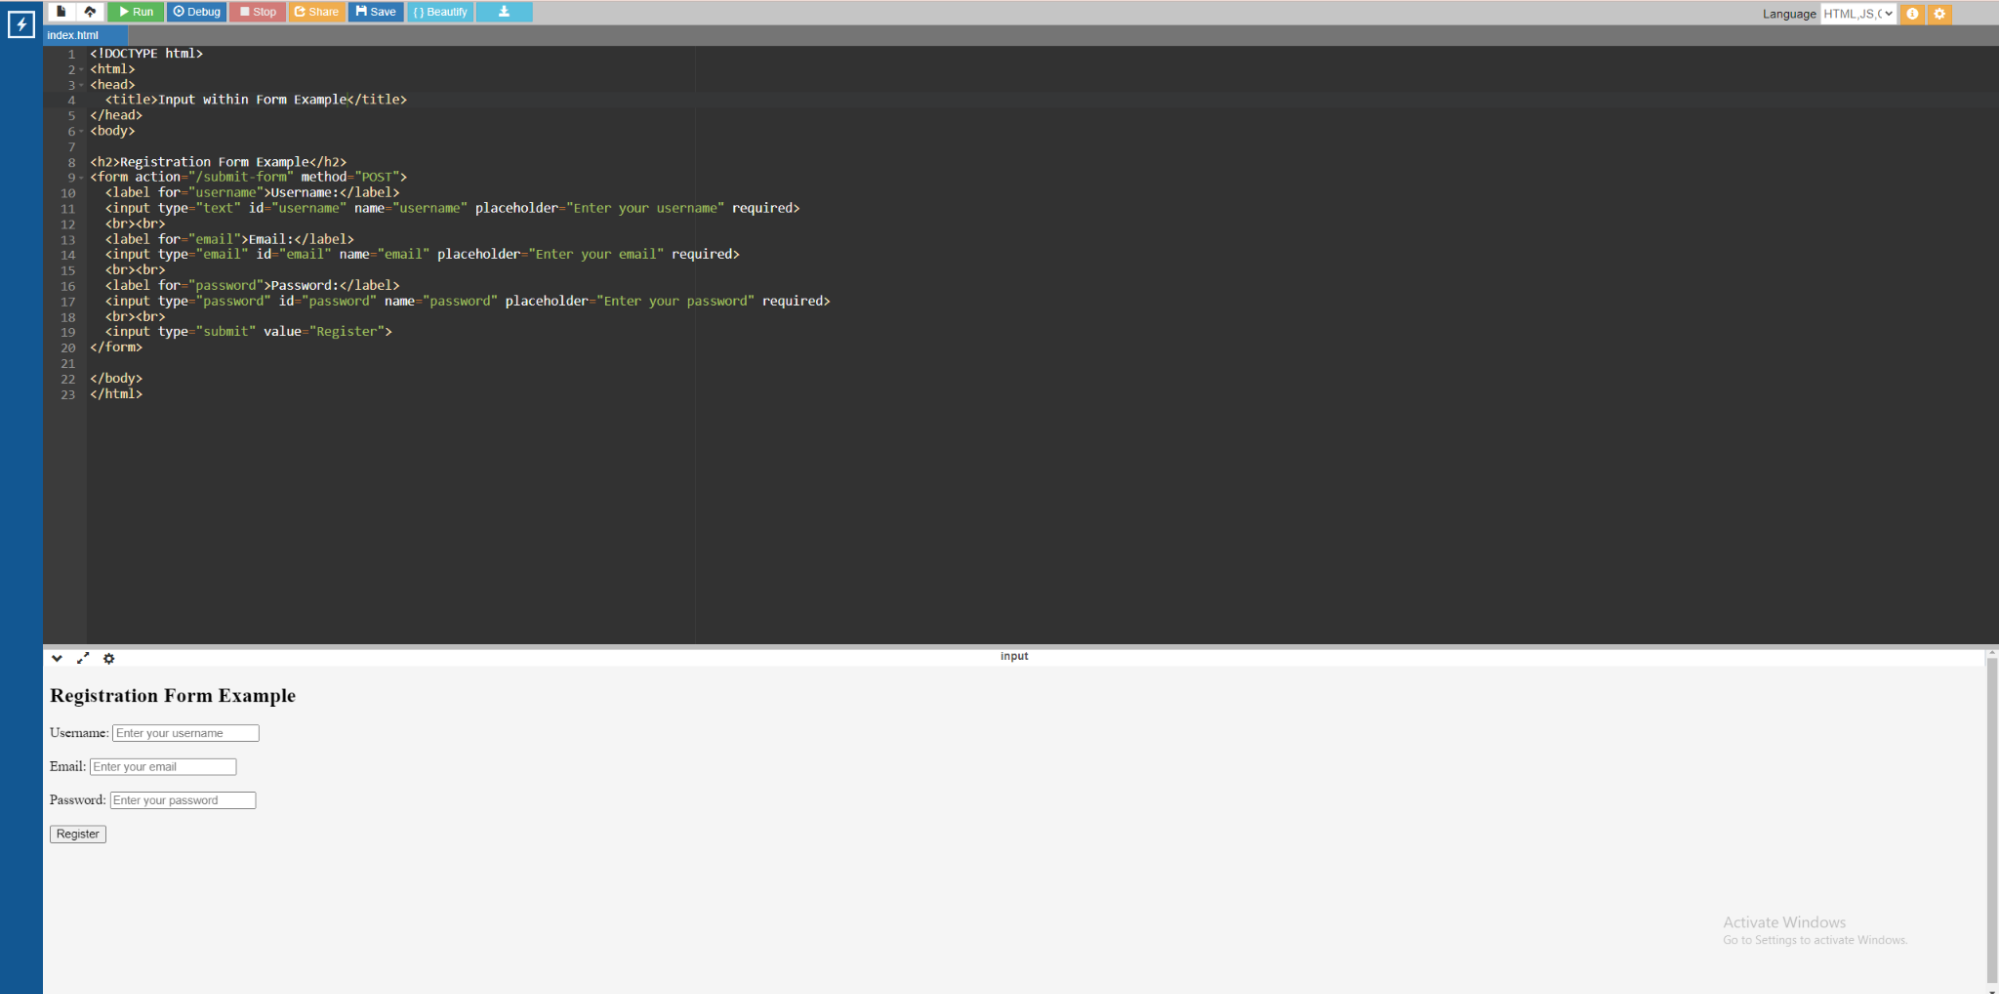
Source: Online gdb Compiler
Code:
<!DOCTYPE html>
<html>
<head>
<title>Input within Form Example</title>
</head>
<body>
<h2>Registration Form Example</h2>
<form action="/submit-form" method="POST">
<label for="username">Username:</label>
<input type="text" id="username" name="username" placeholder="Enter your username" required>
<br><br>
<label for="email">Email:</label>
<input type="email" id="email" name="email" placeholder="Enter your email" required>
<br><br>
<label for="password">Password:</label>
<input type="password" id="password" name="password" placeholder="Enter your password" required>
<br><br>
<input type="submit" value="Register">
</form>
</body>
</html>
In the above example,
- We have created a registration form named Registration Form Example.
- In the example, we have 3 fields. We have defined the type of fields in the input type.
- The first field is Username with input type text.
- The second field is Email and the input type is also email.
- The third field is Password and the input type is password as well.
- Predefining the input type makes sure that the user cannot provide any other type of information. For example, if the input type is email, then the user has to follow the basic structure of an email which is abc@xyz.com.
<label> element
The <label> element in HTML puts the name on fields such as a <input>, <textarea>, <select>, or <button> element. This helps the user immensely while using the form. It gives the user a clear picture of where to put in which information, making their lives easier. It works somewhat like the name attribute in HTML form.
To explain it better, let me share an example of an HTML form label.
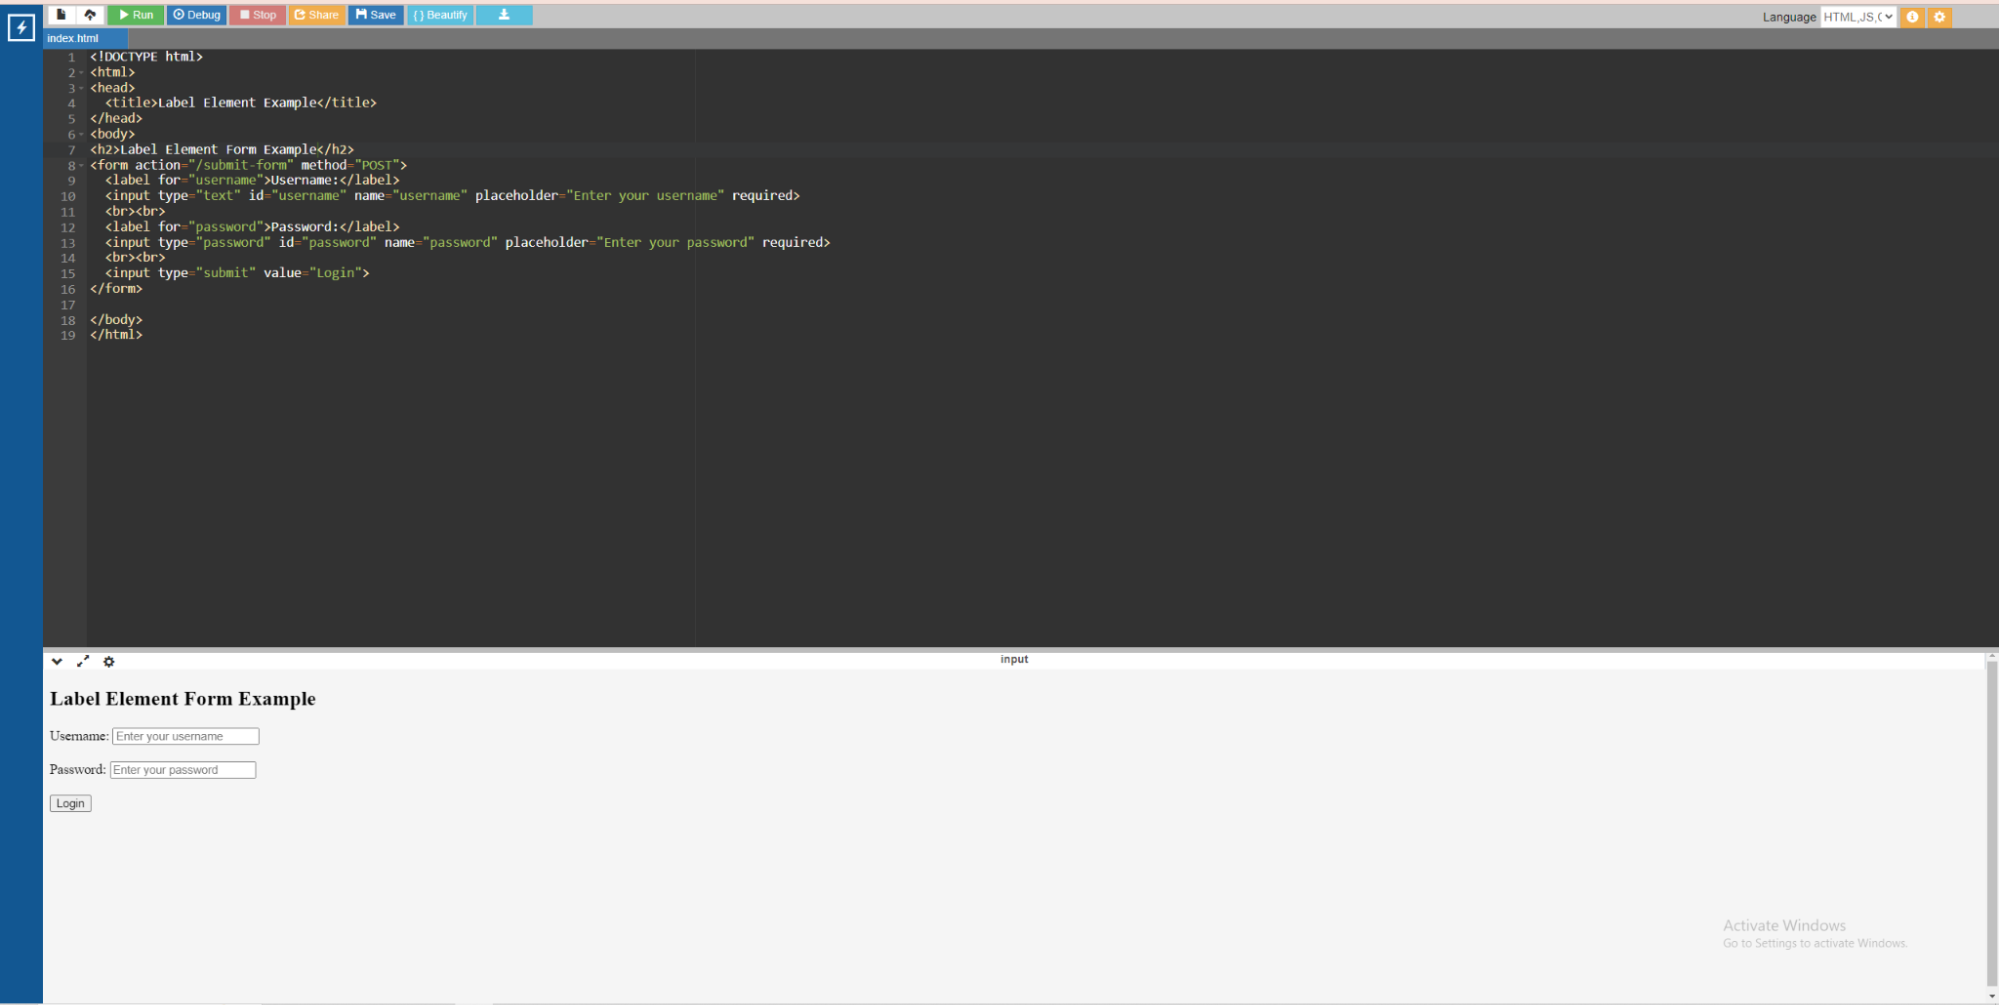
Source: Online gdb Compiler
Code:
<!DOCTYPE html>
<html>
<head>
<title>Label Element Example</title>
</head>
<body>
<h2>Label Element Form Example</h2>
<form action="/submit-form" method="POST">
<label for="username">Username:</label>
<input type="text" id="username" name="username" placeholder="Enter your username" required>
<br><br>
<label for="password">Password:</label>
<input type="password" id="password" name="password" placeholder="Enter your password" required>
<br><br>
<input type="submit" value="Login">
</form>
</body>
</html>
In the above example,
- Each <label> element is associated with its corresponding <input> element using the for attribute and the id attribute. For example, <label for="username"> is associated with <input id="username"> by using the same value for the for and id attributes.
- The text within the <label> element provides a description of the associated form control. This helps the users to know where to fill which information.
<textarea> element
The <textarea> HTML element creates a multiline text input field within a form. It is used to give a space to users to enter and edit several lines of text, such as paragraphs, comments, and other long text material.
Let me explain with the help of an example.

Source: Online gdb Compiler
Code:
<!DOCTYPE html>
<html>
<head>
<title>Textarea Element Example</title>
</head>
<body>
<form action="/submit-form" method="POST">
<label for="message">Message:</label>
<textarea id="message" name="message" rows="4" cols="50" placeholder="Enter your message" required></textarea>
<br><br>
<input type="submit" value="Submit">
</form>
</body>
</html>
In the above example,
- The rows and columns attributes specify the textarea elements’ initial size. In this scenario, rows="4" specifies the beginning height to display four lines of text, while cols="50" specifies the initial width to support 50 characters per line.
- The <label> element adds a descriptive label to the textarea, making it easier to use. In this case, it is “Enter your message”.
- The needed property makes the textarea field necessary, meaning that users must add a message before submitting the form.
<button> element
The <button> element in HTML creates a clickable button within a form or anyplace else in a webpage where user interaction is required. It can be used for a variety of purposes, including submitting forms or simply browsing another website.
Let me explain with the help of an example.
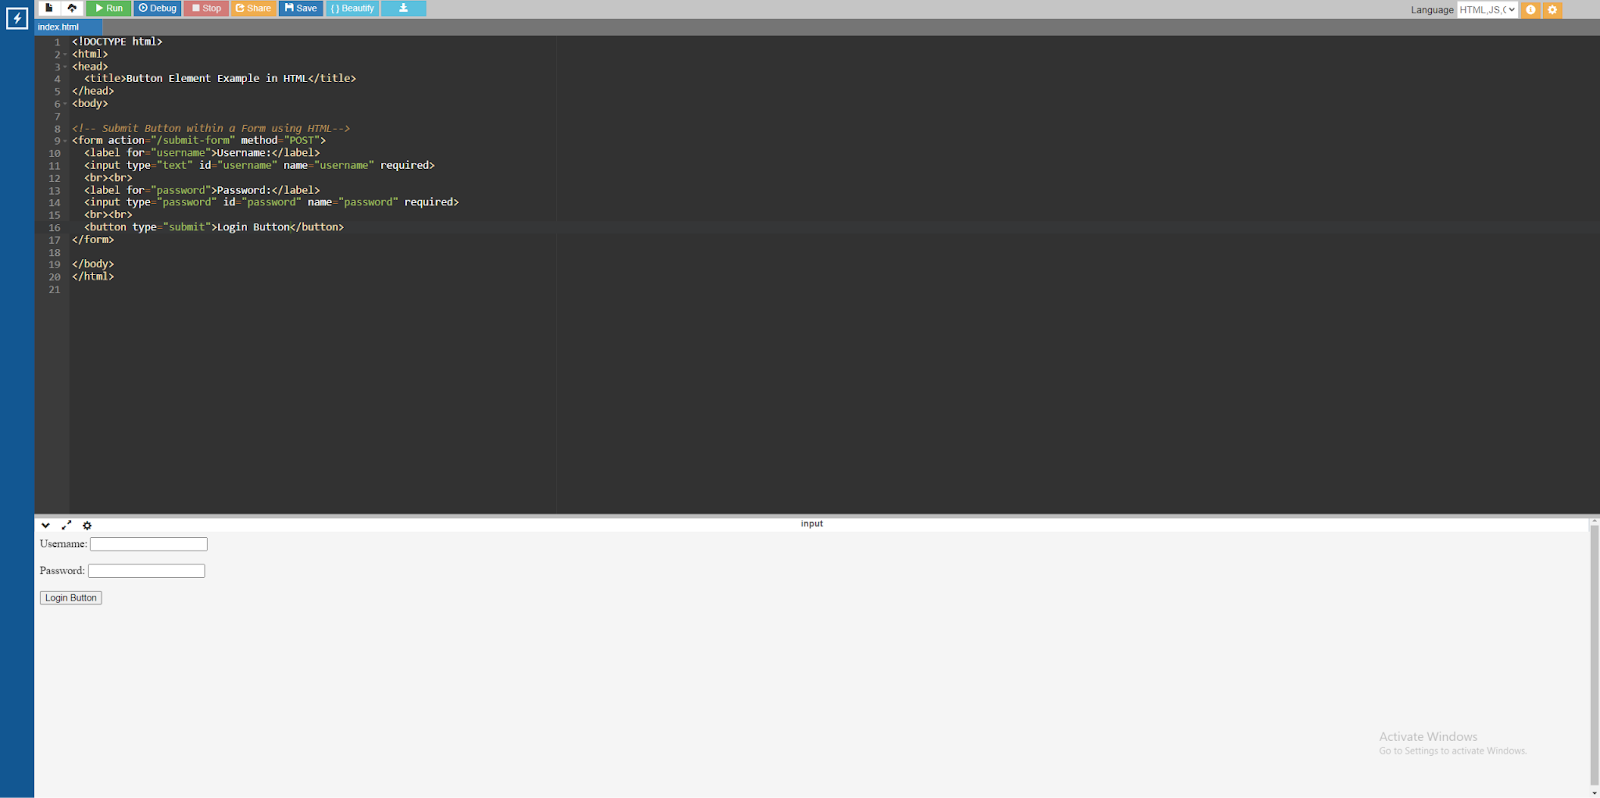
In the above example,
- The <button> element serves as a submit button within a <form>. When clicked, it sends the form data to the server using the action and method properties.
- The button's type="submit" property specifies it as the form's submit button.
<datalist> element
It is used to give a list of predefined alternatives for user input in HTML with a <input> element of type text or numeric. It enables users to select values from a dropdown list or suggest possibilities while typing into the input area. This is used to create an HTML form with select option.
Let me explain this element with the help of an example.
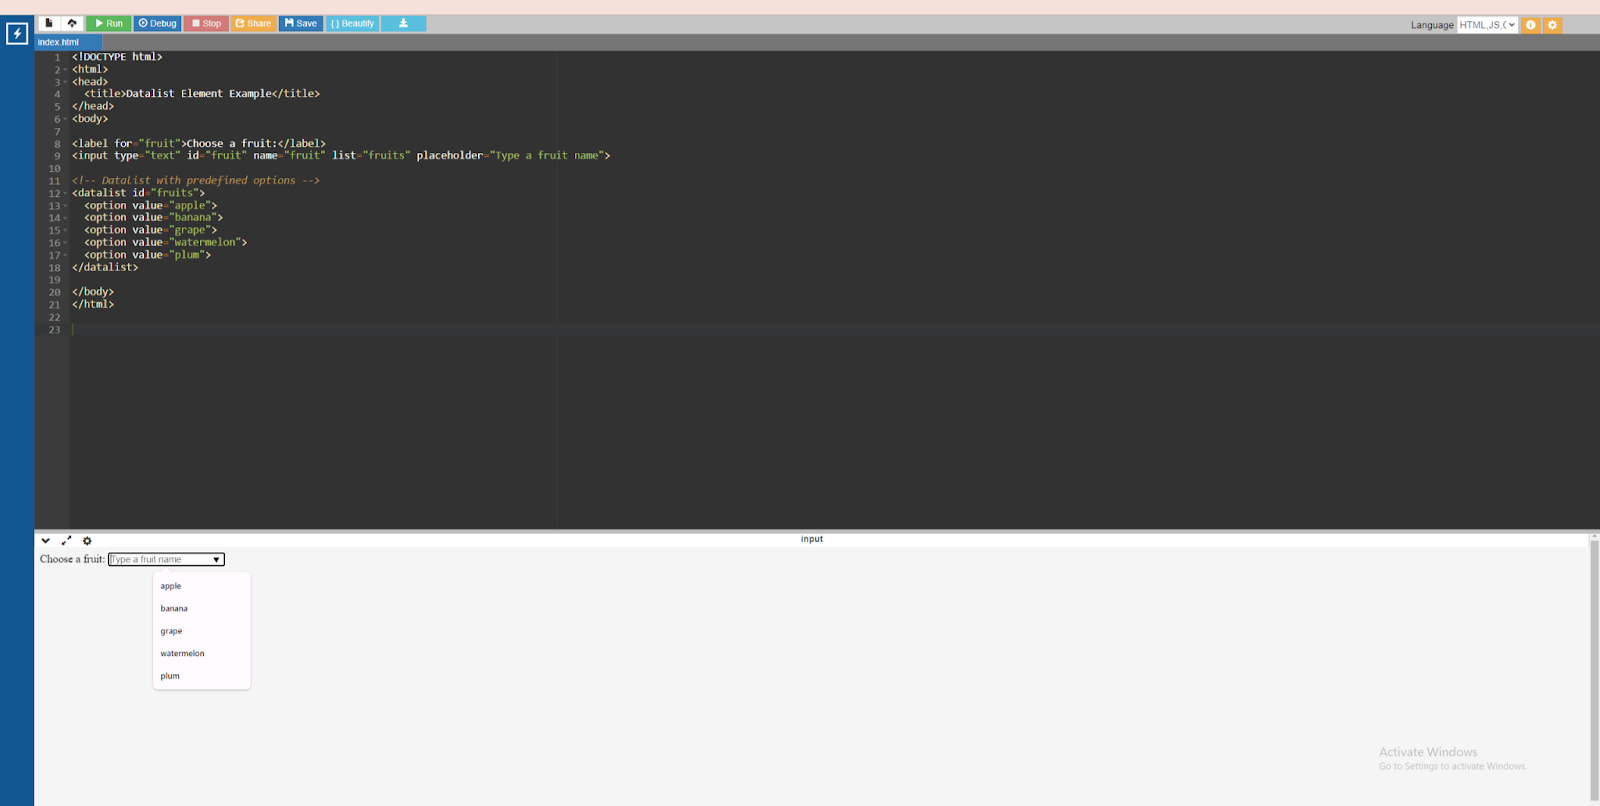
Code:
<!DOCTYPE html>
<html>
<head>
<title>Datalist Element Example</title>
</head>
<body>
<label for="fruit">Choose a fruit:</label>
<input type="text" id="fruit" name="fruit" list="fruits" placeholder="Type a fruit name">
<!-- Datalist with predefined options -->
<datalist id="fruits">
<option value="apple">
<option value="banana">
<option value="grape">
<option value="watermelon">
<option value="plum">
</datalist>
</body>
</html>
In the above example,
- The <input> element with type="text" is used to create a text input field where users can type a browser name.
- The input element's list="fruits" attribute references the <datalist> with the id browsers. This connects the input field to the data list's predefined HTML form select option.
- The <datalist> element includes a list of <option> elements, each with a specified value that users can select from a dropdown list.
- As users type into the input area, the browser will propose options from the datalist based on their input, making it easy to choose from predetermined values.
<fieldset> and <legend> elements
HTML's <fieldset> and <legend> elements group related form controls and provide a visual label or title. This combination is especially useful for organizing and structuring forms that contain multiple input fields.
Let me explain with the help of an example.
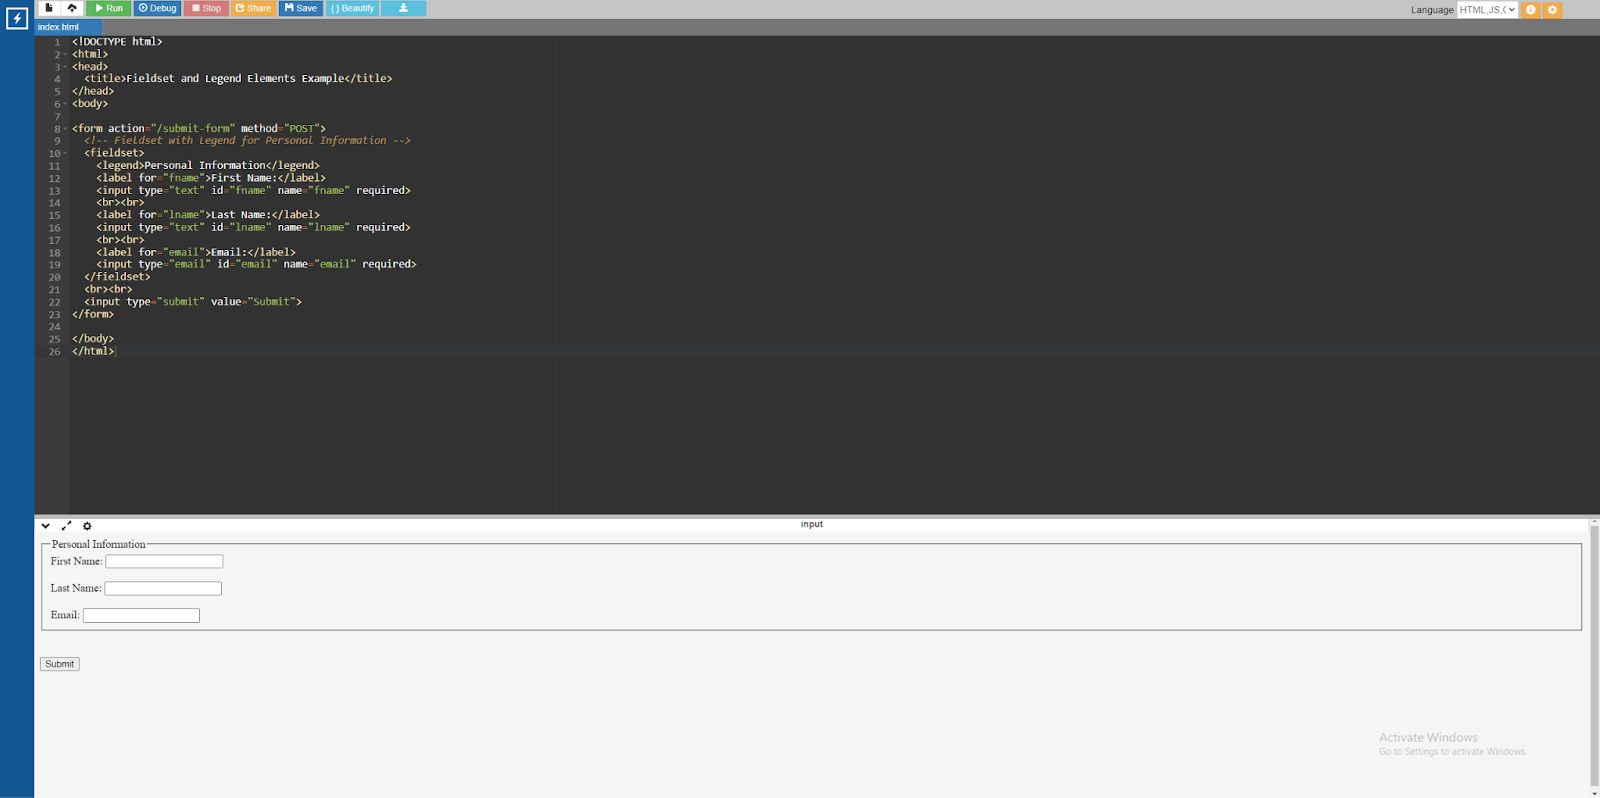
Code:
<!DOCTYPE html>
<html>
<head>
<title>Fieldset and Legend Elements Example</title>
</head>
<body>
<form action="/submit-form" method="POST">
<!-- Fieldset with Legend for Personal Information -->
<fieldset>
<legend>Personal Information</legend>
<label for="fname">First Name:</label>
<input type="text" id="fname" name="fname" required>
<br><br>
<label for="lname">Last Name:</label>
<input type="text" id="lname" name="lname" required>
<br><br>
<label for="email">Email:</label>
<input type="email" id="email" name="email" required>
</fieldset>
<br><br>
<input type="submit" value="Submit">
</form>
</body>
</html>
In the above example,
- The <fieldset> element groups related form controls. In this case, it groups the input fields for personal information (first name, last name, and email address).
- The <legend> element is positioned within the <fieldset> and acts as a title or label for the grouped controls. In this example, the fieldset is labeled "Personal Information."
- The <label> (HTML form legend) element adds a descriptive label to the input field, enhancing accessibility and usability.
- The <input> elements collect user input for the form, while the submit button (<input type="submit">) sends the form data to the specified server endpoint.
Summing Up
HTML form elements are crucial to make interactive HTML forms that are eye-catching. Nowadays, we have an extremely short attention span, and if something does not grab our attention in an instant, we tend not to use it. The different form attributes in HTML and HTML form elements help us catch the attention of the user. You can now implement HTML forms in your next HTML project and make it more interesting.
This tutorial has given you a basic understanding of HTML form elements and their subsequent HTML form tags list. However, if you want to know more advanced concepts of HTML programming I would definitely recommend checking out certified courses from a trusted platform.
One such platform is upGrad. Their courses are in collaboration with some of the best universities around the world. Their courses are also curated by some of the best professors in the field.
Frequently Asked Questions
1. What are HTML form elements?
HTML form elements serve as building blocks for building interactive forms or elements where users can fill in information. They contain text input areas, checkboxes, radio buttons, dropdown menus, buttons, and more. These elements are used within the
2. What are some common HTML form elements?
Some of the common HTML form elements are. legendInputText AreaSubmit Button legend Input Text Area Submit Button How do I create a form in HTML?
3. How do I create a form in HTML?
To create a form in HTML, we use the
4. What is the purpose of the <input> element?
The input element in HTML form is used to give a field where the user can provide data. There are various input types like text, numbers, email, and radio( used for HTML form radio button). What is the
5. What is the <textarea> element used for?
HTML's
6. Can I style HTML form elements?
Yes, you can use CSS to style HTML form elements, making them more visually appealing or better suited to your website's design. You can use styles to change the color, size, font, background, border, and spacing of form elements.

Author|983 articles published


upGrad Learner Support
Talk to our experts. We are available 7 days a week, 10 AM to 7 PM
Indian Nationals
Foreign Nationals
