All courses
Agentic AI
Agentic AI

IIIT Bangalore
Executive Programme in Generative AI for LeadersArtificial Intelligence
Degree / Exec. PG

IIIT Bangalore
Executive Diploma in Machine Learning and AI
OPJ Global University
Master’s Degree in Artificial Intelligence and Data Science
Liverpool John Moores University
Master of Science in Machine Learning & AI
Golden Gate University
DBA in Emerging Technologies with Concentration in Generative AIExecutive Certificate

IIITB & IIM, Udaipur
Chief Technology Officer & AI Leadership ProgrammeIIIT Bangalore
Executive Programme in Generative AI for Leaders
upGrad | Microsoft
Gen AI Mastery Certificate for Software DevelopmentupGrad | Microsoft
Gen AI Mastery Certificate for Managerial ExcellenceOffline Bootcamps

upGrad
Data Science and AI-MLDoctorate
For All Domains
IIITB & IIM, Udaipur
Chief Technology Officer & AI Leadership Programme
Swiss School of Business and Management
Global Doctor of Business Administration from SSBM
Edgewood University
Doctorate in Business Administration by Edgewood UniversityGolden Gate University
Doctor of Business Administration From Golden Gate University
Rushford Business School
Doctor of Business Administration from Rushford Business School, SwitzerlandGolden Gate University
Master + Doctor of Business Administration (MBA+DBA)-d9bdeff6165f4eb1ba2adcebde78e961.svg)
University of Waterloo
Chief Technology and AI Officer ProgramLeadership / AI
Golden Gate University
DBA in Emerging Technologies with Concentration in Generative AIMachine Learning
Machine Learning
Data Science
Degree / Exec. PG
O.P Jindal Global University
Master’s Degree in Artificial Intelligence and Data ScienceIIIT Bangalore
Executive Diploma in Data Science & AILiverpool John Moores University
Master of Science in Data ScienceExecutive Certificate
upGrad | Microsoft
Gen AI Foundations Certificate Program from MicrosoftupGrad | Microsoft
Gen AI Mastery Certificate for Data AnalysisupGrad | Microsoft
Gen AI Mastery Certificate for Software DevelopmentupGrad | Microsoft
Gen AI Mastery Certificate for Managerial ExcellenceupGrad | Microsoft
Gen AI Mastery Certificate for Content CreationOffline Bootcamps
upGrad
Data Science and AI-MLupGrad
Data AnalyticsMBA
Masters

Paris School of Business
Master of Science in Business Management and TechnologyO.P.Jindal Global University
MBA (with Career Acceleration Program by upGrad)Edgewood University
MBA from Edgewood UniversityO.P.Jindal Global University
MBA from O.P.Jindal Global UniversityGolden Gate University
Master + Doctor of Business Administration (MBA+DBA)Executive Certificate

IMT, Ghaziabad
Advanced General Management ProgramMarketing
Executive Certificate
Offline Bootcamps
upGrad
Digital MarketingManagement
Degree
O.P Jindal Global University
MSc in International Accounting & Finance (ACCA integrated)Paris School of Business
Master of Science in Business Management and Technology
Golden Gate University
Master of Arts in Industrial-Organizational PsychologyExecutive Certificate

IIIT-B & IIM, Udaipur
Chief Technology Officer & AI Leadership Programme
IIM Kozhikode
Human Resource Analytics Course from IIM-KupGrad | Microsoft
Gen AI Foundations Certificate Program from MicrosoftEducation
Education

Northeastern University
Master of Education (M.Ed.) from Northeastern UniversityEdgewood University
Doctor of Education (Ed.D.)Edgewood University
Master of Education (M.Ed.) from Edgewood UniversityCertifications
Project Management
Certification

Knowledgehut
Leadership And Communications In ProjectsKnowledgehut
Microsoft Project 2007/2010-ae8d039bbd2a41318308f8d26b52ac8f.svg)
Knowledgehut
Financial Management For Project ManagersKnowledgehut
Fundamentals of Earned Value Management (EVM)Knowledgehut
Fundamentals of Portfolio ManagementKnowledgehut
Fundamentals of Program Management-35c169da468a4cc481c6a8505a74826d.webp&w=128&q=75)
Knowledgehut
CAPM® CertificationsKnowledgehut
Microsoft® Project 2016Certifications & Trainings
-7f4b4f34e09d42bfa73b58f4a230cffa.webp&w=128&q=75)
Knowledgehut
PMP® CertificationKnowledgehut
PMI-RMP® CertificationKnowledgehut
PMP Renewal Learning PathKnowledgehut
Oracle Primavera P6 V18.8Knowledgehut
Microsoft® Project 2013Knowledgehut
PfMP® Certification CourseKnowledgehut
Project Planning and MonitoringPrince2 Certifications

Knowledgehut
PRINCE2® FoundationKnowledgehut
PRINCE2® PractitionerKnowledgehut
PRINCE2 Agile Foundation and PractitionerKnowledgehut
PRINCE2 Agile® Foundation CertificationKnowledgehut
PRINCE2 Agile® Practitioner CertificationManagement Certifications
Knowledgehut
Project Management Masters Certification ProgramKnowledgehut
Change ManagementKnowledgehut
Project Management TechniquesKnowledgehut
Product Management Certification ProgramKnowledgehut
Project Risk Management- Study abroad
- Offline centres
- uGSOT - B.Tech
More
%20(2)-db0b6f38da9c485faf76e366793c9b9e.webp&w=128&q=75)


2. HTML Basics
3. HTML Syntax
9. HTML Head
10. HTML Title
11. HTML Styles
12. HTML Paragraphs
13. HTML Symbols
14. HTML Emojis
15. HTML Formatting
16. HTML Entities
17. HTML Audio
18. HTML Images
19. HTML Lists
20. HTML Links
21. SVG in HTML
22. HTML Forms
23. HTML Video
24. HTML Canvas
25. Adjacency Lists
26. HTML Input Types
27. HTML Tables
31. HTML Layout
33. HTML Div
37. HTML Iframes
40. HTML Code
41. HTML Colors
42. HTML CSS
43. HTML Editors
44. HTML Examples
45. Class in HTML
46. HTML Exercises
47. HTML ID
49. HTML Table Style
50. HTML Script
HTML Tables
HTML is a basic skill to have in the field of web development. It is a skill definitely needed if you want to work in the web development sector. Questions from HTML tables are a staple in an interview for asking questions. It tests your foundation in web development.
In this tutorial, I will share with you how to build HTML tables.
An HTML table is a structure that organizes and displays data in rows and columns on a web page. It is defined in HTML with the element.
HTML Table Format
Here, let me share with you the code for HTML table as an example to give you an idea about the HTML table structure.

Code:
<!DOCTYPE html>
<html>

<head>
<title> HTML Tables </title>
</head>

<body>
<table border = "4">
<tr>
<td> Fruits </td>
<td> Color </td>
</tr>

<tr>
<td> Apple </td>
<td> Red </td>
</tr>

<tr>
<td> Banana </td>
<td>Yellow</td>
</tr>
</table>

</body>
</html>
Here, you can see what kind of output we get from using the HTML table tag. Let us dissect each element.
As you can see, we have used table border as 4. This border is thicker than the corresponding lines making up the table. Here, the <tr> tag is used to create the table rows. The <td> tag is used to create the individual cells.
HTML Table Header
Now, let me teach you how to use a table header to assign an HTML table title. Let me explain with the help of an example. Make your own HTML table examples for practice with a different header.
.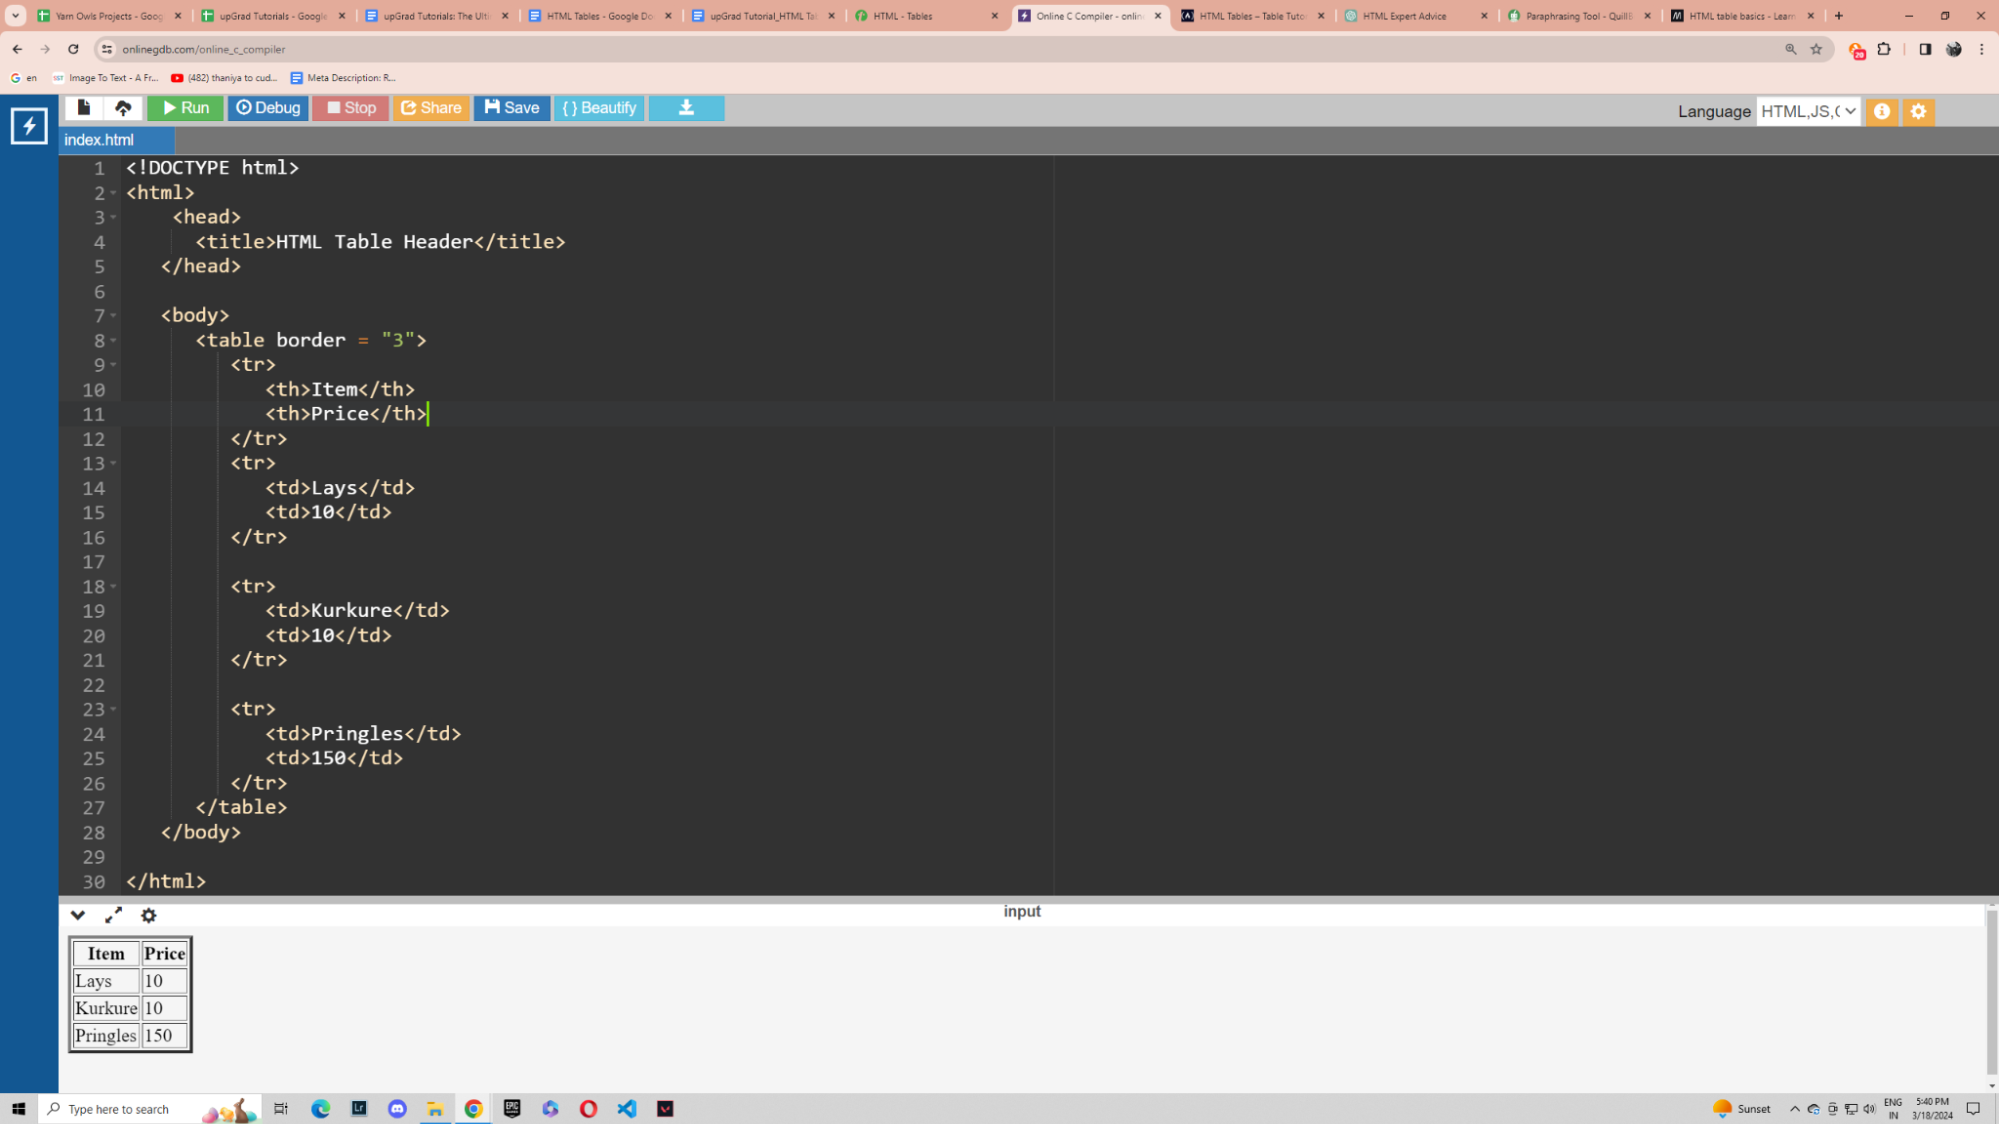
Code:
<!DOCTYPE html>
<html>
<head>
<title>HTML Table Header</title>
</head>

<body>
<table border = "3">
<tr>
<th>Item</th>
<th>Price</th>
</tr>
<tr>
<td>Lays</td>
<td>10</td>
</tr>

<tr>
<td>Kurkure</td>
<td>10</td>
</tr>

<tr>
<td>Pringles</td>
<td>150</td>
</tr>
</table>
</body>

</html>
The <th> tag is used in HTML for defining table headers. The <td> tag is replaced with <th> in this case for headers. Here, the table border thickness is mentioned as 3. If the borders are not needed, you can use border=”0”.
Rowspan and Colspan
This is generally done with the attributes colspan and rowspan functions. Tables with uneven rows and columns have specific use cases but this concept will help you visualize exactly how the changes in the code are affecting your HTML tables. Let us take a look at an example.
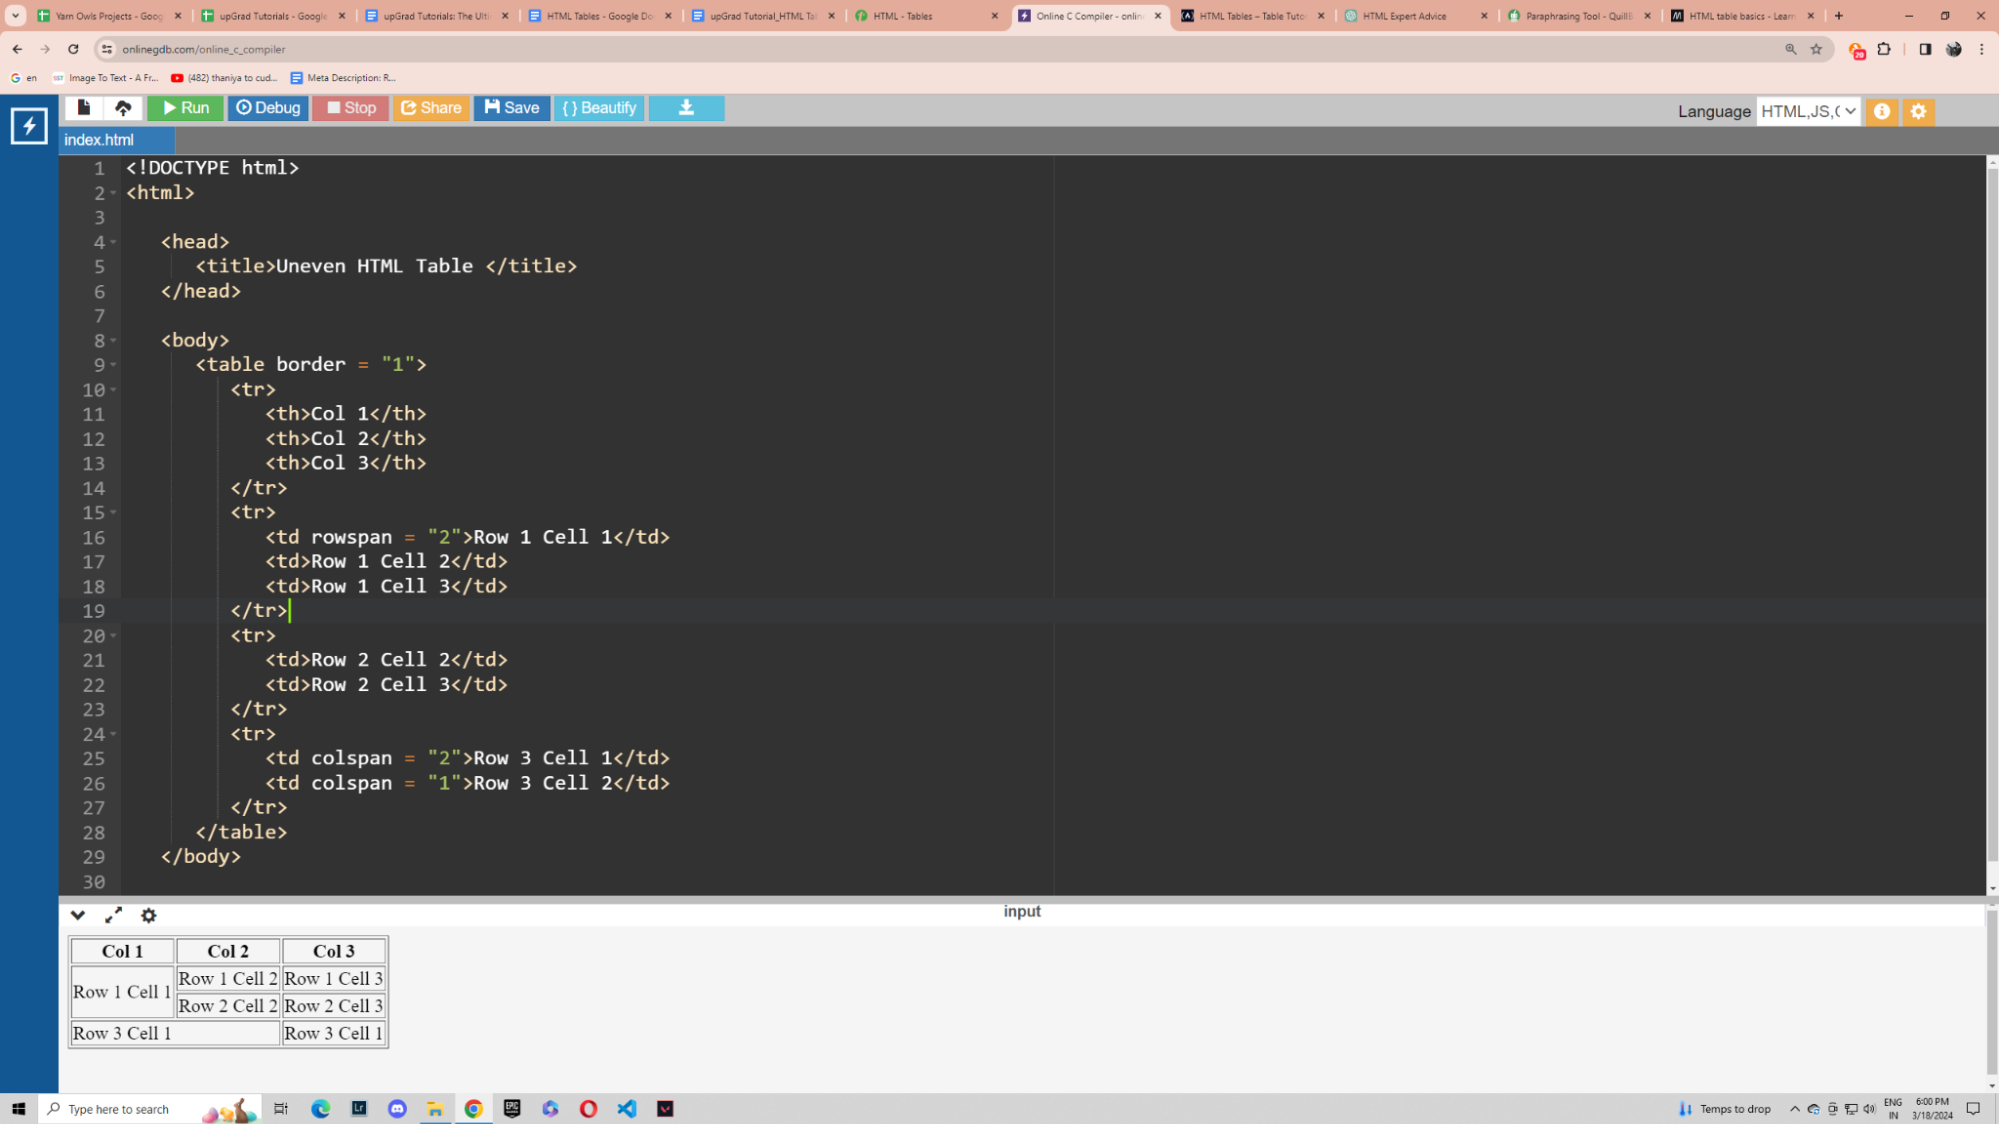
Code:
<!DOCTYPE html>
<html>

<head>
<title>Uneven HTML Table </title>
</head>

<body>
<table border = "1">
<tr>
<th>Col 1</th>
<th>Col 2</th>
<th>Col 3</th>
</tr>
<tr>
<td rowspan = "2">Row 1 Cell 1</td>
<td>Row 1 Cell 2</td>
<td>Row 1 Cell 3</td>
</tr>
<tr>
<td>Row 2 Cell 2</td>
<td>Row 2 Cell 3</td>
</tr>
<tr>
<td colspan = "2">Row 3 Cell 1</td>
<td colspan = "1">Row 3 Cell 2</td>
</tr>
</table>
</body>
</html>
Colspan and rowspan are basic HTML table attributes merge the desired number of cells together. As we can see from the above example, we have assigned rowspan=”2” for Row1, Cell 1 meaning it will now span across 2 cells vertically. Similarly, Row 3 Cell 1 has the attribute colspan=”2” meaning this cell will span across 2 cells horizontally.
Background Color and Border Color
To make the tables more inviting and attractive, we use attributes like bordercolor and bgcolor to change the HTML table border color and background color respectively. Let us look at an example now to understand HTML table styles.
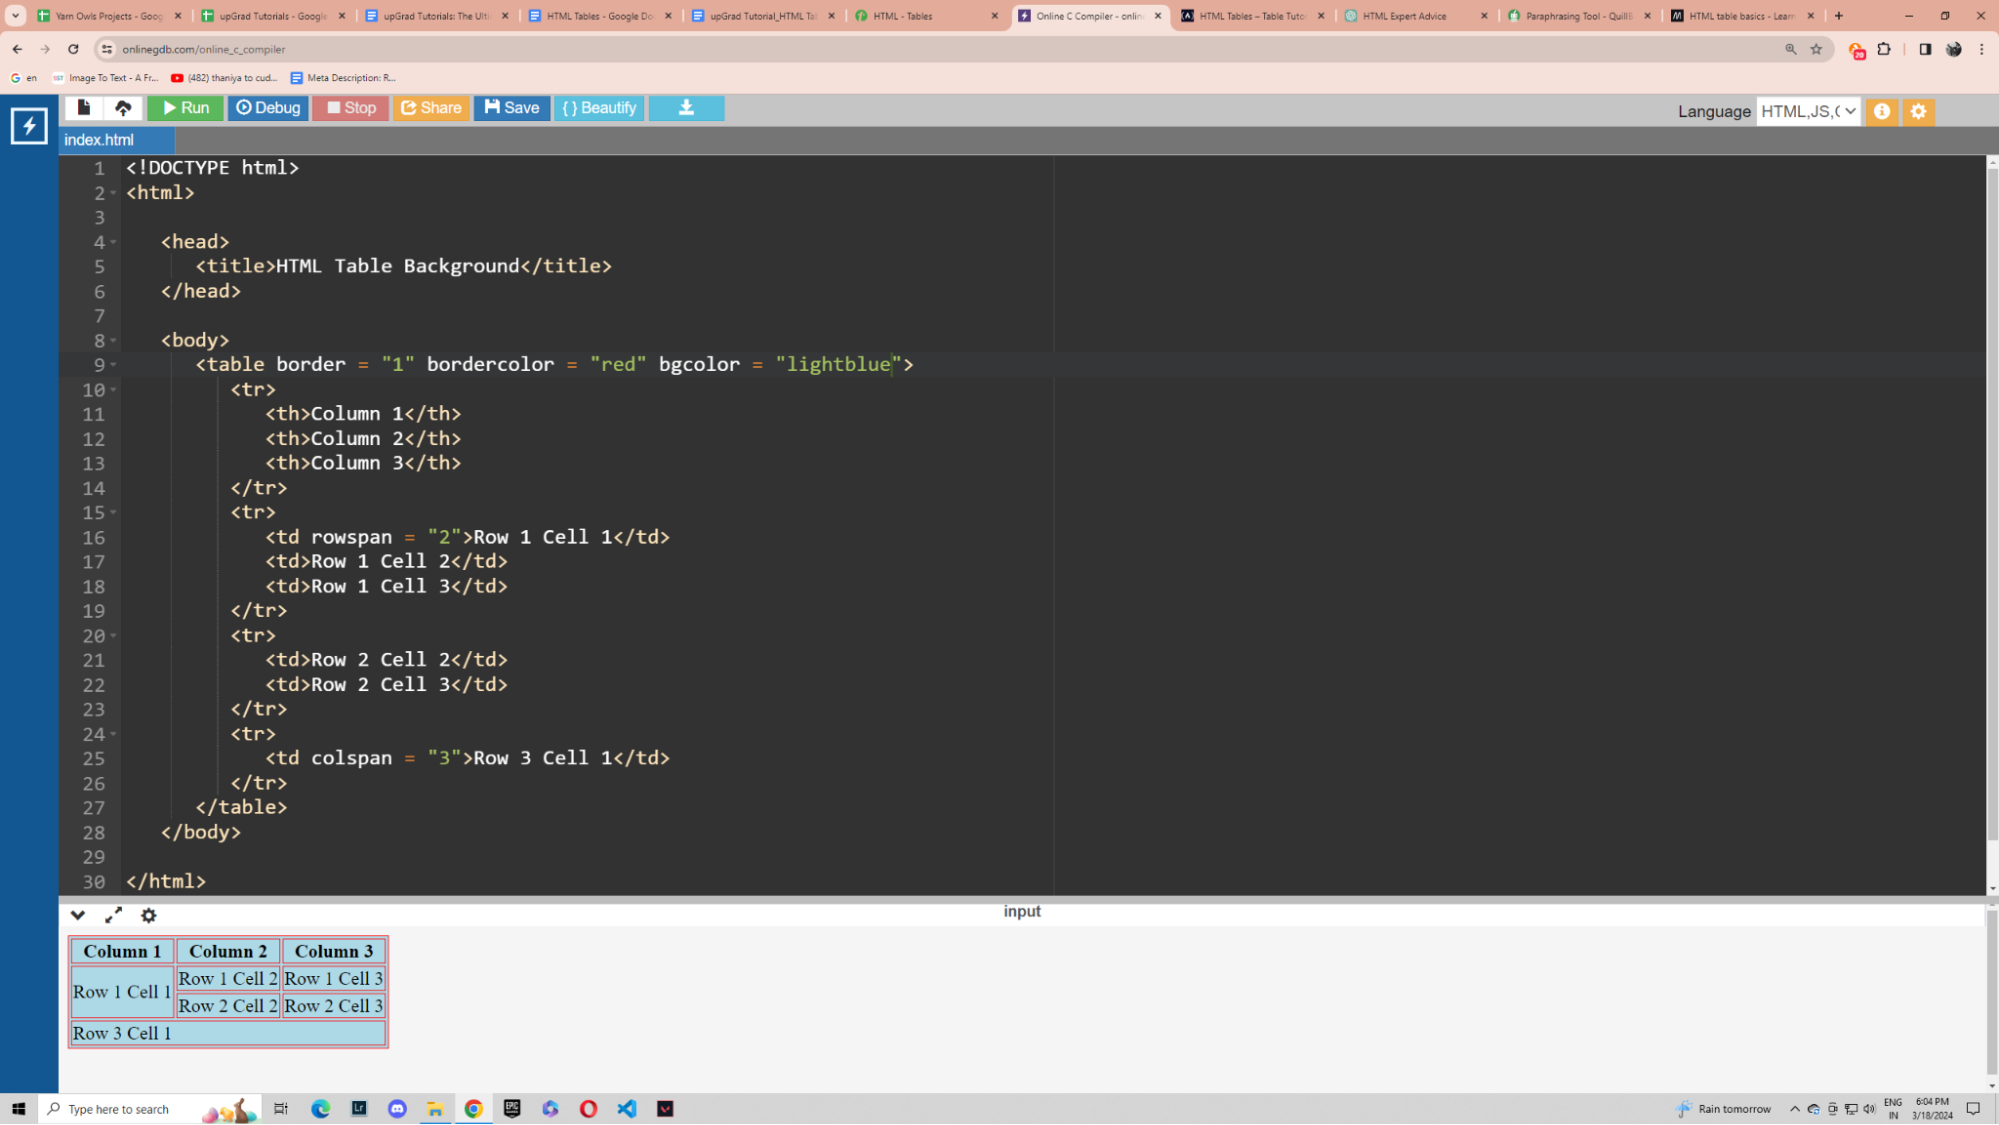
Code:
<!DOCTYPE html>
<html>

<head>
<title>HTML Table Background</title>
</head>

<body>
<table border = "1" bordercolor = "red" bgcolor = "lightblue">
<tr>
<th>Column 1</th>
<th>Column 2</th>
<th>Column 3</th>
</tr>
<tr>
<td rowspan = "2">Row 1 Cell 1</td>
<td>Row 1 Cell 2</td>
<td>Row 1 Cell 3</td>
</tr>
<tr>
<td>Row 2 Cell 2</td>
<td>Row 2 Cell 3</td>
</tr>
<tr>
<td colspan = "3">Row 3 Cell 1</td>
</tr>
</table>
</body>

</html>
Here in this example, the value of bordercolor and bgcolor has been changed to red and lightblue respectively resulting in the change in colour.
Footer
Just like the header goes on the top of the table, the footer goes at the bottom of the table. Let us understand it with the help of an example.

Code:
<!DOCTYPE html>
<html>

<head>
<title>HTML Table</title>
</head>

<body>
<table border = "1" width = "100%">
<thead>
<tr>
<td colspan = "4">This is the head of the table</td>
</tr>
</thead>

<tfoot>
<tr>
<td colspan = "4" bgcolor="yellow">This is the footer of the table</td>
</tr>
</tfoot>

<tbody>
<tr>
<td>Cell 1</td>
<td>Cell 2</td>
<td>Cell 3</td>
<td>Cell 4</td>
</tr>
</tbody>

<tbody>
<tr>
<td>Cell 5</td>
<td>Cell 6</td>
<td>Cell 7</td>
<td>Cell 8</td>
</tr>
</tbody>

</table>
</body>

</html>
As you can see, we have used the <tfoot> tag to define the footer for the table with the value “This is the footer of the table”. It spans across 4 cells because of the colspan attribute and is yellow because of the bgcolor attribute.
Nested Table
In HTML, nested tables means inserting a table inside another table. This technique can be used to design more complicated tables or to organize data at different levels. Let us look at an example of how to create nested tables in HTML.

Code:
<!DOCTYPE html>
<html>

<head>
<title>HTML Table</title>
</head>

<body>
<table border = "2" width = "100%">

<tr>
<td>
<table border = "2" width = "100%">
<tr>
<th> Name </th>
<th> Marks </th>
</tr>
<tr>
<td> Mukesh Raman </td>
<td> 87 </td>
</tr>
<tr>
<td> Aziz Md </td>
<td> 70 </td>
</tr>
<tr>
<td> Mumtaz Khan </td>
<td> 75 </td>
</tr>
</table>
</td>
</tr>

</table>
</body>

</html>
How to Include a Caption in HTML Tables
Captions help convey what the table is showing. It is basically a name card for the HTML tables. Let’s see how to include a caption in HTML tables with the help of an example.
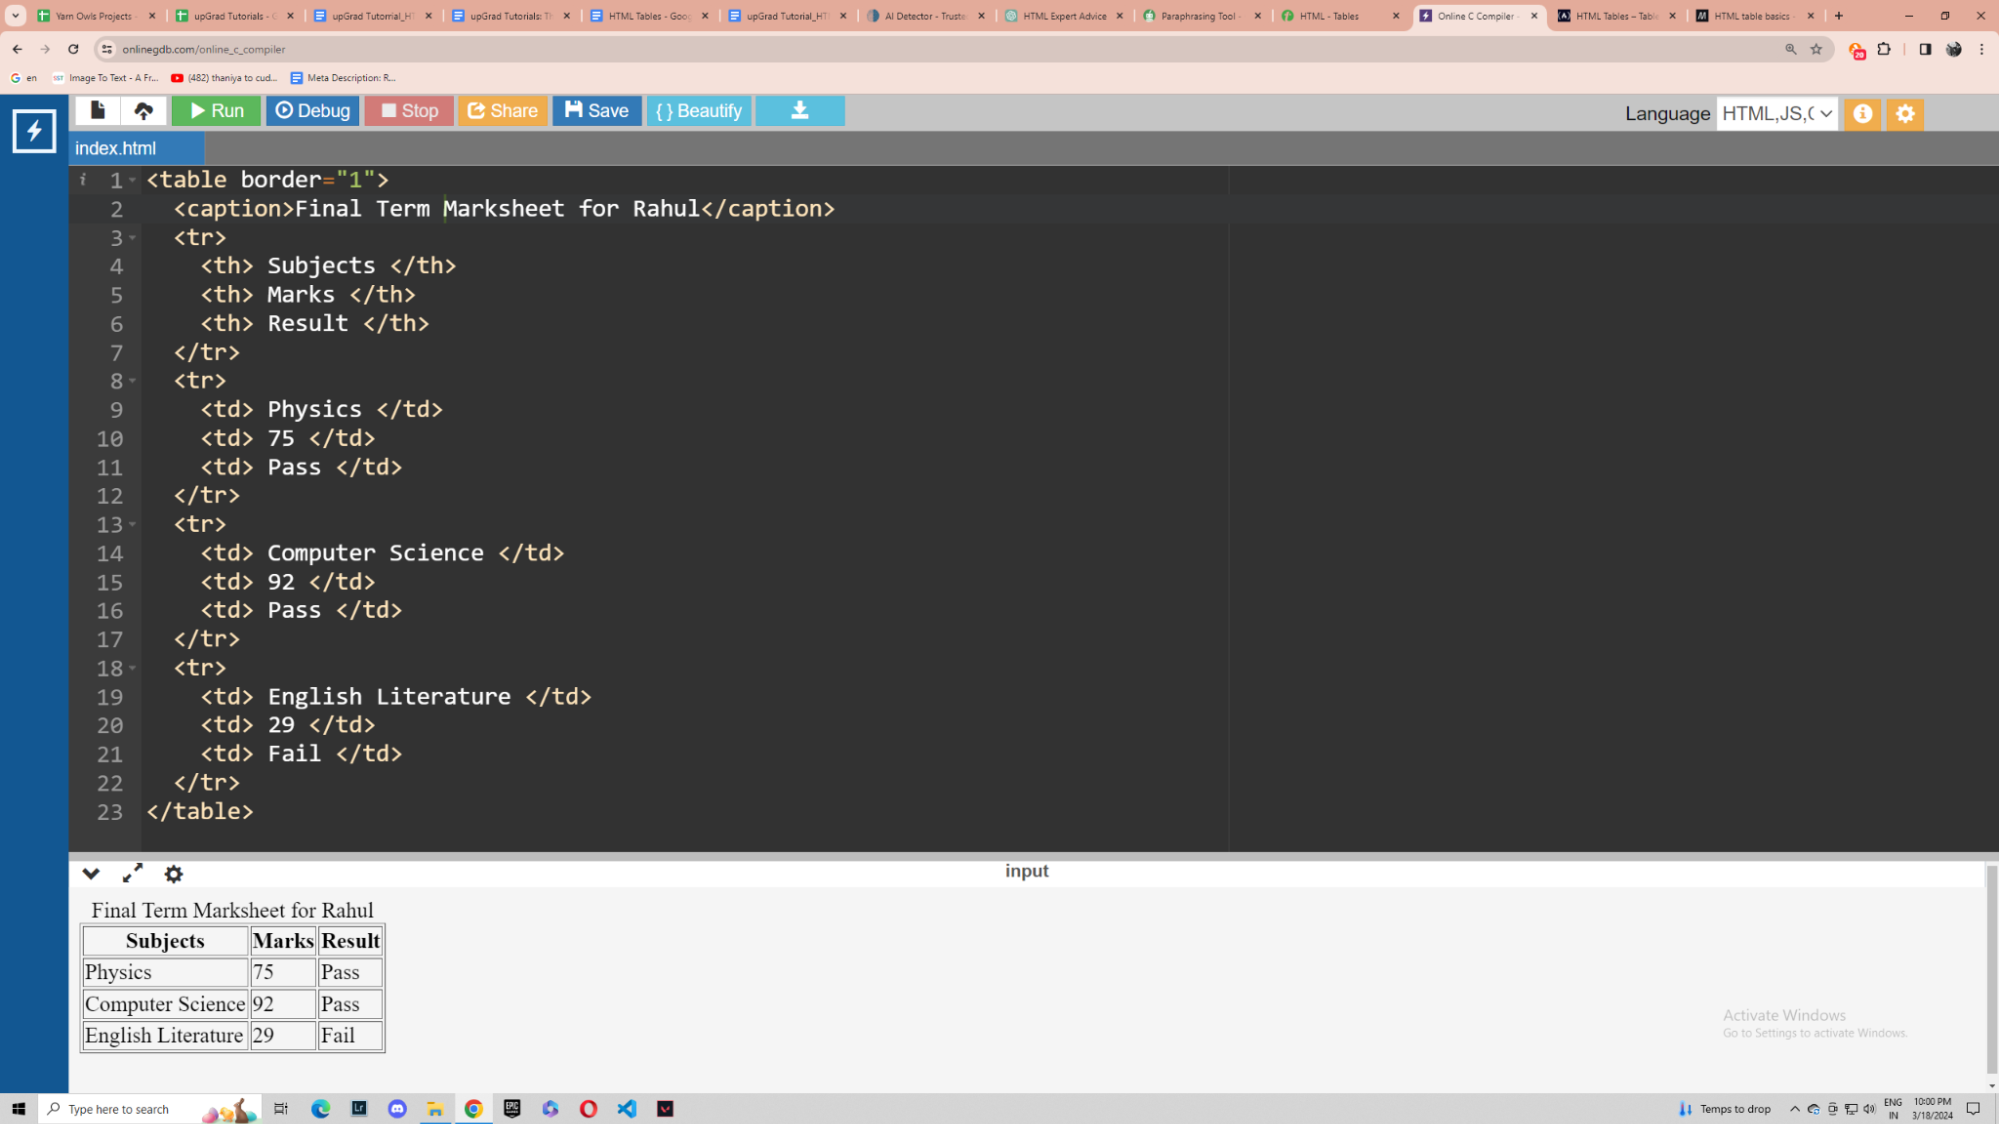
Code:
<table border="1">
<caption>Final Term Marksheet for Rahul</caption>
<tr>
<th> Subjects </th>
<th> Marks </th>
<th> Result </th>
</tr>
<tr>
<td> Physics </td>
<td> 75 </td>
<td> Pass </td>
</tr>
<tr>
<td> Computer Science </td>
<td> 92 </td>
<td> Pass </td>
</tr>
<tr>
<td> English Literature </td>
<td> 29 </td>
<td> Fail </td>
</tr>
</table>
As we can see, the <caption> tag is used to specify the caption Final Term Marksheet for Rahul.
Altering Table Height and Width
The width and height characteristics can be used to specify a table's dimensions. We can define table width and height in pixels or as a percentage of the available screen area. Let me show with the help of an example.
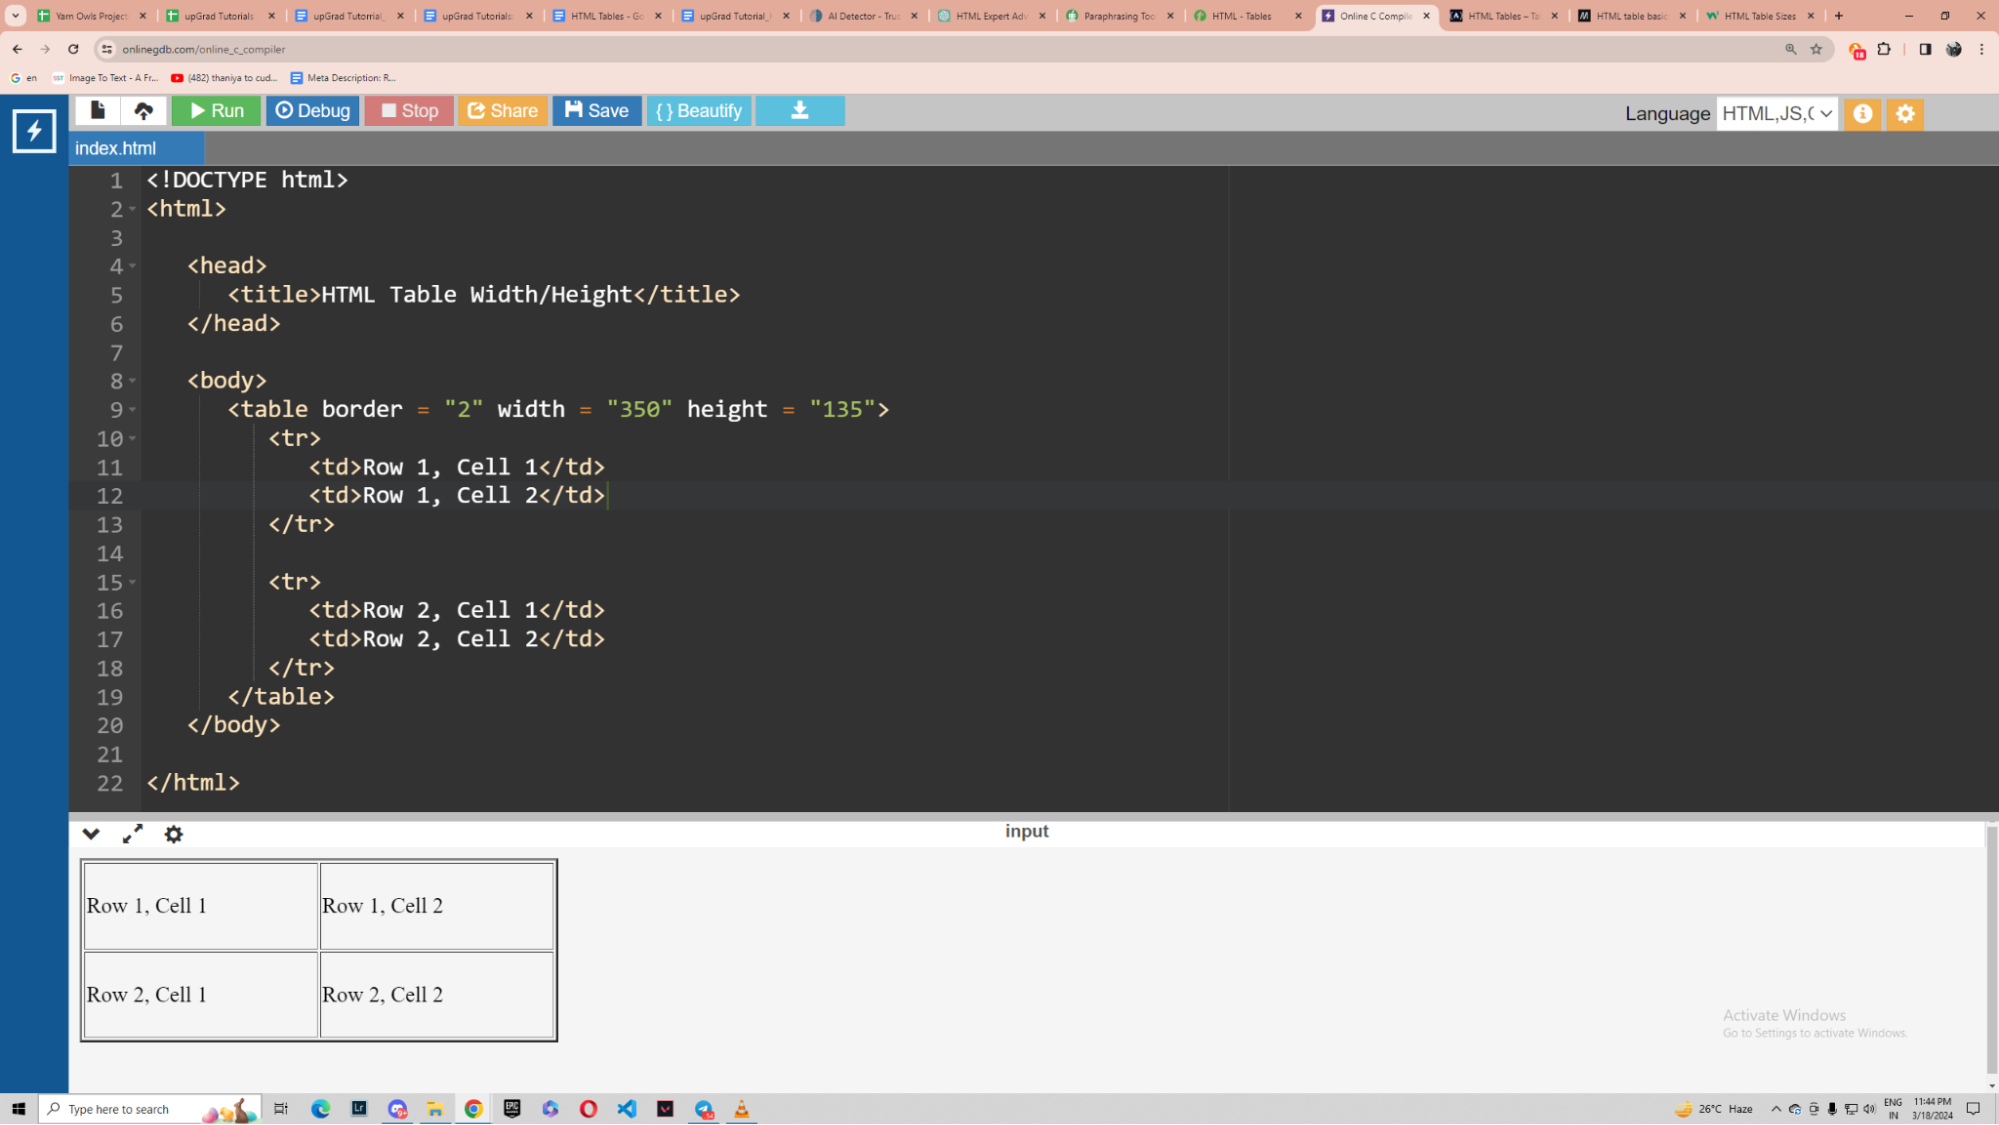
Code:
<!DOCTYPE html>
<html>

<head>
<title>HTML Table Width/Height</title>
</head>

<body>
<table border = "2" width = "350" height = "135">
<tr>
<td>Row 1, Cell 1</td>
<td>Row 1, Cell 2</td>
</tr>

<tr>
<td>Row 2, Cell 1</td>
<td>Row 2, Cell 2</td>
</tr>
</table>
</body>

</html>
As you can see from the above example, the width and height attributes are used to alter the dimensions of the table. Here, the width and height attributes are set as 350 and 135 units respectively.
Functionality
In this section, I am going to explain when to use tables in your HTML-based web page or web application.
Comparisons
Tables are a fantastic way to compare data. Say you want to compare the prices of two items ramen and noodles with respect to their prices of 500 and 95. A table gives you a visual representation of the data and makes it easier to compare.
Overview of Data
Tables can also be used when we want to showcase a complete overview of data regarding something specific. For example, tables are a great way to showcase marks obtained by a student in a test in different subjects. If you have noticed, tables are also popularly used to show rankings in a tournament.
Large Data Collections
When there is a large list of data and corresponding value pairs, tables work as a godsend. It makes it a lot easier to correlate data and find out information you are looking for in a shorter amount of time.
Conclusion
In short, HTML tables continue to be a useful tool for organizing and presenting structured data on web pages, despite the introduction of improved CSS layout techniques. This tutorial has covered all the basics of HTML tables to give you a clear idea about the concept.
However, doing certified online or offline courses can help a lot with your concepts and help your CV at the same time. I would recommend checking out courses from upGrad. Their courses are in collaboration with some of the best universities around the world. The courses are curated by some of the best professors in this field.
Frequently Asked Questions
1. What is a table in HTML?
A table in HTML showcases data in rows and columns. Tables are usually used to present structured data such as timetables, charts, and tabular data. Why use HTML tables?
2. Why use HTML tables?
HTML tables arrange and display structured data in a tabular fashion on web pages and web apps. HTML tables are useful tools for efficiently organizing and presenting data on web pages. What is the HTML table used for?
3. What is the HTML table used for?
HTML tables are used to organize and display structured data in rows and columns on websites. They are widely utilized in a variety of scenarios, including displaying financial data, product comparisons, schedules, and charts. How many types of tables are there in HTML?
4. How many types of tables are there in HTML?
There is only one type of table in HTML. CSS allows you to style and structure tables in a variety of ways, such as building responsive tables, data tables, and visually appealing layouts. What is the HTML table format?
5. What is the HTML table format?
To create a HTML table, use the element. Rows are represented by elements, and cells inside each row are represented by or elements. To create a HTML table, use the element. Rows are represented by elements, and cells inside each row are represented by or elements. How to create HTML tables?
6. How to create HTML tables?
To create a table, start by using the
tag. Then define rows and particular cells with and| respectively. Then close the element with the |
| respectively. Then close the element with the |
7. What is HTML table size?
An HTML table's size refers to its dimensions, which are normally determined by the content it includes and CSS styling. Tables can be made flexible and responsive to fit different screen sizes, but their size is mostly determined by the amount of content. How to insert tables in HTML?
8. How to insert tables in HTML?
When we insert a table in HTML, we use the
tag. When we insert a table in HTML, we use the
Author|416 articles published


upGrad Learner Support
Talk to our experts. We are available 7 days a week, 10 AM to 7 PM
Indian Nationals
Foreign Nationals
Disclaimer
The above statistics depend on various factors and individual results may vary. Past performance is no guarantee of future results.
The student assumes full responsibility for all expenses associated with visas, travel, & related costs. upGrad does not .