All courses
Agentic AI
Agentic AI
Artificial Intelligence
Degree / Exec. PG

IIIT Bangalore
Executive Diploma in Machine Learning and AI
OPJ Global University
Master’s Degree in Artificial Intelligence and Data Science
Liverpool John Moores University
Master of Science in Machine Learning & AI
Golden Gate University
DBA in Emerging Technologies with Concentration in Generative AIExecutive Certificate

IIITB & IIM, Udaipur
Chief Technology Officer & AI Leadership Programme
IIIT Bangalore
Executive Programme in Generative AI for Leaders
upGrad | Microsoft
Gen AI Mastery Certificate for Software DevelopmentupGrad | Microsoft
Gen AI Mastery Certificate for Managerial ExcellenceOffline Bootcamps

upGrad
Data Science and AI-MLDoctorate
For All Domains
IIITB & IIM, Udaipur
Chief Technology Officer & AI Leadership Programme
Swiss School of Business and Management
Global Doctor of Business Administration from SSBM
Edgewood University
Doctorate in Business Administration by Edgewood UniversityGolden Gate University
Doctor of Business Administration From Golden Gate University
Rushford Business School
Doctor of Business Administration from Rushford Business School, Switzerland-d9bdeff6165f4eb1ba2adcebde78e961.svg)
University of Waterloo
Chief Technology and AI Officer ProgramLeadership / AI
Golden Gate University
DBA in Emerging Technologies with Concentration in Generative AIMachine Learning
Machine Learning
Data Science
Degree / Exec. PG
O.P Jindal Global University
Master’s Degree in Artificial Intelligence and Data ScienceIIIT Bangalore
Executive Diploma in Data Science & AILiverpool John Moores University
Master of Science in Data ScienceExecutive Certificate
upGrad | Microsoft
Gen AI Foundations Certificate Program from MicrosoftupGrad | Microsoft
Gen AI Mastery Certificate for Data AnalysisupGrad | Microsoft
Gen AI Mastery Certificate for Software DevelopmentupGrad | Microsoft
Gen AI Mastery Certificate for Managerial ExcellenceupGrad | Microsoft
Gen AI Mastery Certificate for Content CreationOffline Bootcamps
upGrad
Data Science and AI-MLMBA
Masters

Liverpool School of Business
Master of Business Administration from Liverpool Business School with IIM Udaipur Certification
Paris School of Business
Master of Science in Business Management and TechnologyO.P.Jindal Global University
MBA (with Career Acceleration Program by upGrad)Edgewood University
MBA from Edgewood UniversityO.P.Jindal Global University
MBA from O.P.Jindal Global UniversityExecutive Certificate

IMT, Ghaziabad
Advanced General Management ProgramMarketing
Executive Certificate
upGrad | Microsoft
Gen AI Foundations Certificate Program from MicrosoftupGrad | Microsoft
Gen AI Mastery Certificate for Content CreationOffline Bootcamps
upGrad
Digital MarketingManagement
Degree
O.P Jindal Global University
MSc in International Accounting & Finance (ACCA integrated)
Golden Gate University
Master of Arts in Industrial-Organizational PsychologyExecutive Certificate

IIIT-B & IIM, Udaipur
Chief Technology Officer & AI Leadership ProgrammeIIIT-B & IIM, Udaipur
Chief Data and AI Officer Programme
IIM Kozhikode
Human Resource Analytics Course from IIM-KupGrad | Microsoft
Gen AI Foundations Certificate Program from MicrosoftEducation
Education

Northeastern University
Master of Education (M.Ed.) from Northeastern UniversityEdgewood University
Doctor of Education (Ed.D.)Edgewood University
Master of Education (M.Ed.) from Edgewood UniversityCertifications
Project Management
Certification

Knowledgehut
Leadership And Communications In ProjectsKnowledgehut
Microsoft Project 2007/2010-ae8d039bbd2a41318308f8d26b52ac8f.svg)
Knowledgehut
Financial Management For Project ManagersKnowledgehut
Fundamentals of Earned Value Management (EVM)Knowledgehut
Fundamentals of Portfolio ManagementKnowledgehut
Fundamentals of Program Management-35c169da468a4cc481c6a8505a74826d.webp&w=128&q=75)
Knowledgehut
CAPM® CertificationsKnowledgehut
Microsoft® Project 2016Certifications & Trainings
-7f4b4f34e09d42bfa73b58f4a230cffa.webp&w=128&q=75)
Knowledgehut
PMP® CertificationKnowledgehut
PMI-RMP® CertificationKnowledgehut
PMP Renewal Learning PathKnowledgehut
Oracle Primavera P6 V18.8Knowledgehut
Microsoft® Project 2013Knowledgehut
PfMP® Certification CourseKnowledgehut
Project Planning and MonitoringPrince2 Certifications

Knowledgehut
PRINCE2® FoundationKnowledgehut
PRINCE2® PractitionerKnowledgehut
PRINCE2 Agile Foundation and PractitionerKnowledgehut
PRINCE2 Agile® Foundation CertificationKnowledgehut
PRINCE2 Agile® Practitioner CertificationManagement Certifications
Knowledgehut
Project Management Masters Certification ProgramKnowledgehut
Change ManagementKnowledgehut
Project Management TechniquesKnowledgehut
Product Management Certification ProgramKnowledgehut
Project Risk Management- Study abroad
- Offline centres
- uGSOT - B.Tech
More
%20(2)-db0b6f38da9c485faf76e366793c9b9e.webp&w=128&q=75)


13. JavaScript Games
21. Express JS
25. JavaScript Regex
JavaScript Games: Best Projects to Learn by Building
Once primarily the language of simple website effects, I believe that JavaScript has evolved into a serious contender for creating full-fledged games. The days of just blinking text and basic animations are long gone. Today's JavaScript boasts powerful frameworks, graphics capabilities, and the ability to run smoothly within the environment everyone already has: their web browser.
Personally, game development is extremely fun and exciting for me. Thus, I am looking forward to teaching you all the foundational concepts of developing JS-based games. If you are someone who wants to unleash the creativity inside you and learn a versatile skill, JavaScript games development will be an exciting domain for you as well.
Let us dive into this JavaScript games tutorial and discover how to bring your game ideas to life.
Why JavaScript for Game Development?
Here are some reasons why we should use JavaScript for game development:
- Browser flexibility: Modern browsers run JavaScript with incredible efficiency. This means your games can effortlessly reach a massive audience without needing any downloads or plugins.
- Ease of learning: While game development is inherently complex, JavaScript offers a lower barrier to entry compared to some traditional game languages. Its forgiving syntax and plentiful learning resources make it a great place to start.
- Growing capabilities: Libraries and frameworks optimized for game development overcome past limitations. Building surprisingly complex and visually rich 2D and even 3D games is now entirely possible with JavaScript.
The Power of Web Games
Here are some reasons why JavaScript games online are so popular among both developers and gamers:
- Accessibility: If a person has a web browser and an internet connection, they have the potential to play your game. This opens up your audience far beyond those who might bother downloading or installing something.
- Portability: Since web games exist in the browser, they aren't strictly tied to a particular operating system. Users on Windows, macOS, Linux, (and often even on mobile devices) can access your creation.
- Platform-independent: The nature of web games means you generally don't need to tailor the game specifically to different hardware configurations. The browser handles a lot of the heavy lifting for you.
Prerequisites for This Guide
To get the most out of any in-depth game development guide, assuming a basic foundation in JavaScript is essential. Specifically for JavaScript games, readers should be comfortable with:
- Variables and data types: Understanding how to store and manipulate different kinds of data.
- Control flow: Using if-else statements and loops (for, while) to control program execution.
- Functions: The ability to break code into smaller, reusable chunks.
- Basic DOM manipulation (optional but helpful): If the guide covers integrating game elements with the webpage, some knowledge of how to interact with the Document Object Model is a bonus.
Game Development Fundamentals
Let us discover the development fundamentals in regard to JavaScript games for beginners.
Core Game Concepts
- Game loops: A game loop is a continuous cycle that runs repeatedly. Each iteration it does the following:
- Processes player input
- Updates game logic (movement, rules, etc.)
- Renders (draws) the updated game state to the screen
- Input handling (keyboard, mouse, touch): Keyboard, mouse, and touch events are vital for interactivity. You'll need to:
- Listen for specific input events (key presses, mouse clicks, screen taps)
- Translate these events into actions within your game world
- Collision detection: Essential for all the best JavaScript game engines. This is the art of determining when game objects intersect or overlap. Collision detection techniques range from simple bounding-box checks to more advanced pixel-level algorithms.
- Game states (menus, play, game over): Managing transitions and logic specific to each state is critical for a polished feel. Games usually exist in distinct states:
- Menu screens
- The active gameplay state
- 'Game Over' screens
- Pause screens, etc.
- Object-oriented programming for games: OOP is a natural fit. It lets you model game concepts as objects (player, enemies, projectiles) with their own properties (position, health) and behaviors (move, shoot). Concepts like inheritance and classes help organize your code effectively.
- Game entity/component systems: Popular in larger games for its flexibility. Here are the core elements of these systems:
- Entities: Essentially IDs representing game objects.
- Components: Modular chunks of data or behavior attached to entities (position, health, sprite renderer, etc.).
- Systems: Handle the logic for specific component types, updating many entities at once
Choosing the Right Tools for JavaScript Games
Let us check out some of the tools you will need to start working on your JavaScript games ideas.
Game Libraries and Frameworks
1. Phaser
Pros: Great for 2D, beginner-friendly, lots of built-in components (physics, etc.), active community.
Cons: Can be heavier for very simple projects, less ideal for pure 3D experiences.
Best for: Beginners venturing into 2D games, rapid prototyping.
2. PixiJS
Pros: Extremely fast 2D rendering, gives you granular control.
Cons: Steeper learning curve, involves building up more of your own game systems.
Best for: Experienced devs wanting performance-optimized 2D, or unique visual effects.
3. BabylonJS
Pros: Powerful 3D focus, physics integration (out-of-the-box), good tooling.
Cons: Smaller community than some others, steeper curve for web newcomers.
Best for: 3D games of all sizes, when performance and visuals are paramount.
4. Three.js
Pros: Extremely popular and well-supported general 3D library (not game-specific).
Cons: Less hand-holding for game concepts, requires deeper understanding of 3D graphics
Best for: 3D games where you need maximum customization or non-game 3D visualizations on the web.
Graphics Manipulation
1. HTML5 Canvas
Pros: Easier to start with, good for basic 2D, built into every browser.
Cons: Slower than WebGL for complex effects or many objects, no 3D out-of-the-box.
2. WebGL
Pros: Access to the raw power of the graphics card, essential for 3D or high-performance 2D.
Cons: More complex to learn, often used via libraries like Three.js instead of directly.
Image, Sprite, and Sprite Sheet Creation
Image: These are the raw building blocks (PNG, JPG, etc.)
Sprites: Often individual images used to represent game elements (player character, projectiles)
Sprite sheets: A single image file containing many sprites laid out in a grid. This can improve performance.
Tools
- Pixel Art Editors: Aseprite, Piskel (great for retro-style games)
- General Graphics Software: Photoshop, GIMP, etc.
- Texture Packer: Specialized tools to create sprite sheets.
Tool Recommendations for JavaScript Games
The 'best' tool depends on your experience and the type of game you are developing. According to me, these are the tools you should be using based on your status:
- Beginners: Start with Phaser and Canvas
- Experienced: Performance-Focused 2D: Explore PixiJS
- 3D-focused: Look into BabylonJS or Three.js
Building Your First Game
For simplicity, I’ll use a library like Phaser. You can adjust it later if you prefer a different approach for your JavaScript games.
Step 1: Project Setup
- Create a folder: Designate a space for your game files.
- Basic HTML: Create a simple index.html file.
Here's a minimal structure:
<!DOCTYPE html>
<html>
<head>
<title>My First Game</title>
<script src="https://cdn.jsdelivr.net/npm/phaser@3/dist/phaser.min.js"></script>
<script src="game.js"></script>
</head>
<body>
</body>
</html>
- Game file: Create an empty game.js file – this is where our main code will live.
Step 2: Game Loop Implementation
Phaser config: Inside game.js:
<!DOCTYPE html>
let config = {
type: Phaser.AUTO, // Determine if Canvas or WebGL will be used
width: 800, // Game width
height: 600, // Game height
scene: {
preload: preload,
create: create,
update: update
}
};
let game = new Phaser.Game(config);
Functions:
function preload() { }
function create() { }
function update() { }
In the above code,
- preload will load assets
- create is run once at the start, set up the game here
- update is the game loop, runs each frame
Step 3: Basic Asset Loading
Get an image: Find a simple game asset online (e.g., open-source player sprite).
In preload:
function preload() {
this.load.image('player', 'assets/player.png');
}
Step 4: Drawing and Updating
In create:
function create() {
this.player = this.add.sprite(100, 100, 'player');
}
Step 5: Player Controls
In update:
function update() {
const cursors = this.input.keyboard.createCursorKeys();
if (cursors.left.isDown) {
this.player.x -= 5;
}
}
Scoring/Win Conditions
- Score variable: In your create function (or globally), initialize a variable:
let score = 0;
let scoreText; // To display the score later
- Score text: In create, add the text:
scoreText = this.add.text(16, 16, 'Score: 0', { fontSize: '32px' }); |
- Updating score: Decide on a scoring trigger (collecting items? Defeating enemies?). Inside that logic, do something like:
score += 10; // Increase on the triggered event
scoreText.setText('Score: ' + score);
- Win condition: In update:
if (score >= 100) {
this.add.text(300, 200, 'You Win!', { fontSize: '48px' });
}
- More Movement: Expand your update function's if statements:
if (cursors.left.isDown) {
this.player.x -= 5;
} else if (cursors.right.isDown) { // Important to add 'else if'
this.player.x += 5;
}
// Add up and down movement with similar 'if' blocks
Asset variety
- Load more: Replicate the this.load.image call in preload for new assets (background, enemies). Give them unique key names.
- Create more: Use this.add.sprite as before, but with the new asset keys.
Additional Manipulation
- Collision: Phaser has built-in overlap checks or colliders. Example:
this.physics.add.overlap(this.player, enemy, collectEnemy, null, this);
// You'd write a 'collectEnemy' function
- Game states: Phaser has Scenes. You could have a 'menu' scene, a 'play' scene, etc., and manage transitions between them.
If you wish to master JS development, you can join upGrad’s full stack development courses.
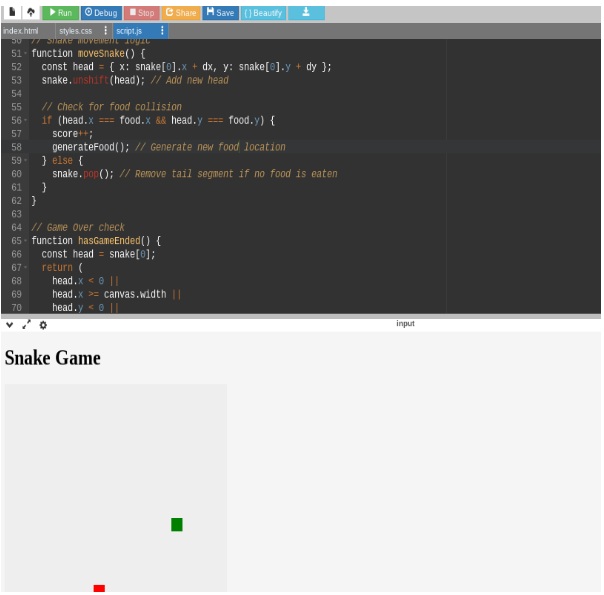
Javascript Games Code for Beginners
Here is a basic JavaScript game that you can try out yourself. Along with the JavaScript games code, I am adding some basic HTML and CSS to keep it as simple as possible. We will be building a version of the ‘Snake’ as it is definitely one of the JavaScript games to learn.
After compilation:
Code for index.html file:
<!DOCTYPE html>
<html>
<head>
<title>Simple Snake Game</title>
<link rel="stylesheet" href="style.css">
</head>
<body>
<h1>Snake Game</h1>
<canvas id="gameCanvas" width="400" height="400"></canvas>
<script src="script.js"></script>
</body>
</html>
Code for styles.css file:
body {
display: flex;
align-items: center;
justify-content: center;
height: 100vh;
margin: 0;
background-color: #eee;
}
canvas {
background-color: #fff;
border: 3px solid black;
}
Code for script.js file:
const canvas = document.getElementById('gameCanvas');
const ctx = canvas.getContext('2d');
const gridSize = 20; // Each snake segment's size
let snake = [{ x: 200, y: 200 }]; // Initial snake position
let food = {}; // Will generate food
let dx = gridSize; // Initial direction (right)
let dy = 0;
let score = 0;
// Generate random food
function generateFood() {
food = {
x: Math.floor(Math.random() * (canvas.width / gridSize)) * gridSize,
y: Math.floor(Math.random() * (canvas.height / gridSize)) * gridSize
}
}
// Main game loop
function main() {
if (hasGameEnded()) return;
setTimeout(function onTick() {
clearCanvas();
drawFood();
moveSnake();
drawSnake();
main();
}, 100)
}
// Helper functions
function clearCanvas() {
ctx.fillStyle = '#eee'; // Background color
ctx.fillRect(0, 0, canvas.width, canvas.height);
}
function drawSnake() {
ctx.fillStyle = 'green'; // Snake color
snake.forEach((segment) => {
ctx.fillRect(segment.x, segment.y, gridSize, gridSize);
});
}
function drawFood() {
ctx.fillStyle = 'red'; // Food color
ctx.fillRect(food.x, food.y, gridSize, gridSize);
}
// Snake movement logic
function moveSnake() {
const head = { x: snake[0].x + dx, y: snake[0].y + dy };
snake.unshift(head); // Add new head
// Check for food collision
if (head.x === food.x && head.y === food.y) {
score++;
generateFood(); // Generate new food location
} else {
snake.pop(); // Remove tail segment if no food is eaten
}
}
// Game Over check
function hasGameEnded() {
const head = snake[0];
return (
head.x < 0 ||
head.x >= canvas.width ||
head.y < 0 ||
head.y >= canvas.height ||
snake.slice(1).some((segment) => segment.x === head.x && segment.y === head.y) // Check for collision with own body
);
}
// Event Listeners (optional for user input)
document.addEventListener('keydown', changeDirection);
function changeDirection(event) {
const LEFT = 37;
const RIGHT = 39;
const UP = 38;
const DOWN = 40;
const keyPressed = event.keyCode;
// Prevent accidental reversal directions
if ((keyPressed === LEFT && dx === gridSize) || (keyPressed === RIGHT && dx === -gridSize)) {
return;
}
if ((keyPressed === UP && dy === gridSize) || (keyPressed === DOWN && dy === -gridSize)) {
return;
}
switch (keyPressed) {
case LEFT:
dx = -gridSize;
dy = 0;
break;
case RIGHT:
dx = gridSize;
dy = 0;
break;
case UP:
dx = 0;
dy = -gridSize;
break;
case DOWN:
dx = 0;
dy = gridSize;
break;
}
}
// Start the game
generateFood();
main();
Here is a quick explanation of the 4 main sections of the JS code:
- Helper functions:
- clearCanvas: Fills the canvas with the background color before redrawing.
- drawSnake: Loops through each snake segment and draws a green rectangle.
- drawFood: Fills the current food location with a red rectangle.
- Movement logic:
- moveSnake:
- Creates a new head position based on current direction (dx, dy).
- Prepends (adds to the beginning) the new head to the snake array.
- Checks for food collision. If so, increases score and generates new food. Otherwise, removes the tail segment to simulate movement.
- Game over check:
- hasGameEnded: Checks if the snake collides with the walls, itself, or goes off-screen.
- Game start:
- Calls generateFood to place the initial food.
- Calls main to start the game loop.
Wrapping Up
You have already built your very own Snake game using JavaScript. While it might be simple, remember even the most complex JavaScript games start with core concepts similar to the ones you've used here. This is only the beginning of your journey in JavaScript games development.
If you wish to learn software engineering, you can join upGrad’s software engineering courses.
Frequently Asked Questions
1. Can you use JavaScript to make games?
Absolutely! JavaScript, along with HTML5 and CSS, is a core technology for building web-based games. Why is JavaScript good for games?
2. Why is JavaScript good for games?
Web games are instantly playable in browsers.JavaScript is relatively easy to learn.Extensive resources and game development libraries exist. Web games are instantly playable in browsers. JavaScript is relatively easy to learn. Extensive resources and game development libraries exist. Which game engine uses JavaScript?
3. Which game engine uses JavaScript?
Popular JavaScript game engines include Phaser, Babylon.js, PixiJS, and Three.js. Can you make money from JavaScript games?
4. Can you make money from JavaScript games?
Yes, through advertising, in-game purchases, subscriptions, or direct sales of your game. How much can I earn from JavaScript?
5. How much can I earn from JavaScript?
Earnings vary wildly. Factors include your game's success, monetization model, and your broader JavaScript development skills (which can be lucrative in web development outside of games). How much can I make with JavaScript?
6. How much can I make with JavaScript?
Earnings vary a lot depending on the domain you use your JS skills or the job profile, thus, it is hard to say how much you can make with JavaScript. Can you make a game without JavaScript?
7. Can you make a game without JavaScript?
Yes! Engines like Unity (C#), Unreal Engine (C++), and Godot (GDScript) are powerful alternatives, often used for larger-scale or non-web-based projects. Can JavaScript be used for mobile games?
8. Can JavaScript be used for mobile games?
Yes, frameworks like React Native and Cordova allow you to build cross-platform mobile games using JavaScript.

Author|306 articles published


upGrad Learner Support
Talk to our experts. We are available 7 days a week, 10 AM to 7 PM
Indian Nationals
Foreign Nationals
